Flowserve Chemstar standard User Manual
Page 25
CHEMSTAR USER INSTRUCTIONS ENGLISH 71569185 02-10
Page 25 of 44
flowserve.com
b) Rotating the bearing carrier the width of one notch
on the bearing carrier, as shown above, moves
the impeller axially by 0.05 mm (0.002in.).
Example: for an impeller setting of 0.45 mm,
(0.018 in.) simply move the carrier counter-
clockwise nine notches for the required clearance.
c) Use the notch closest the parting line on the top
centre of the bearing housing as the reference
point to begin adjustment.
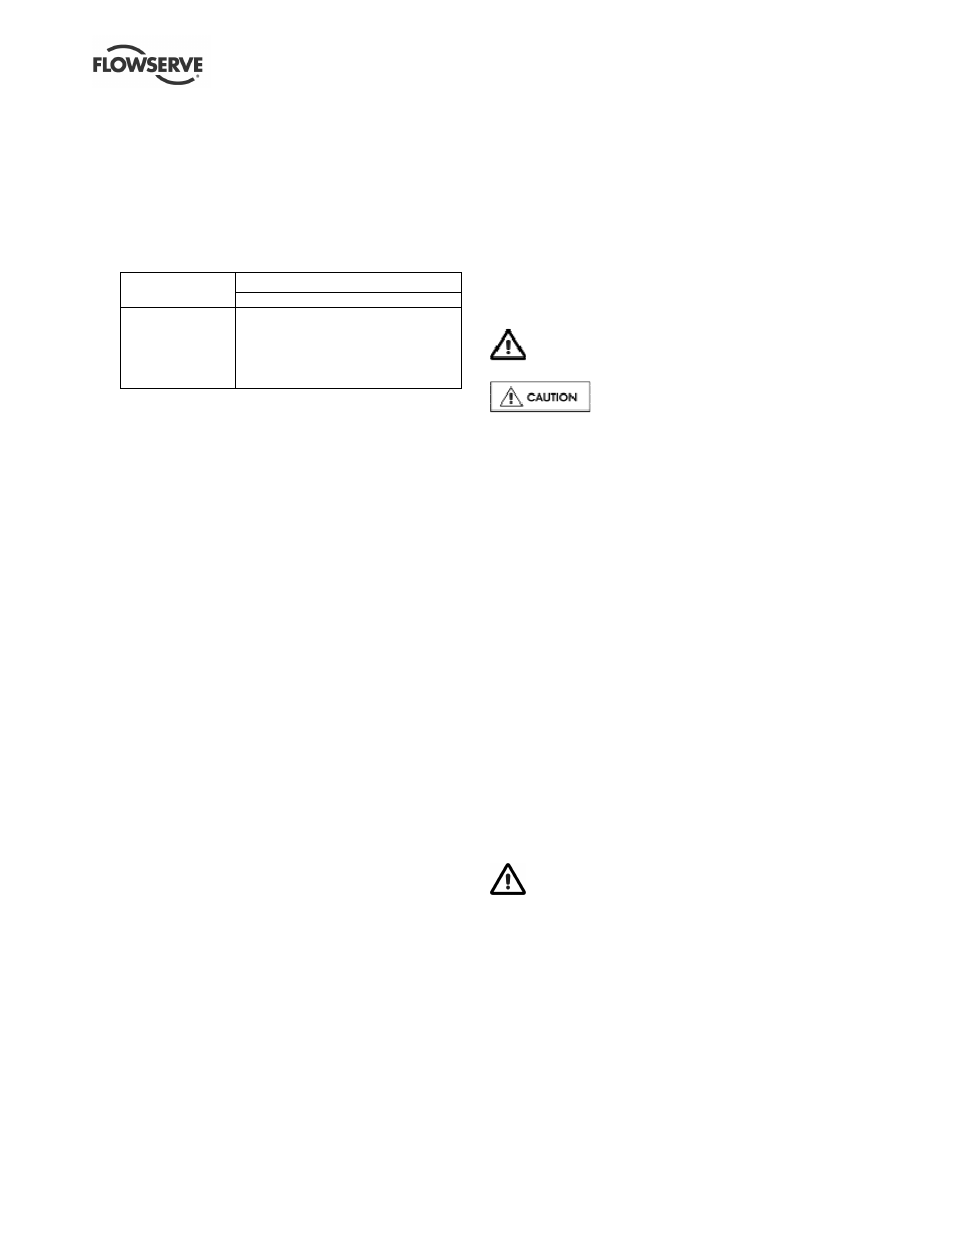
Impeller clearance setting
Temperature
All impeller diameters
50 ºC (120 ºF)
100 ºC (210 ºF)
150 ºC (300 ºF)
200 ºC (390 ºF)
260 ºC (500 ºF)
0.45 mm (0.018 in.)
0.55 mm (0.022 in.)
0.65 mm (0.026 in.)
0.75 mm (0.030 in.)
0.85 mm (0.033 in.)
d) After obtaining the proper clearance, listed in the
table, tighten the set-screws evenly to lock the
impeller and shaft assembly. Because of the
slight draw as the carrier/housing threads lock it
may be necessary to allow for this change.
e) Check that the shaft can turn freely without
binding.
f) If a cartridge seal is fitted it should be reset at this
point.
g) Ensure the coupling distance between shaft ends
(DBSE) is correct. Reset/re-align if necessary.
6.7.3 Installation and rotor clearance setting for
repeller pumps
a) Install the secondary shaft sealing as applicable
(see section 6.10.6 or 6.10.8). Attach the repeller
cover [1220.2] to the bearing housing flange (see
section 6.10.7) and place the repeller [2000.1]
temporarily clamped by the impeller [2000] as
described in section 6.10.9.
b) Set the repeller 0.35 to 0.55 mm (0.015 to 0.020 in.)
off the repeller cover [1220.2].
c) Turn the bearing carrier counter-clockwise until
the repeller comes into gentle contact with the
repeller cover. Rotating the shaft at the same
time will accurately determine when a detectable
rub is obtained. This is the zero clearance
setting.
d) Rotating the bearing carrier [3240] by the width of
one notch, as shown above, moves the impeller
axially by 0.05 mm (0.002 in.).
e) Uniformly tighten the set screws [6570.3] in
incremental steps up to the final torque value to
lock the bearing carrier in place.
f) Remove the impeller [2200] from the shaft, taking
care that the now loose repeller [2200.1] does not
slip off the shaft. Install the rear cover [1220.1] as
shown in section 6.10.9.
g) Secure the impeller onto the shaft as shown in
section 6.10.4.
h) Check the impeller setting with a feeler gage. The
clearance should be 0.35 to 0.55 mm (0.015 to
0.020 in.). If the clearance falls outside the
correct setting, it may be readjusted. For
example, if the repeller is set at 0.55 mm, and the
impeller clearance is 0.65 mm, then rotate the
bearing carrier [3240] anti-clockwise to reduce
the repeller clearance from 0.55 mm to 0.45 mm.
This will bring the impeller clearance from
0.65 mm back to 0.55 mm, which is acceptable.
6.8 Disassembly
Refer to Safety section before dismantling the
pump.
Before dismantling the pump for
overhaul, ensure genuine Flowserve replacement
parts are available. Refer to sectional drawings for
part numbers and identification. See section 8, Parts
lists and drawings.
6.8.1 Bearing housing assembly
To remove, proceed as follows:
a) Disconnect all auxiliary pipes and tubes where
applicable.
b) Remove coupling guard and disconnect coupling.
c) If oil lubricated frame, drain oil by removing drain
plug [6569.1].
d) Refer to sectional drawings in section 8.
e) Remove casing nuts [6580.1].
f) Remove bearing housing support foot [3134] to
baseplate screws.
g) Remove bearing housing power end assembly to
rear and out, leaving casing in place. The
threaded holes in the bearing housing flange may
be used for jacking to assist with removal.
h) Remove pump casing gasket and discard. A
replacement gasket will be required for assembly.
i)
Clean gasket mating surfaces.
6.8.2 Impeller removal
NEVER APPLY HEAT TO REMOVE THE
IMPELLER. TRAPPED OIL OR LUBRICANT MAY
CAUSE AN EXPLOSION.
a) Fit a chain wrench or bolt a bar to the holes in the
coupling half, or fit a keyed shaft wrench directly
to the shaft [2100], first removing the coupling.
Preferably clamp the bearing housing foot of the
subassembly to the work surface.
b) Grasp the impeller [2200] firmly with both hands
(wear heavy gloves). Raise the wrench above
the workbench to the 11 o'clock position by
turning the impeller clockwise as viewed from the
impeller end of the shaft.