Fieldpiece SMAN2 - 3-Port Digital Manifold User Manual
Fieldpiece, Quick start, Certifications
01
06
02
07
03
08
04
09
05
10
Quick Start
1 Power on your SMAN by holding the ON/OFF
button for 1 second.
2 Select desired units (English or Metric) by
pressing the UNITS button (SMAN3) or hold-
ing the ENTER button for 1 second (SMAN2).
3 Connect hoses and pipe clamps to the system.
4 Press the circular button to select between
Actual Superheat and Subcooling, Target
Superheat, Direct Temperature Display (T1 T2
Direct) or Saturation Temperature Display.
Certifications
C-Tick (N22675)
CE
RoHS Compliant
Description
Your SMAN is the portable digital refrigerant
manifold and vacuum gauge (SMAN3) for A/C
and refrigeration professionals. Your SMAN
combines high pressure manifold gauges, a
superheat/subcooling calculator, micron gauge
for vacuum (SMAN3), and dual temperature
measurements into one easy-to-use instrument.
Your SMAN calculates and displays target
superheat and actual superheat to ensure
proper charging of a unit. Your SMAN can
also display the liquid and vapor saturation
temperatures in Saturation mode to help you
trouble shoot your system.
Your SMAN is designed to meet the demands
of the HVAC/R professional with a ruggedized
rubber boot for durability, a strong metal
hanger for easy storage and a high quality,
water resistant nylon pouch. A bright blue
backlight and very large, easily viewable display
lets you see your measurements in any work
environment. SMAN has a very intuitive user
interface and extremely long battery life.
Your SMAN comes pre-programmed with
the most accurate P-T charts for 44 of the most
common refrigerants in the field so you are
always prepared for any job.
Fieldpiece
Digital Manifold &
Vacuum Gauge
OPERATOR'S MANUAL
Models SMAN2 SMAN3
Controls
T1
T2
Atmospheric
Pressure
Superheat
Subcooling
T1 T2 Direct
Saturation
Target
Superheat
CAL
CAL
CAL
CAL
Test
Pressure
AUTO
OFF
Refrigerant
ON/OFF
Enter
Units
Alarm
Digital Manifold + Vacuum Gauge
SMAN3
1 Insert K-type thermocouple plugs here.
2 Temperature calibration pots.
3 Press to zero atmospheric pressure.
4 Press to linear adjust pressure curve. (See
Advanced Pressure Calibration section.)
5 Press to engage backlight. Hold when
powering on to toggle Auto Power Off.
6 Press/hold to cycle through refrigerants.
7 Hold 1 second to toggle power on/off.
8 Press up or down arrow to adjust values.
9 Press to confirm selection. For the
SMAN2, hold 1 second to adjust units.
10 Press to turn on/off the Hi/Lo vacuum alarms
and hold to change alarm settings.
11 Press to toggle through temperature tests.
12 Press to adjust units. (SMAN3)
13 Turn clockwise to close Low side port.
14 Turn clockwise to close High side port.
Functions
Standard Pressure
1 Connect your SMAN to the system using EPA approved 1/4in
refrigerant hoses.
2 Read pressures directly from the upper display.
Superheat and Subcooling
1 Press circular button to cycle through temperature modes until SH
and SC are shown. The SMAN can show superheat and subcooling
simultaneously.
2 Choose the appropriate refrigerant using the REFRIGERANT
button.
3 Connect the K-type thermocouple and EPA approved refrigerant
hoses to your SMAN.
4 Connect your SMAN to the system:
Superheat: Hand tighten low side hose to suction line service
port. Place the thermocouple on the suction line between the
evaporator and compressor, no closer than 6 inches to compressor.
Subcooling: Hand tighten high side hose to liquid line service
port. Attach the thermocouple on the liquid line between the
condenser and expansion valve (TXV), as close to the service port
as possible.
5 After turning the system on or making any adjustments to
the system wait 15 minutes before charging by superheat or
subcooling to ensure that the system is stable and running
normally. Add or remove refrigerant using the low and high side
valves as needed. Let system stabilize again for 15 minutes.
Saturation
Shows vapor (VSAT) and liquid (LSAT) saturation temperatures
calculated from the pressures measured and the refrigerant selected.
T1 T2 Direct
1 Press circular button until T1 and T2 are shown.
2 Plug in any K-type thermocouple into T1 and/or T2.
3 Read the temperature directly from the display.
4 T1-T2 is displayed in the lower left corner of the display.
Target Superheat
Target Superheat is only used for charging fixed orifice air
conditioning systems. Your SMAN allows you to input indoor
wet bulb (IDWB) and outdoor dry bulb (ODDB) temperatures
manually, in real-time using K-type thermocouples, or a
combination of both to calculate the Target Superheat. Your SMAN
will detect if a thermocouple is plugged in or not. Unplugging the
thermocouple lead(s), at any time, sends the SMAN into manual
input mode and plugging them in, at any time, automatically
sends the SMAN to input directly from the thermocouples.
Input temperatures with K-type thermocouples
1 Press circular button until Target SH is shown in the bottom,
center of display.
2 Plug ATWB1 Wet bulb K-type thermocouple into T1 and ATA1 Dry
bulb K-type thermocouple into T2.
3 Press ENTER. The IDWB will display the real-time temperature
measured from T1. Use the ARROW button to select the
temperature you want to input first, either IDWB or ODDB.
4 For IDWB input, wet the sock of the ATWB1. Clip it to the return
of the evaporator between the filter and coil. When the wet bulb
temperature reaches its lowest point and stabilizes, press ENTER
to lock the reading. If the inputted temperature is below the wet
bulb range, “-OL” will blink. If the inputted temperature is above
the wet bulb range, “OL” will blink. Retake the measurement if
“OL” or “-OL” is displayed.
5 For ODDB input, clip the ATA1 thermocouple to the side of the
condenser. Once reading is stable, press ENTER. If the inputted
temperature is below the dry bulb range, “-OL” will blink. If the
inputted temperature is above the dry bulb range, “OL” will blink.
Re-take the measurement if “OL” or “-OL” is displayed. For accurate
results, keep the ATA1 shaded from direct sunlight.
6 Once both IDWB and ODDB are locked in, the Target Superheat
will show in the lower left corner of the display. If the Target
Superheat calculated from the IDWB and ODDB temperatures is
outside the range in which air conditioning is recommended then
“OL” is displayed. Usually, raising the indoor temperature will
bring the conditions within manufacturer’s recommendations.
If your target superheat is out of the recommended range, press
ENTER to re-take both your measurements.
7 To re-take either IDWB or ODDB, press the ARROW button until
the label (IDWB or ODDB) you wish to re-take is blinking. Press
ENTER. Re-do the measurement and press ENTER to lock it in. The
newly calculated target superheat will be displayed.
8 To clear both IDWB and ODDB simultaneously, press ENTER.
Input temperatures manually
1 Press circular button until Target SH is shown at the bottom,
center of display. Unplug thermocouples from T1 and/or T2.
2 Press ARROW button to select a blinking IDWB or ODDB. Press
ENTER to make a selection. Use the ARROW button to change
blinking digit and press ENTER to lock in each digit. Once the
last digit for ODDB or IDWB is locked in, the calculated target
superheat will show in the lower left corner of the display.
Note: When pressing ENTER to lock in the last digit for IDWB or
ODDB, if the inputted temperature is below the wet bulb or dry
bulb range, “-OL” will flash once. If the inputted temperature is
above the wet bulb or dry bulb range, “OL” will flash once. In both
instances you must re-input the measurement.
3 See steps 6-8 above.
Pulling a Vacuum (model SMAN3)
Follow all manufacturers’ evacuation procedures over those in
this manual.
Note: larger systems may take much longer to reach a deep vacuum
and a different evacuation method or equipment might be preferred.
1 Connect your SMAN3 in between your vacuum pump and the
system, then power on your SMAN3.
2 Draw a vacuum on the system. The SMAN will automatically
sense the negative pressure and display the vacuum in microns.
3 Press Alarm button to toggle between the High (Hi) alarm, the
Low (Lo) alarm and no alarm. No Display of Lo or Hi means alarm
is off. Note: The stopwatch will start when an alarm is selected.
Pressing Alarm will reset the stopwatch.
4 When the rate of change in pressure is less than 1 micron per 10
seconds, Stable will appear in the lower left corner of the display.
Additional Tips:
To achieve a deep vacuum as quickly as possible:
1 Use the shortest hoses with the largest diameter available.
2 Remove Schrader cores and core depressors. Core removal tools
like the "MegaFlow Valve Core Removal Tool" can be purchased to
help with this process.
3 Inspect the rubber seals at both ends of your hoses for damage
that may result in leakage.
4 Do not use hoses with low loss fittings when evacuating or
pulling a vacuum on a system.
Set Vacuum Alarms (SMAN3)
1 Hold the ALARM button for one second to enter Alarm Set mode.
2 Press the ALARM button to toggle between Alarm Hi and Lo.
3 Use ARROW button to select the value and press ENTER to lock in
each digit. Once last digit in Alarm Lo is locked, your SMAN will
automatically revert to normal testing mode.
T1
T2
Atmospheric
Pressure
Superheat
Subcooling
T1 T2 Direct
Saturation
Target
Superheat
CAL
CAL
CAL
CAL
Test
Pressure
AUTO
OFF
Refrigerant
ON/OFF
Enter
Units
Alarm
Digital Manifold + Vacuum Gauge
SMAN3
1
1
2
2
3
14
4
5
8
9
11
10
12
6
7
LOW
HIGH
LOW
HIGH
13
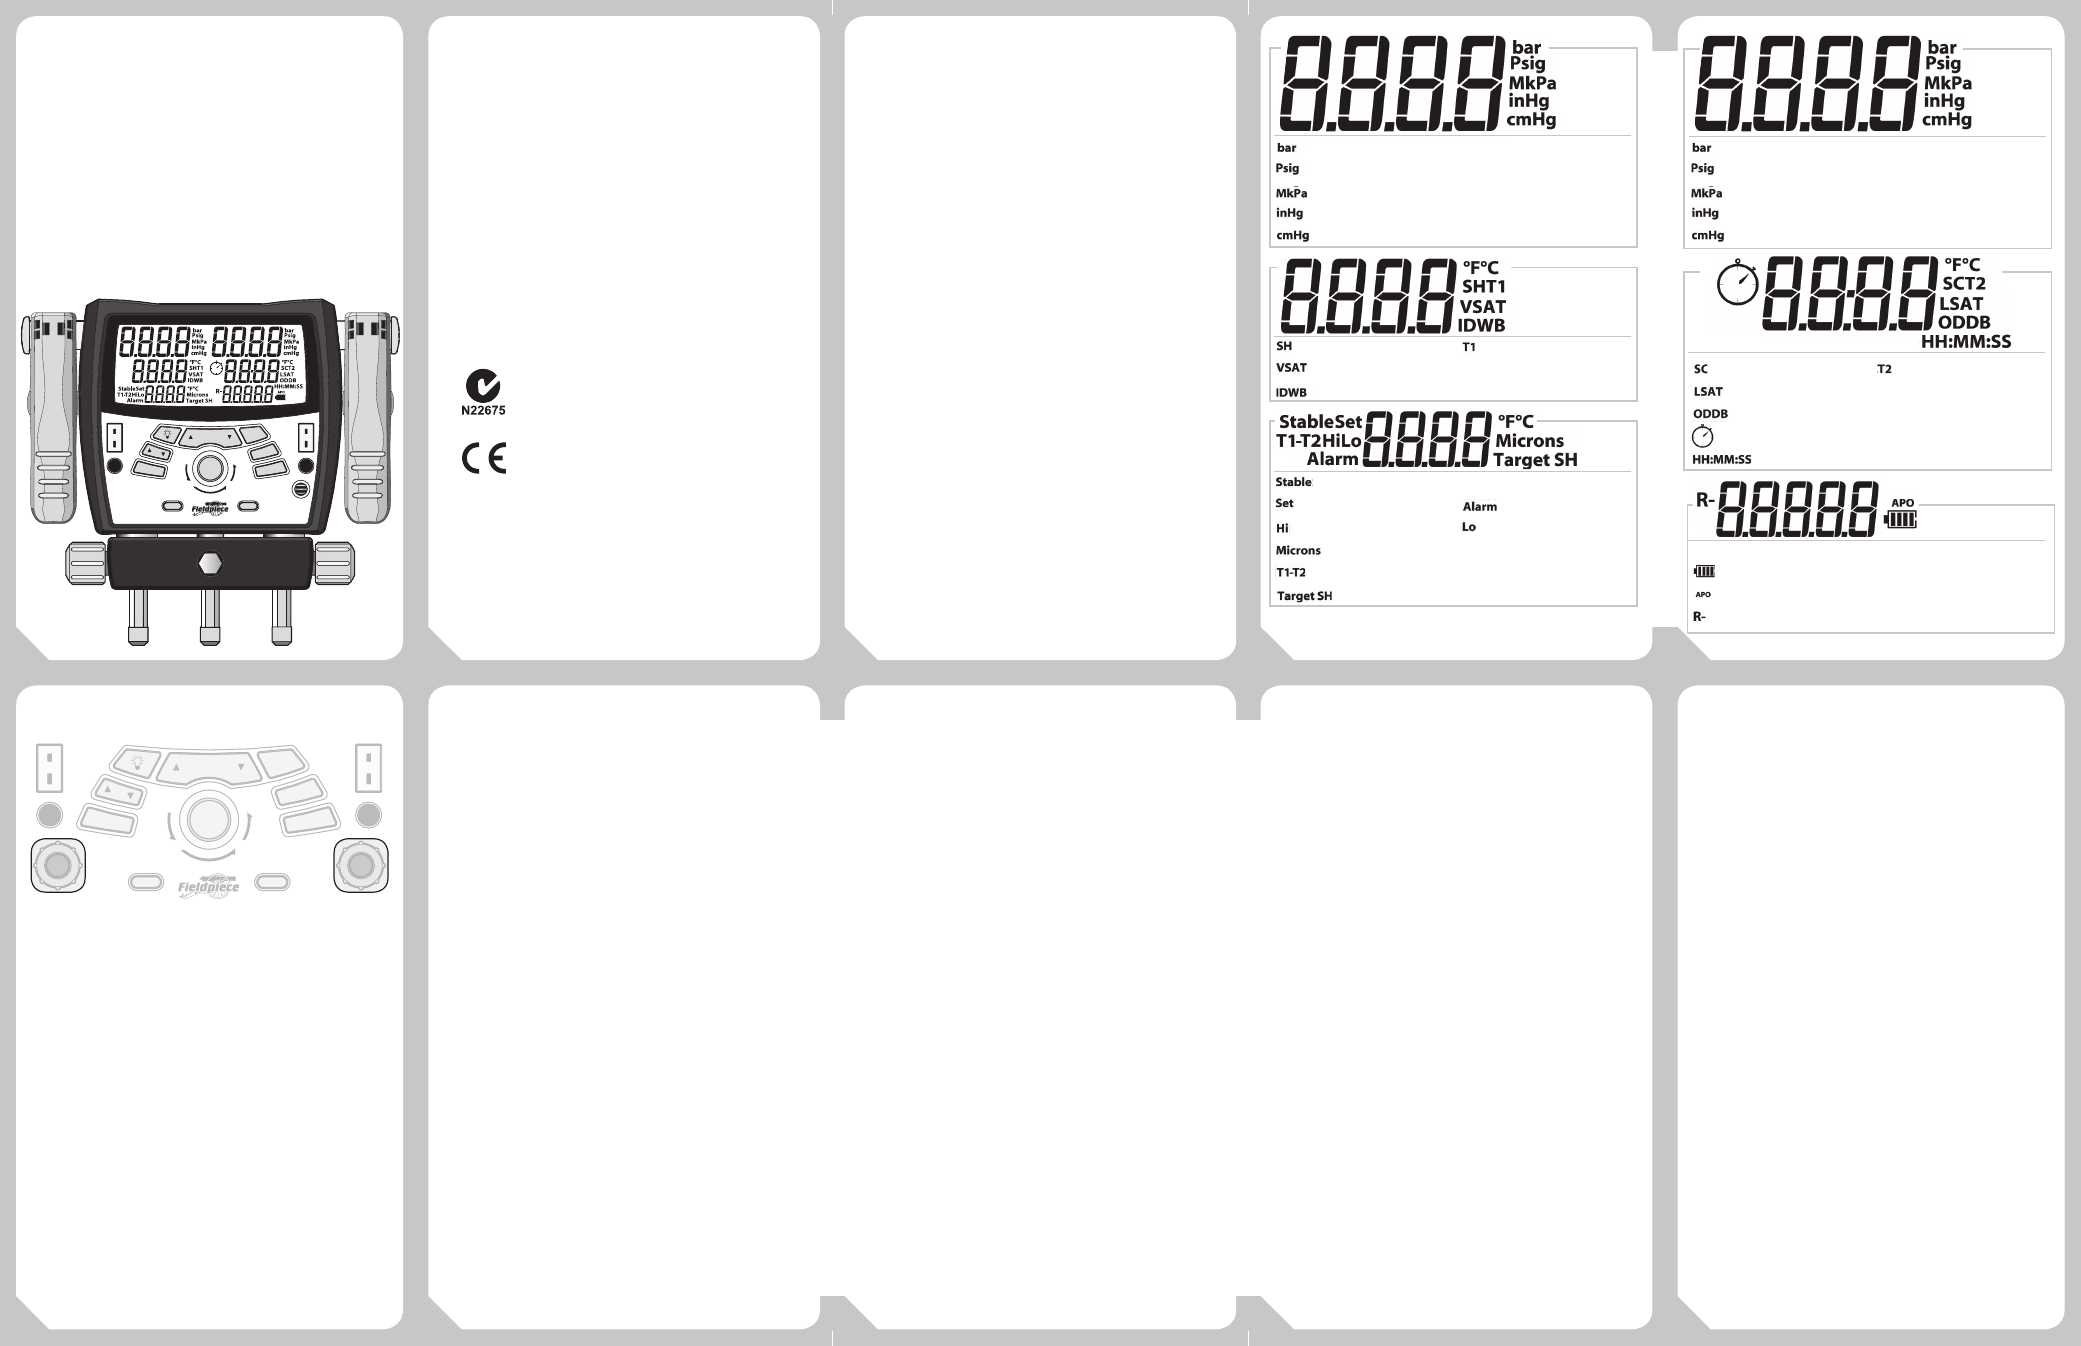
Pressure (bar)
Pressure (pounds/in
2
)
Pressure (kilopascals or Megapascals)
Negative Pressure (inches of mercury)
Negative Pressure (cm of mercury)
Superheat
T1 Direct
Vapor Saturation Temperature
Indoor Wet Bulb
Micron Reading Has Stabilized
Set Mode
Alarm Mode
High Alarm
Low Alarm
Vacuum (Microns of Mercury)
T1 thermocouple - T2 thermocouple
Target Superheat
Pressure (bar)
Pressure (pounds/in
2
)
Pressure (kilopascals or Megapascals)
Negative Pressure (inches of mercury)
Negative Pressure (cm of mercury)
Subcooling
T2 Direct
Liquid Saturation Temperature
Outdoor Dry Bulb
Vacuum Stopwatch
Hours:Minutes or Minutes:Seconds
Battery Life
Auto Power Off Enabled
Selected Refrigerant of System