Operating instructions 13 – Drake MEQ1000A Multiplexing Hybrid QAM Modulator User Manual
Page 13
Operating Instructions 13
(from Drake Digital Headend Control Program)
Operating Instructions - From Drake Digital Headend
Control Program
1) Confirm that all c onnections to the MEQ1000A and its
ins talled enc oder m odules have been m ade as desc ribed
pre vious ly. Connec t a s erial c able from the RS232 IN
c onnec tor on the MEQ1000A to the s erial port on the PC. (This
disc uss ion as sum es that the Headend Control Program has
already been ins talled on the PC as per the instruc tions
s upplied w ith the s oftw are.)
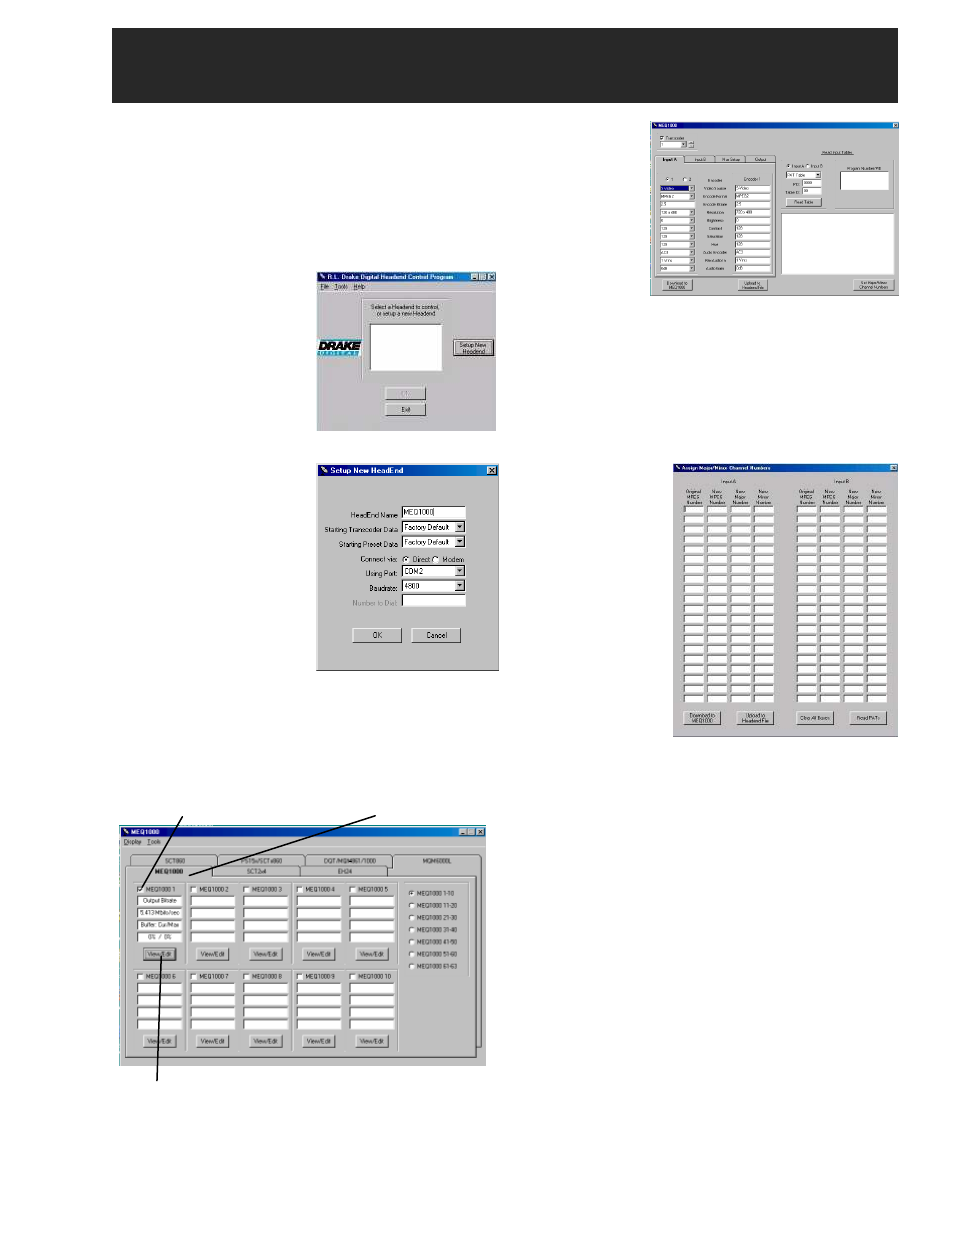
2) Ac tivate the s oftw are. You
s hould s ee a sc reen s imilar to
FIGURE 1 at right.
3) Click on the ‘Setup New
Headend’ button. This will
bring up the sc reen s hown in
FIGURE 2. Type in the nam e
of the headend in the
you c hoos e to
program . In this
c as e, 'Input A'
c ontains an SDE24
w hic h c ontains tw o
enc oders . Selec t
radio button '1' and
program eac h
param eter to the
des ired value.
Select radio button
2 and s et eac h para-
Figure 4
m eter to the des ired value. Selec t in turn, 'Input B', 'Mux Setup
and 'Output' and s et each param eter as desc ribed previous ly.
Note that if the value of the param eter selec ted in the left c olum n
differs from the value of that param eter in the right c olumn, that
value w ill appear in red.
6) Click on the ‘Set Major/Minor Channel Numbers’ button.
‘HeadEnd Name’ field. In this
c as e w e have typed in
MEQ1000A. Then s elec t the
‘PC Baudrate’ and ‘Using
Port’. If you intend to us e a m
odem ins tead of a direct
c onnec tion, m ak e that
s elec tion us ing the ‘Connec t
via:’ radio buttons , and type in
the phone num ber of the
des ired m odem in the ‘Num ber
to dial’ w indow . Then c lic k
‘OK’.
4) You w ill be pres ented w ith
a sc reen s imilar to the one
Figure 1
Figure 2
You w ill be pres ented w ith a sc reen s hown in FIGURE 5.
7) This sc reen allow s
the us er to reasign
MPEG num bers as
w ell as new m ajor and
minor c hannel
num bers .
8) Onc e the s elec tions
have been
m ade, click on the
‘Download to
MEQ1000’ button.
This w ill trans fer all
s how n on FIGURE 3. Click on the MEQ1000A tab, and c lick
on the box repres enting the MEQ1000A unit ID of the unit you
are programm ing. In this exam ple w e s elec ted Unit ID #1.
Then c lic k on the ‘View Edit” button.
s elec tions on this
sc reen as w ell as all
s elec tions m ade on
the previous sc reens
to the MEQ1000A and
its ins talled modules .
Figure 5
Select MEQ1000A Unit ID
MEQ1000A Tab
Clos e this sc reen by clic king on the ‘X’ in the upper right
hand c orner of the sc reen.
9) You w ill note that all of the items in the right hand c olum ns
in the 'Input A', 'Input B', 'Mux Setup' and 'Output Enc oders ',
sc reens are now black and agree w ith the s elec tions m ade in
the left hand c olum ns .
10) Additional inform ation on the operation of the Drak e
Digital Headend Control Program c an be found in the
ins truc tions inc luded on the program CD.
View / Edit Button
Figure 3
This w ill bring up the sc reen s how n in FIGURE 4. Click on
the Trans c oder box and s elec t the transc oder num ber you
w is h to program . In this cas e w e have s elec ted Trans c oder
1. Then s elec t 'Input A' and s elec t the number of the enc oder