SOR Adjustable Dead Band Weatherproof Pressure Switch User Manual
Page 3
Form 466 (05.13) ©SOR Inc.
3/4
Overtravel has been preset at the factory. The 3/16” overtravel adjustment
screw on the lever assembly has been precisely positioned for optimum
performance. Any inadvertent movement could render the device inoperative
and void the warranty.
The left adjusting nut must always be lower than the right adjusting nut when
calibration is complete.
Slowly decrease pressure to the pressure port. The continuity tester will indicate that
contacts have changed state when decreasing set point is reached. Note pressure at
decreasing set point.If the decreasing set point is too low, turn the right adjusting nut
clockwise to raise the decreasing set point. If the decreasing set point is too high, turn
the right adjusting nut counterclockwise to lower the decreasing set point. The left
adjusting nut must always be lower than the right adjusting nut when calibration is
complete.
Repeat Steps 3 and 4 until desired set points are obtained. If the pressure switch fails
to respond to pressure change during calibration, increasing/decreasing set points
may be too close together. See Form 281 for minimum/maximum dead band
capabilities. Replace the housing cover.
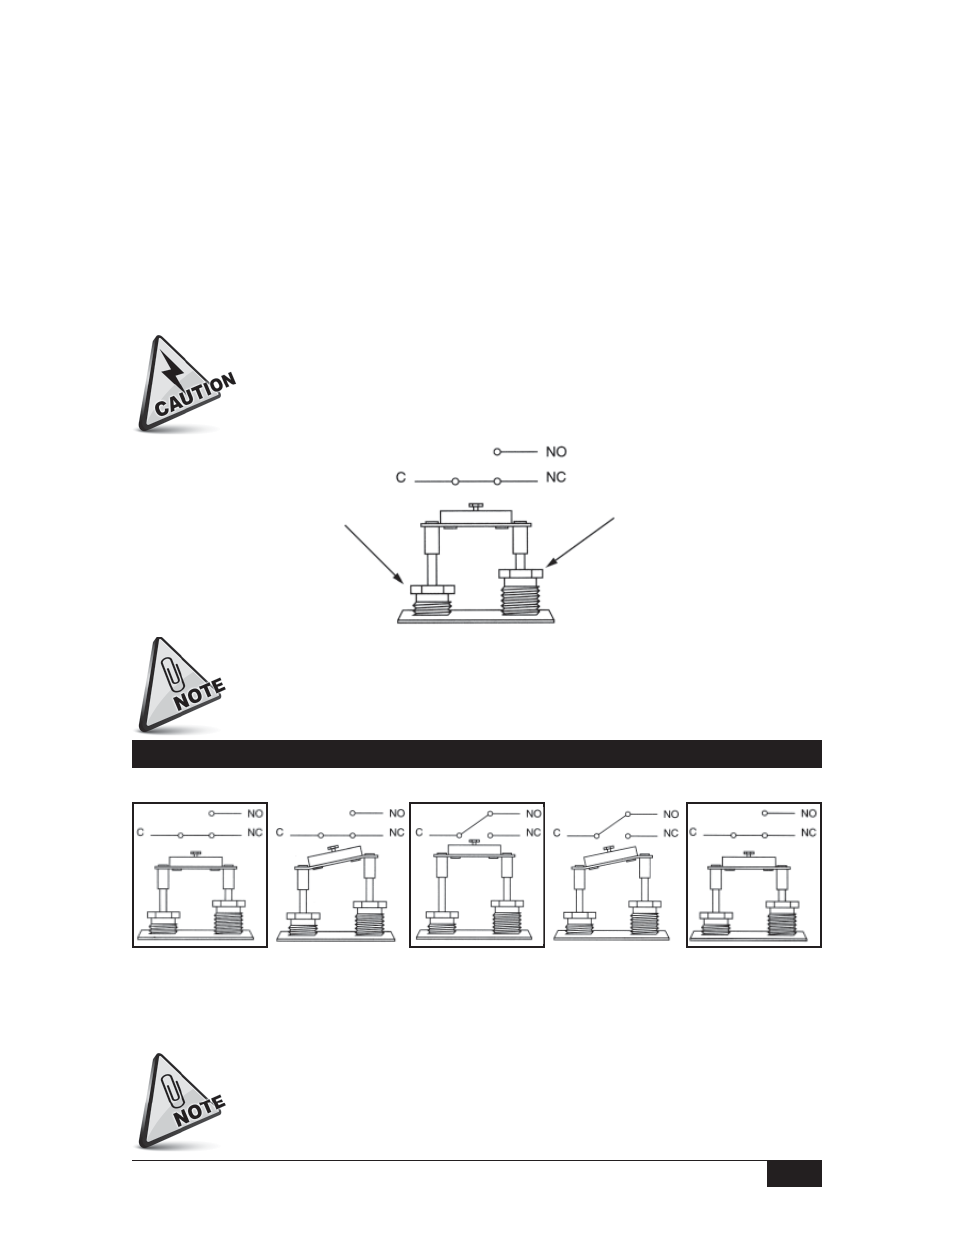
Principle of Operation
No pressure applied.
Electrical switching
element is deactuated.
Pressure greater
than decreasing set
point but less than
increasing
set point: Electrical
switching element
remains deactuated.
Pressure equal to or
greater than increasing
set point: Electrical
switching element is
actuated.
Pressure less than
increasing set point
but greater than
decreasing set point:
Electrical switching
element remains
actuated.
Pressure equal to or
less than decreasing
set point: Electrical
switching element is
deactuated.
Actuation
Deactuation
Piston movement exaggerated for clarity in drawings above.
Increasing Set
Point Adjustment
To raise the increasing set
point, turn the left adjust-
ing nut clockwise. To lower
the increasing set point,
turn the left adjusting nut
counterclockwise.
Decreasing
Set Point Adjustment
To raise the decreasing
set point, turn the right
adjusting nut clockwise.
To lower the decreasing
set point, turn the right
adjusting nut counter-
clockwise.