Digital 1000 calibration – Labconco XVS Ventilation Stations 4865060 User Manual
Page 41
Chapter 6: Maintaining your XPert or XVS Enclosure
Product Service 1-800-522-7658
37
Digital 1000 Calibration
1. Calibrate the airflow monitor according to the instruction manual that
comes with the kit. To successfully calibrate, it will be necessary to
change the face velocity by adjusting the airflow exhaust volume.
The exhaust volume can be adjusted with the speed control on the
FilterMate or by using an adjustable damper on the exhaust blower.
Typical calibration conditions are set at face velocity air sample
differences of at least 20 feet per minute. The airflow monitor is
factory set to be calibrated with a difference of at least 50 fpm and
can be changed by changing the “lower/higher air sample difference”.
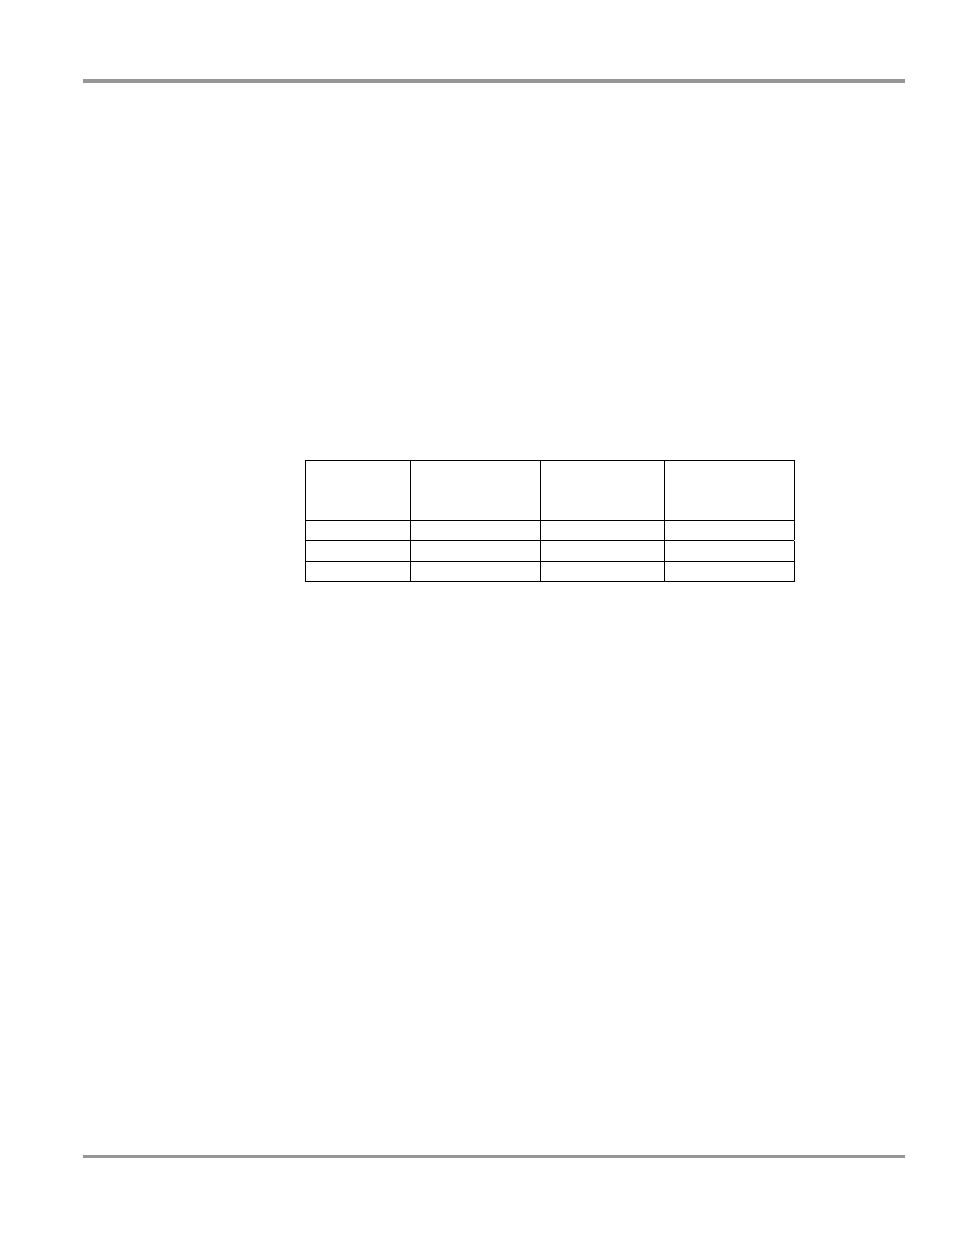
The following suggested in flow face velocity speeds are
recommended to successfully calibrate. Typical low air alarms are set
10-20 fpm below operational speeds. Follow Step 2 below and
review the Labconco 1000 Alarm User’s Manual that comes with the
airflow monitor.
Low Air
Alarm
Set Point
Enclosure
Operating In
flow Speed
Low
Calibration
Set Point
High
Calibration
Set Point
40 - 50 fpm
60 fpm
40 - 60 fpm
100 – 120 fpm
60 - 70 fpm
80 fpm
50 - 90 fpm
100 – 150 fpm
80 – 90 fpm
100 fpm
50 – 110 fpm
100 – 170 fpm
2. Go to setup and then CAL CONFIG MENU and change the
“lower/higher air sample difference” to 20 fpm. This will allow you
to successfully calibrate with values of a minimum of 20 fpm
difference.
3. While in CAL CONFIG MENU, change the “sensor difference” from
10% to 3%.
4. While in CAL CONFIG MENU, adjust the red low air alarm to the
desired setting such as 55 fpm. Then adjust the yellow “CAUTION
or WARNING” to 59 fpm. Then adjust the “CAUTION or
WARNING” air reset to 3 fpm. This sets the alarm condition.
5. To complete the CAL CONFIGURATION, be sure to enter “DONE”.
6. To start the calibration mode, use the Labconco 1000 Manual and
enter “CALIBRATION” mode on the display from the SETUP menu.
7. Follow the instructions on the display and alter the low exhaust
volume with the speed control on the FilterMate or exhaust damper.
Measure the average face velocity and enter the low value on the
display. Be careful not to block the opening. The low exhaust
volume calibration will take about 5 seconds.
8. Now alter the high exhaust volume with the speed control on the
FilterMate or exhaust damper. Measure the average face velocity and
enter the high value on the display. The high value must be at least
20 fpm greater than the low value. The high exhaust volume
calibration will take about 5 seconds.
- XVS Ventilation Stations 4865022 XVS Ventilation Stations 4865021 XVS Ventilation Stations 4865012 XVS Ventilation Stations 4865011 XVS Ventilation Stations 4865010 XVS Ventilation Stations 4864042 XVS Ventilation Stations 4864041 XVS Ventilation Stations 4864032 XVS Ventilation Stations 4864031 XVS Ventilation Stations 4864030 XVS Ventilation Stations 4864022 XVS Ventilation Stations 4864021 XVS Ventilation Stations 4864012 XVS Ventilation Stations 4864011 XVS Ventilation Stations 4864010 XVS Ventilation Stations 4863042 XVS Ventilation Stations 4863041 XVS Ventilation Stations 4863032 XVS Ventilation Stations 4863031 XVS Ventilation Stations 4863030 XVS Ventilation Stations 4863022 XVS Ventilation Stations 4863021 XVS Ventilation Stations 4863012 XVS Ventilation Stations 4863011 XVS Ventilation Stations 4863010 XVS Ventilation Stations 4862042 XVS Ventilation Stations 4862041 XVS Ventilation Stations 4862032 XVS Ventilation Stations 4862031 XVS Ventilation Stations 4862030 XVS Ventilation Stations 4862022 XVS Ventilation Stations 4862021 XVS Ventilation Stations 4862012 XVS Ventilation Stations 4862011 XVS Ventilation Stations 4862010 XPert Balance Enclosures 3971872 XPert Balance Enclosures 3971871 XPert Balance Enclosures 3971862 XPert Balance Enclosures 3971861 XPert Balance Enclosures 3971860 XPert Balance Enclosures 3971842 XPert Balance Enclosures 3971841 XPert Balance Enclosures 3971832 XPert Balance Enclosures 3971831 XPert Balance Enclosures 3971830 XPert Balance Enclosures 3971822 XPert Balance Enclosures 3971821 XPert Balance Enclosures 3971802 XPert Balance Enclosures 3971801 XPert Balance Enclosures 3971800 XPert Balance Enclosures 3971672 XPert Balance Enclosures 3971671 XPert Balance Enclosures 3971662 XPert Balance Enclosures 3971661 XPert Balance Enclosures 3971660 XPert Balance Enclosures 3971642 XPert Balance Enclosures 3971641 XPert Balance Enclosures 3971632 XPert Balance Enclosures 3971631 XPert Balance Enclosures 3971630 XPert Balance Enclosures 3971622 XPert Balance Enclosures 3971621 XPert Balance Enclosures 3971602 XPert Balance Enclosures 3971601 XPert Balance Enclosures 3971600 XPert Balance Enclosures 3971572 XPert Balance Enclosures 3971571 XPert Balance Enclosures 3971562 XPert Balance Enclosures 3971561 XPert Balance Enclosures 3971560 XPert Balance Enclosures 3971542 XPert Balance Enclosures 3971541 XPert Balance Enclosures 3971532 XPert Balance Enclosures 3971531 XPert Balance Enclosures 3971530 XPert Balance Enclosures 3971522 XPert Balance Enclosures 3971521 XPert Balance Enclosures 3971502 XPert Balance Enclosures 3971501 XPert Balance Enclosures 3971500 XPert Balance Enclosures 3930442 XPert Balance Enclosures 3030441 XPert Balance Enclosures 3930432 XPert Balance Enclosures 3930431 XPert Balance Enclosures 3930430 XPert Balance Enclosures 3930422 XPert Balance Enclosures 3930421 XPert Balance Enclosures 3930402 XPert Balance Enclosures 3930401 XPert Balance Enclosures 3930400 XPert Balance Enclosures 3930342 XPert Balance Enclosures 3030341 XPert Balance Enclosures 3930332 XPert Balance Enclosures 3930331 XPert Balance Enclosures 3930330 XPert Balance Enclosures 3930322 XPert Balance Enclosures 3930321 XPert Balance Enclosures 3930302 XPert Balance Enclosures 3930301 XPert Balance Enclosures 3930300 XPert Balance Enclosures 3930242 XPert Balance Enclosures 3030241 XPert Balance Enclosures 3930232 XPert Balance Enclosures 3930231 XPert Balance Enclosures 3930230 XPert Balance Enclosures 3930222 XPert Balance Enclosures 3930221 XPert Balance Enclosures 3930202 XPert Balance Enclosures 3930201 XPert Balance Enclosures 3930200