Troubleshooting, Engine, Cuning blade – Bolens TMO-3394704 User Manual
Page 15: C. reaissembly, Fuel filter, Drive belt removal and replacement
Attention! The text in this document has been recognized automatically. To view the original document, you can use the "Original mode".
TROUBLESHOOTING
Refer to page 19 of this manual for trouble shooting
information.
ENGINE
Refer to the separate engine manual for all engine
maintenance instructions.
Maintain
engine oil
as instructed in the separate
engine manual packed with your unit. Read and follow
instructions carefully.
Service
air cleaner
every 10 hours under normal con
ditions. Clean every few hours under extremely dusty
conditions. Poor engine performance and flooding
usually indicates that the air cleaner should be ser
viced. To service the air cleaner, refer to the separate
engine manual packed with your unit.
The
spark plug
should be cleaned and the gap reset
once a season. Spark plug replacement is recom
mended at the start of each mowing season; check
engine manual for correct plug type and gap specifi
cations.
CUniNG BLADE
A. Removal for Sharpening or Replacement
A
WARNING:
Be
sure
to
disconnect
and
ground the spark plug wire and remove
ignition key before working on the cut
ting
blade
to
prevent
accidental
engine
starting.
Protect
hands
by
using
heavy
gloves
or
a
rag
to
grasp
the
cutting
blades.
1. Remove the large bolt and lock washer which
holds the blade and adapter to the blade spindle.
2. Remove the blade and adapter from the spindle.
3. If the blade or blade adapter needs replacing,
remove the two small bolts, lock washers and
nuts which hold the blade to the adapter.
B. Sharpening
Remove the cutting blade by following the directions
of the preceding section.
When sharpening the blade, follow the original angle
of grind as a guide. It is extremely
important
that
each cutting edge receives an equal amount of gr'nd-
ing to prevent an unbalanced blade. An unbalariced
blade will cause excessive vibration when rotating at
high speeds, may cause damage to the mower and
could break, causing persona! injury.
The blade can be tested for balance by balancing it
on a round shaft screwdriver. Remove metal from the
heavy side until it balances evenly.
NOTE:
It is recommended tnat the blade always be
removed from the adapter for the best test of balance.
C. Reaissembly
Before reassembling the blade and the blade adapter
to the unit, lubricate the spindle and the inner surface
of the blade adapter with light oil. Lubricating the bolt
holes, bolts and inner surface of the nuts with light oil
is also recommended. A 4 oz. plastic bottle of light oil
lubricant is available. Order part number 737-0170.
Engine oil may also be used.
When replacing the blade, be certain the wide blade
is assembled on the right side of the deck. Be sure to
install the blades with the side of the blades marked
"Bottom” (or with part number) facing the ground
when the mower is in the operating position.
Blade Mounting Torque
Center Bolt; 450 in. lbs. min., 600 in. lbs. max.
Blade Adapter Bolts: 200 in. lbs. min., 350 in. lbs. max.
To insure safe operation of your unit, ALL nuts and
bolts must be checked periodically for correct tightness.
FUEL FILTER
Your unit is equipped with a replaceable in-line fuel fil
ter. Replace filter whenever contamination or discol
oration is noticed. Order replacement filter through
your engine authorized servicer.
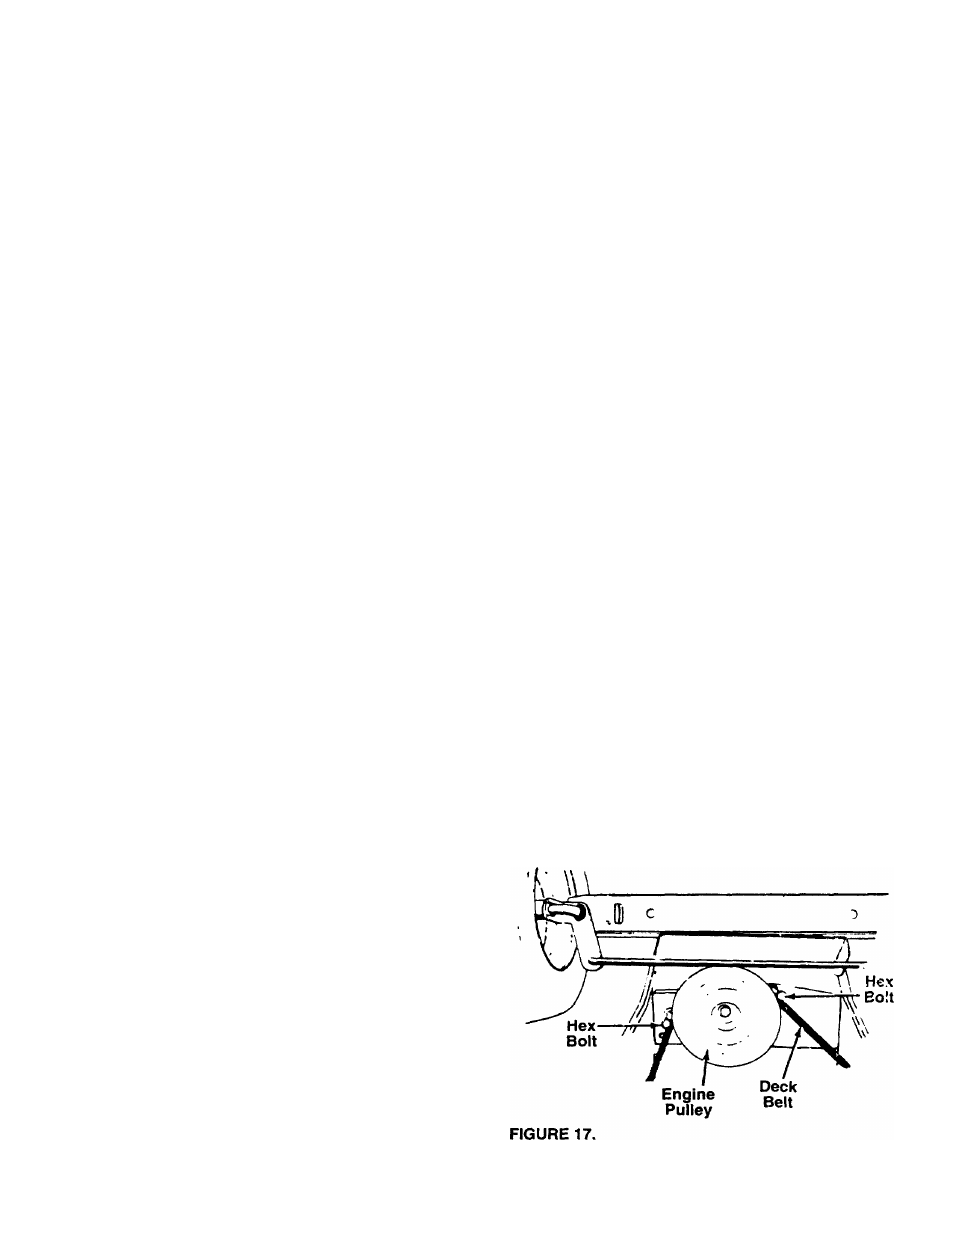
DRIVE BELT REMOVAL AND REPLACEMENT
▲
WARNING:
Disconnect
the
spark
plug
wire
and
ground
it
against
the
engine.
Block the wheels of the unit.
NOTE: When changing the belts, a spring puller or
other suitable tool is required to remove some of
the springs. A spring pulier (part number 732-
0571) is available to assist in removal of springs.
Removing the Deck Beit
NOTE:
Figures 17, 20 and 21 are shown with the unit
tipped up for clarity. It is not necessary to tip the unit
to remove the belts.
1. Place the lift lever in the disengaged position.
2. Remove the two hex bolts (belt keepers) from the
engine pulley belt guard. See figure 17.
15