Checking forward drive belt tension, A warning, Checking the reverse drive beit tension – Troy-Bilt 15009 User Manual
Page 41: Adjusting the forward drive belt tension, Adjusting forward drive belt tension, Warning
Attention! The text in this document has been recognized automatically. To view the original document, you can use the "Original mode".
Checking Forward Drive Belt Tension
A
WARNING
stop the engine, allow it to cool, disconnect
the spark plug wire and prevent it from
touching the spark plug, then remove the
Engine Ignition key before performing any
maintenance on your tiller.
Failure to follow these instructions could re
sult in personal injury or property damage.
This test for the correct tension on the forward
drive belt is the same check that you used when
adjusting the handlebar height.
Please refer to Section 3, Handlebar Height
Adjustment, for the correct procedures. If you get
the 3/16" to 5/16" gap that is mentioned in the
Handlebar Height Adjustment procedure, the
tension on the forward drive belt is correct.
If you are unable to get the 3/16" to 5/16" gap
when the lower end of the Forward Clutch Rod is
in the correct hole in the swivel plate, your belt
may be worn and you may have to make the
secondary adjustment to the forward drive belt
idler to take up slack. Please refer to “Adjusting
the Forward Drive Belt Tension” in this Section.
Checking the Reverse Drive Beit Tension
A
WARNING
stop the engine, allow it to cool, disconnect
the spark plug wire and prevent it from
touching the spark plug, then remove the
Engine Ignition key before performing any
maintenance on your tiller.
Failure to follow these instructions could re
sult in personal injury or property damage.
1. Remove the two nuts that secure the belt
cover to the tiller.
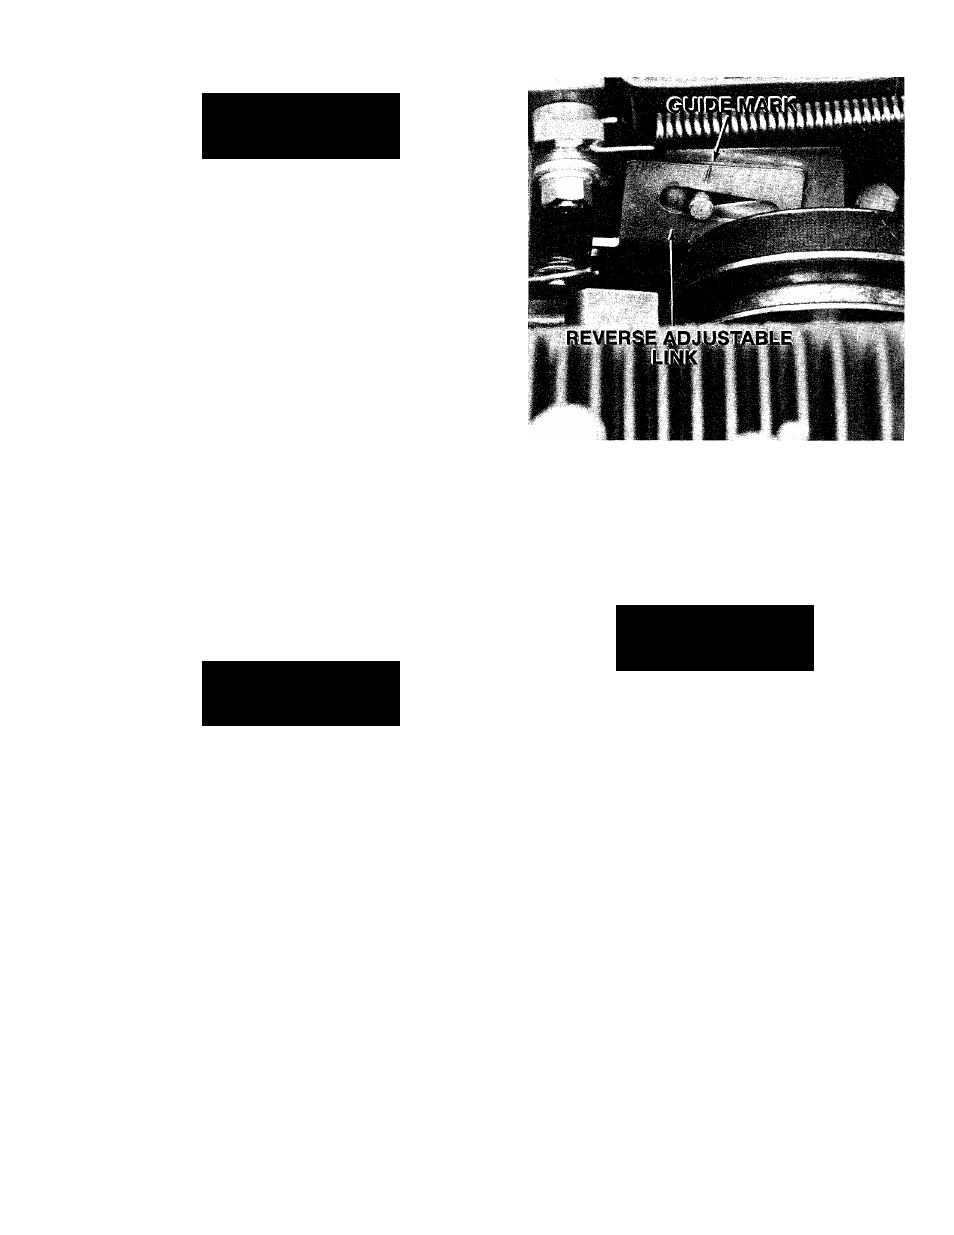
2. Position yourself at the front of the tiller and
use your left hand to push the reverse idler arm
inward as far as possible. While holding the arm
at this position, look at the position of the belt
tension guide mark on the reverse adjustable
link. See Photo 5-13.
3. The belt tension is correct if the guide mark is
anywhere to the left (as viewed from the front of
the tiller) of the pin. If the guide mark is aligned
with, or moves to the right side of the pin, then
the belt is too loose and it must be adjusted. See
“Adjusting Reverse Drive Belt Tension” in this
Section.
Photo 5-13: The guide mark on the Reverse
Adjustable Link (all models).
4. If the belt tension is correct, reinstall the belt
cover and secure it with the two nuts.
ADJUSTING
THE
FORWARD
DRIVE
BELT TENSION
A
WARNING
Stop the engine, allow it to cool, disconnect
the spark plug wire and prevent it from
touching the spark plug, then remove the
Engine ignition key before performing any
maintenance on your tiller.
Failure to follow these instructions could re
sult in personal injury or property damage.
To correctly adjust the tension on the forward
drive belt, you must first make certain that the
lower end of the Forward Clutch Lever is in the
correct hole in the swivel plate as described in
Section 3, Handlebar Height Adjustment.
If, after the handlebar height adjustment has
been performed, you are still unable to get the
3/16" to 5/16" gap as described in that proce
dure, you will have to make a secondary adjust
ment to compensate for the slack in the worn
belt. Do this as follows:
1. Remove the inner hairpin cotter from the lower
end of the Forward Clutch Rod.
2. Unscrew the Forward Clutch Rod (counter
clockwise as viewed from front of tiller) until the
threaded upper end of the Forward Clutch Rod
protrudes slightly above the rectangular nut in
the Forward Clutch bracket. See Photo 5-14.
39