Step 5: checking the transmission gear oil level – Troy-Bilt 15009 User Manual
Page 12
Attention! The text in this document has been recognized automatically. To view the original document, you can use the "Original mode".
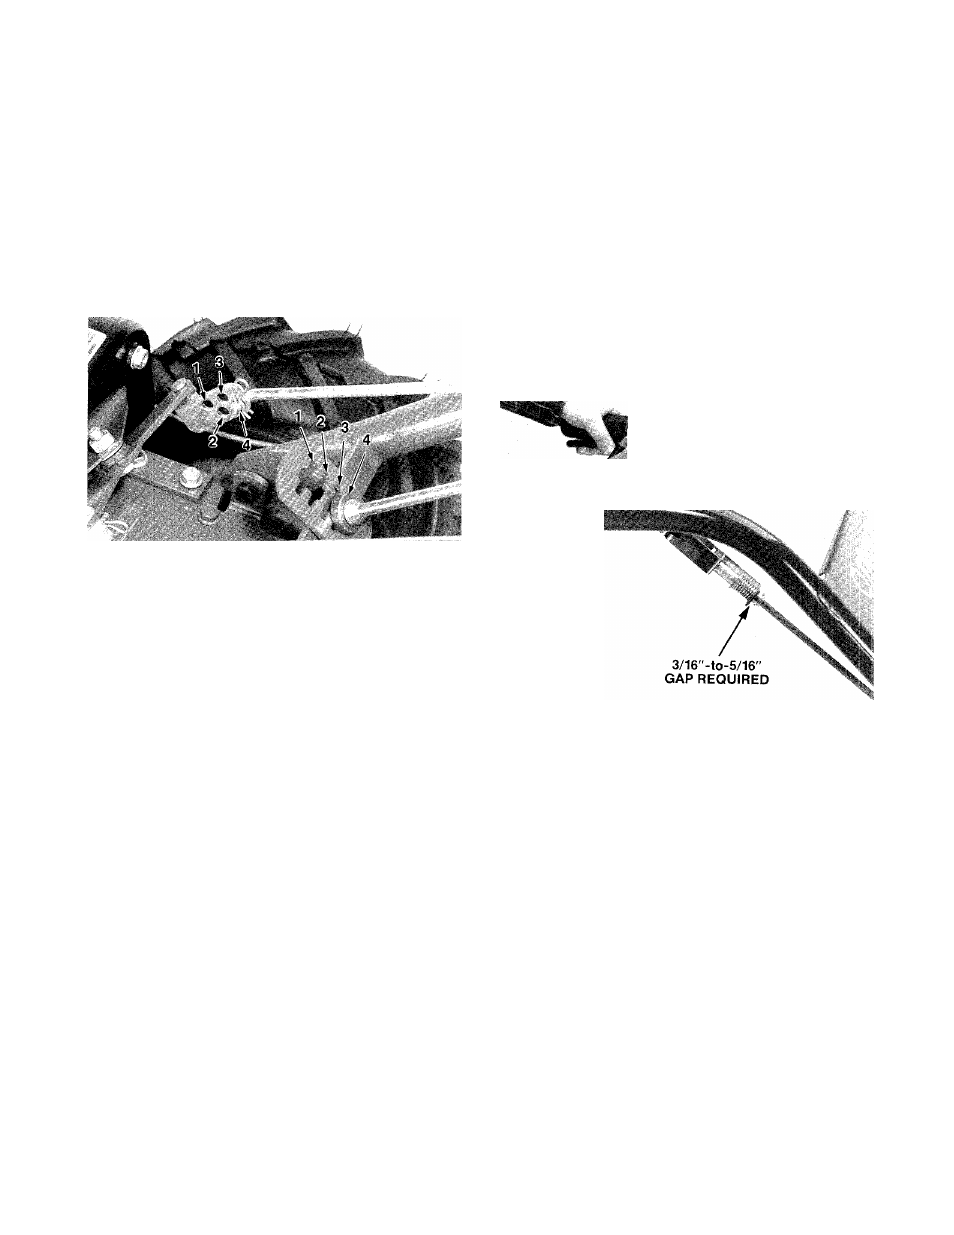
3. Note the four holes in the swivel plate on the
shifting mechanism.
The hole that you must in
sert the lower end of the Forward Clutch Rod
into depends upon which handlebar height
setting (on the curved handlebar height ad
justment bracket) you have the handiebars
set at.
Refer to Photo 2-10 to determine which
hole in the swivel plate to use. For example: if
you set the handlebar in slot number 1, then the
Forward Clutch Rod must be installed in hole
number 1 of the swivel plate.
.-'s»
Photo 2-10: Handlebar Height setting and Forward
Clutch Rod positioning are interrelated. They must
both be set in the same numbered positions.
4. Insert the lower end of the Forward Clutch
Rod into the proper hole in the swivel plate.
Secure it to the swivel plate by inserting a hairpin
cotter through the outer hole in the small bend of
the Forward Clutch Rod.
IMPORTANT
Whenever the handlebar height is changed,
the position of the Forward Clutch Rod must
be changed accordingly. Changing the han
dlebar height changes the tension on the
Forward Clutch Rod. This tension must be
adjusted by relocating the rod in the appro
priate hole in the clutch swivel plate.
To make sure the tension on the Forward
Clutch Rod (once connected) is correct:
a.
Stand on the right-hand side of the tiller
and pull the Forward Clutch Lever up and
hold it in place. See Photo 2-11.
b.
Check the gap between the “E-ring” and
the lower end of the bracket at the upper
end of the Forward Clutch Rod. Refer to
Photo 2-11.The gap should be 3/16"-to-
5/16". If you do not have a ruler handy, the
thickness of five pennies is approximately
5/16" thick.
c.
If the gap is incorrect, reverify that the
Forward Clutch Rod is located in the cor
rect hole in the swivel plate. If it isn’t, move
the lower end of the Forward Clutch Rod
into the correct hole and then check the
measurement gap again.
d.
To reset the gap distance properly, you
must make a simple adjustment to the
length of the Forward Clutch Rod. To do
this,disconnect it from the swivel plate,
then rotate it clockwise or counterclock
wise to shorten or lengthen the rod.
Reconnect it and measure the gap again
as shown below in Photo 2-11. Adjust the
length of the rod until the gap is within
3/16" to 5/16".
Photo 2-11: Carefully measure the gap between the
Forward Clutch Bracket and the “E-Ring. ”
STEP 5: CHECKING THE
TRANSMISSION GEAR OIL LEVEL
Once the handlebars are securely installed on
the tiller, move the tiller to a level area.
We have installed gear oil in the tiller trans
mission here at the Factory.
However, you
should make this very important check to be
sure that the gear oil level is still correct.
1. Make sure that your tiller is on a level area.
2. Lower the depth regulator lever to the second
notch to make sure that the transmission is as
level as possible. (See Photo 2-12.).
NOTE —
For shipping purposes, the depth regulator lever
might be secured with a plastic tie. If so, before the
depth regulator lever can be lowered, you must lift
the hood flap at the rear of the tiller and cut and re
move the tie.
10