The edge stitcher – SINGER 301 User Manual
Page 26
Attention! The text in this document has been recognized automatically. To view the original document, you can use the "Original mode".
w
48
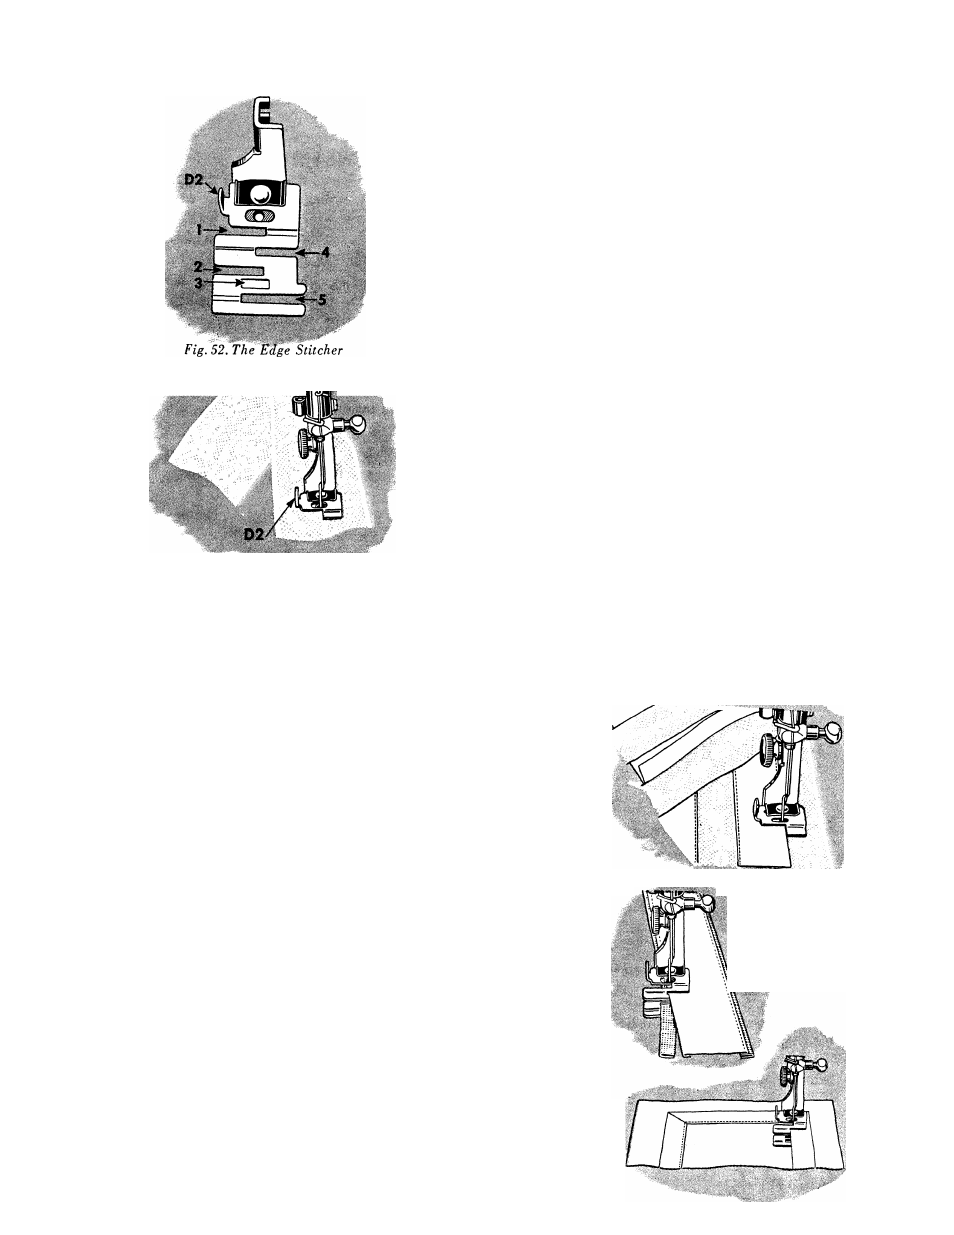
T H E E D G E S T I T C H E R
This attachment should be used when the stitching must be
kept accurately on extreme edge of material. It is also useful
for sewing together laces, insertions and embroideries, sewing
in position hemmed or folded edges, piping or sewing flat
braid to a garment.
To Adjust the Edge Stitcher
Fasten this attachment to presser bar in place of presser foot.
See that needle enters center of needle hole.
The distance from line of stitching to edge of material in slots
is regulated by moving lug D2, Fig, 52 to right or left.
To Sew Lace Together
!• Insert one of laces in slot 1 of edge stitcher and the other
in slot 4, Fig. 52.
2. Adjust lug D2 until edges to be joined are caught by stitch
ing.
3. Slightly overlap edges of lace while stitching to keep them
against ends of slots.
4. Loosen both thread tensions to avoid puckering of fine lace.
Fig. 53. Sewing Lace Together
49
To Insert Lace or Ribbon
1. Fold edge of material to which lace or ribbon is to be sewn
and insert it in slot 1 of edge stitcher.
2. Insert lace or ribbon in slot 4 of edge stitcher and proceed
to sew.
3. Cut away surplus folded material close to stitching.
To Pipe with Edge Stitcher
1. Cut piping bias and twice width of slot 3 so that it can be
folded once.
2. Insert piping with its folded edge to left in slot 3 and edge
to be piped in slot 4, Fig. 52.
To Apply Folded Bias Tape or Military Braid
1. Place garment under edge stitcher and tape in slot 1 or 4,
Fig. 52.
2. To make square corners, sew to turning point, remove tape
from attachment, form corner by hand, replace tape and con
tinue stitching.
3. To space two or more parallel rows, mark material with a
guide line, using a crease,^ chalk or basting thread.
Fig. 56. Applying Bias Folded Tape
Fig. 54. Setting in
lerfitiwi
Fig. 55, Piping
with the
Edge Stitcher