To install/tensjon plain-end blades – Sears 113.20765 User Manual
Page 9
Attention! The text in this document has been recognized automatically. To view the original document, you can use the "Original mode".
BLADE INSTALLATION AND
TENSIONING FOR PLAIN-END
OR PIN TYPE BLADES
NOTE: Included with the scroll saw are three 5"
blades. This saw can accommodate 5" to 6" plain-
end blades, and 5” pin type blades
TO INSTALL/TENSJON PLAIN-END
BLADES:
WARNING: FOR YOUR OWN SAFETY, TURN
SWITCH ‘OFF’, REMOVE KEY ANP REMOVE
PLUG FROM POWER SOURCE OUTLET BEFORE
REMOVING OR INSTALLING SAWBLADE.
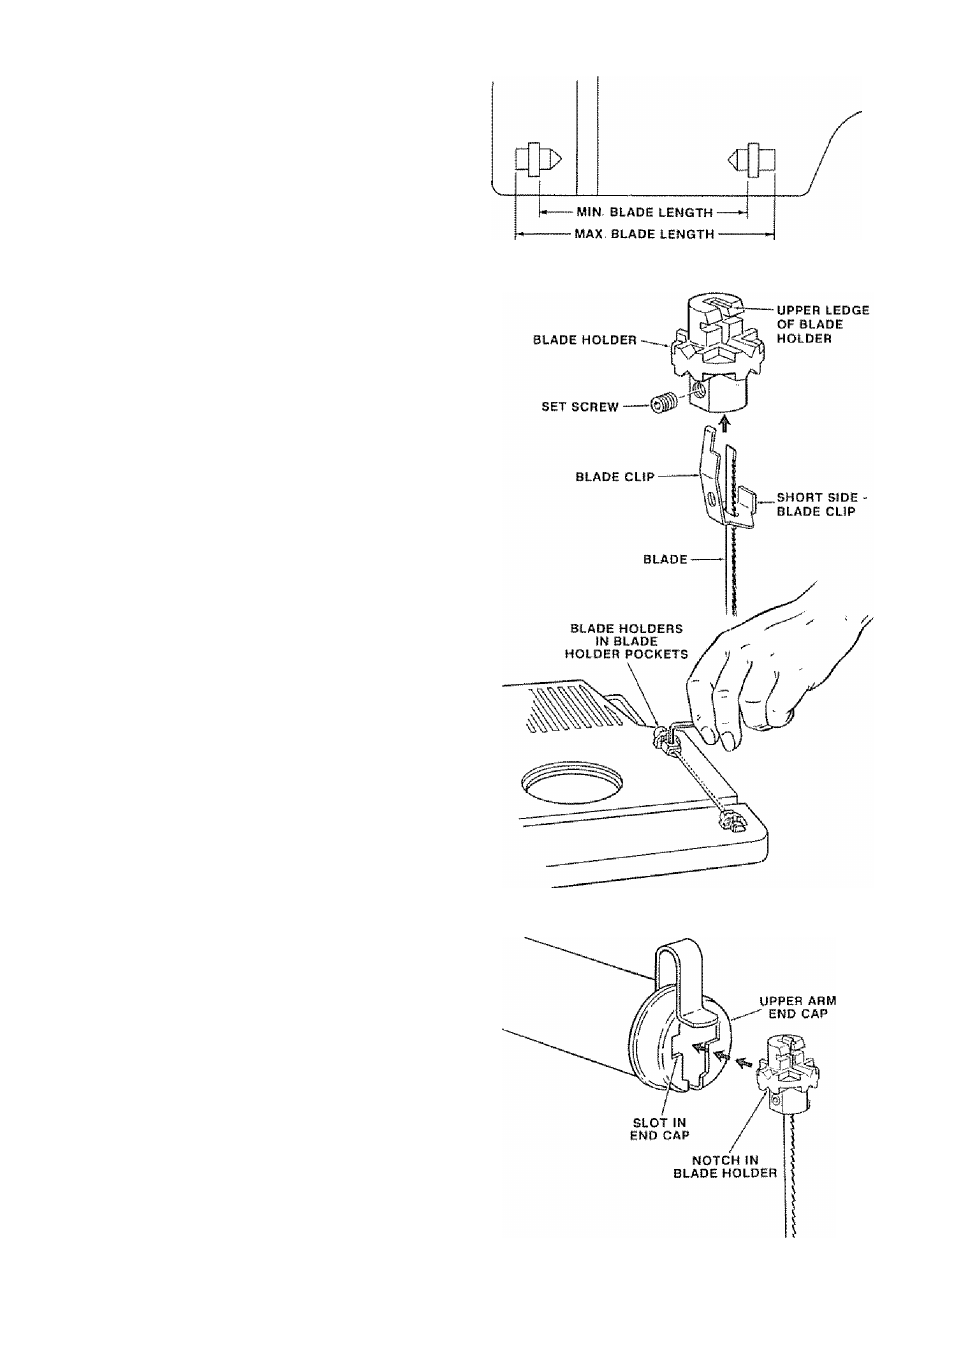
NOTE: Use blade holder pockets to verify correct
blade length and positioning
1 Locate four (4) blade holders, four (4) 10-32 x 1/4
set screws, one {1) blade, four (4) blade clips, and
one (1) set screw wrench among loose parts Two
(2) extra blade holder assemblies are provided for
quick and convenient changing of blades,
2 Insert one (1) blade clipintoeach blade hoiderby
pushing clip through holder until it snaps into
place catching upperledge. Insert one 10-32 x 1/4
set screw into each blade holder
3 Insert blade into one holder by pushing short side
of blade clip towards set screw, installing blade,
and releasing side of blade clip Place holder into
blade holder pocket in table (set screw side
upward) and check for proper extension squaring
blade to opposite blade holder pocket center
point Tighten set screw with wrench provided.
4, insert blade into other holder (as described
above) Place both holders in pockets in table to
achieve proper spacing and tighten other set
screw.
5 Place holder assembly in table insert hole; make
sure the teeth are pointing downward.
BLADE HOLDER POCKETS
USED AS BLADE LENGTH GAUGE
6- Set notches in blade holders into slots inside upper
and lower arm end caps The blade holders provide
slots for orientating blade in any 90® position
NOTE; Blade holders do not touch the retainer clips after
being properly installed The purpose of the retainer
clips is to deflect the blade holders if the blade breaks