Unit controls and safety devices – Carrier 38QF User Manual
Page 13
Attention! The text in this document has been recognized automatically. To view the original document, you can use the "Original mode".
3. Start unit and run until suction pressure reaches
5 psig (see Caution).
4. Shut unit off and frontseat suction valve.
5. Vent remaining pressure to atmosphere.
C.Al'llOX; 3SQP unit coils will hold onl>
lactoi>-supplied amount of refrigerant. Addi
tional rd'rigeranl ma\ cause units to reliese
pressure thru internal pressuie relief sake (indi
cated b\ a sudden rise of suetion pressure) be
fore suction pressure reaehes 5 psig. [1 this
occurs, shut off unit irnmediateK: Iront.seat
suction \al\c and \ent remaining piessiire to
Unit Controls and Safety Devices
HIGH-PRESSURE RELIEF VALVE is located in
compressor. Relief valve opens at a pressure differ
ential of approximately 500 psig between suction
(low side) and discharge (high side) to allow pressure
equalization.
INTERNAL CURRENT AND TEMPERATURE
SENSITIVE OVERLOAD resets automatically
when internal compressor motor temperature drops
to a safe level (overloads may require up to 45
minutes to reset). When an internal overload is sus
pected of being open, check by using an ohmmeter
or continuity tester. If necessary, refer to Carrier
Standard Service Techniques Manual, Chapter 2,
for complete instructions.
LIQUID
LINE
LOW-PRESSURE
SWITCH
(LLPS) is connected in liquid line to work with
compressor internal thermostat in providing loss-of-
charge protection during the heating cycle. Control
is mounted on liquid line.
With a high-side leak, pressure gradually de
creases until low-pressure control stops the com
pressor. (Low-pressure control settings are shown
in Table 8.)
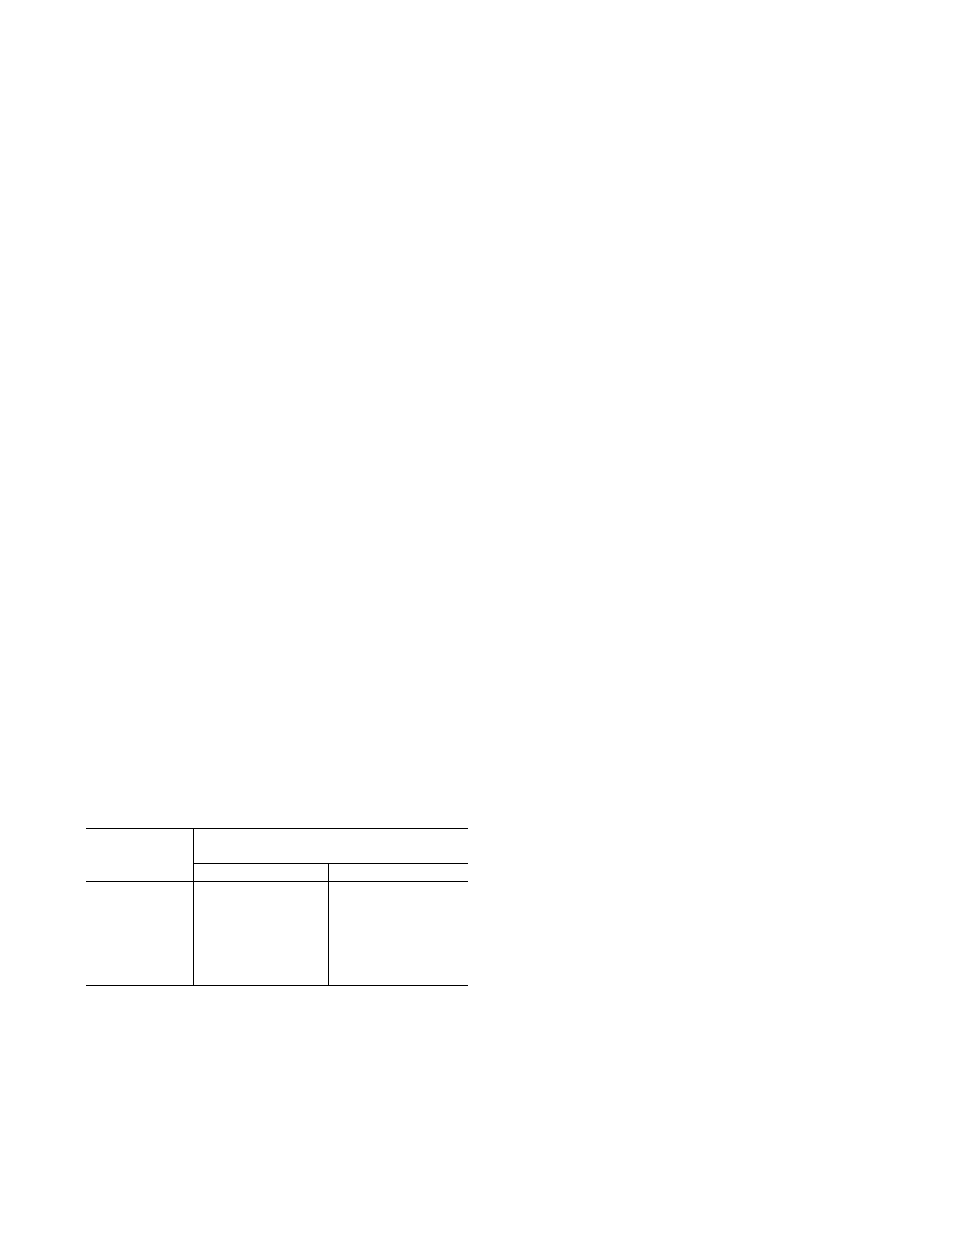
^ Table 8 — Pressure Switch Settings
UNIT
38QF
LIQUID LINE
LOW-PRESSURE SWITCH
Cut-in
Cutout
018
024
030
036
22 ±5 psig
7 ± 3 psig
042
048
060
With a low-side leak there is always some pressure
in the liquid line. However, compressor motor tem
perature increases because of insufficient suction
gas cooling. This causes internal thermostat to
actuate and stop compressor. When compressor
stops, system pressure equalizes and contacts on
pressure control open. The compressor cannot re
start until leak is repaired and system recharged.
CRANKCASE HEATER is connected across line
side of contactor and operates continuously.
The purpose of the heater is to keep the crankcase
warm during the off cycle and thus prevent dilution
of the oil with refrigerant. This assures good lubri
cation and prevents loss of oil from crankcase
during start-up.
To energize crankcase heater, turn thermostat to
OFF position and close electrical disconnect to heat
pump.
If the electrical disconnect switch to the outside
unit has been off for an extended period of time, the
crankcase heater should be energized for 24 hours
before starting the compressor.
DEFROST
CONTROL,
consisting
of
defrost
control board and defrost thermostat, interrupts
normal system heating operation every 90 minutes
to defrost outdoor coil, if the coil saturated suction
temperature
indicates
freezing
temperatures.
Defrost control simultaneously stops outdoor fan,
energizes reversing valve solenoid to return system
to cooling cycle (outdoor unit as condenser, indoor
unit as evaporator), and activates accessory electric
heater.
For the heat pump to defrost, 2 conditions are
necessary:
1. Defrost timer contacts must be closed.
2. Refrigerant temperature from outdoor unit must
be cold enough to cause defrost thermostat con
tacts to close. Contacts close at 31 ±4 F.
Every 90 minutes of elapsed running time, the de
frost timer contacts close for 10 seconds. If the
defrost thermostat contacts are closed, the unit
defrosts. The defrost timer limits defrosting period
to 10 minutes. Normally, the frost is removed and
the defrost thermostat contacts open to terminate
defrosting before 10 minutes have elapsed. Defrost
thermostat contacts open at 80 ± 6 F liquid refrig
erant temperature. When defrosting is terminated,
the outdoor fan motor is energized and reversing
valve solenoid is de-energized, returning unit to
heating cycle.
HEAT PUMP CIRCUITS shown in Fig. 6 are re
frigerant flow diagrams for heating and cooling
cycles.
AccuRater™ (Bypass Type) Servicing
— See
Fig. 22 for bypass type AccuRater components. The
piston has a refrigerant metering hole thru it. The
retainer forms a stop for the piston in the refrigerant
bypass mode, and a sealing surface for liquid line
flare connection. To check, clean or replace piston:
1. Shut off power to unit.
2. Pump unit down using Pumpdown Procedure
described previously.
3.
Remove liquid line flare connection from
AccuRater.
4. Pull retainer out of body, being careful not to
scratch flare sealing surface. If retainer does not
pull out easily, carefully use Vise Grip pliers to
remove retainer.
13