Service, Service kits available – Wilkerson P12 User Manual
Page 2
!
Service
CAUTION:
SHUT OFF AIR SUPPLY and exhaust the primary and
secondary pressure before disassembling regulator unit.
(Turning the knob counterclockwise reduces regulator’s
setting, but does not vent downstream pressure on non-
relieving regulators.)
CAUTION:
Lubricate parts with a mineral based oil / grease or silicone free
grease. DO NOT use synthetic oils / greases such as esters.
A. Use the following procedure to service Diaphragm and
/ or Control Spring:
1. Disengage the adjusting knob by pulling upward. Turn
adjusting knob counterclockwise until the compression is
released from the pressure control spring.
2. Unscrew the threaded collar and remove the bonnet
assembly. Next, disassemble, clean, and carefully inspect
parts for wear and/or damage. If replacement is necessary,
use parts from service kits.
3. Lubricate o-ring and lip seals with grease (supplied with kits).
4. Install diaphragm assembly into bonnet. Then install bonnet
assembly to body and tighten threaded collar per Figure 1.
B. Servicing the Valve Assembly-
1. Exhaust system air pressure as previously described. Then
remove bottom cap by unscrewing it from body. Next, remove
valve assembly, o-ring, cap o-ring and valve return spring.
2. Next, disassemble, clean, and carefully inspect parts for
wear and/or damage. If replacement is necessary, use parts
from service kits.
3. Lubricate o-ring and sliding surfaces using grease supplied
with service kit.
4. Install parts as shown in Figure 1.
5. Lubricate cap o-ring and install it in o-ring groove on cap.
Then screw cap into body until the cap bottoms out in body
(See Figure 1).
6. Turn on air supply and adjust to desired secondary pressure
as described in the Operation section.
Turn on air pressure and check regulator for leakage. If leakage
occurs, DO NOT OPERATE — conduct repairs again.
If you have questions concerning how to service this unit, contact
your local authorized dealer or your customer service representative.
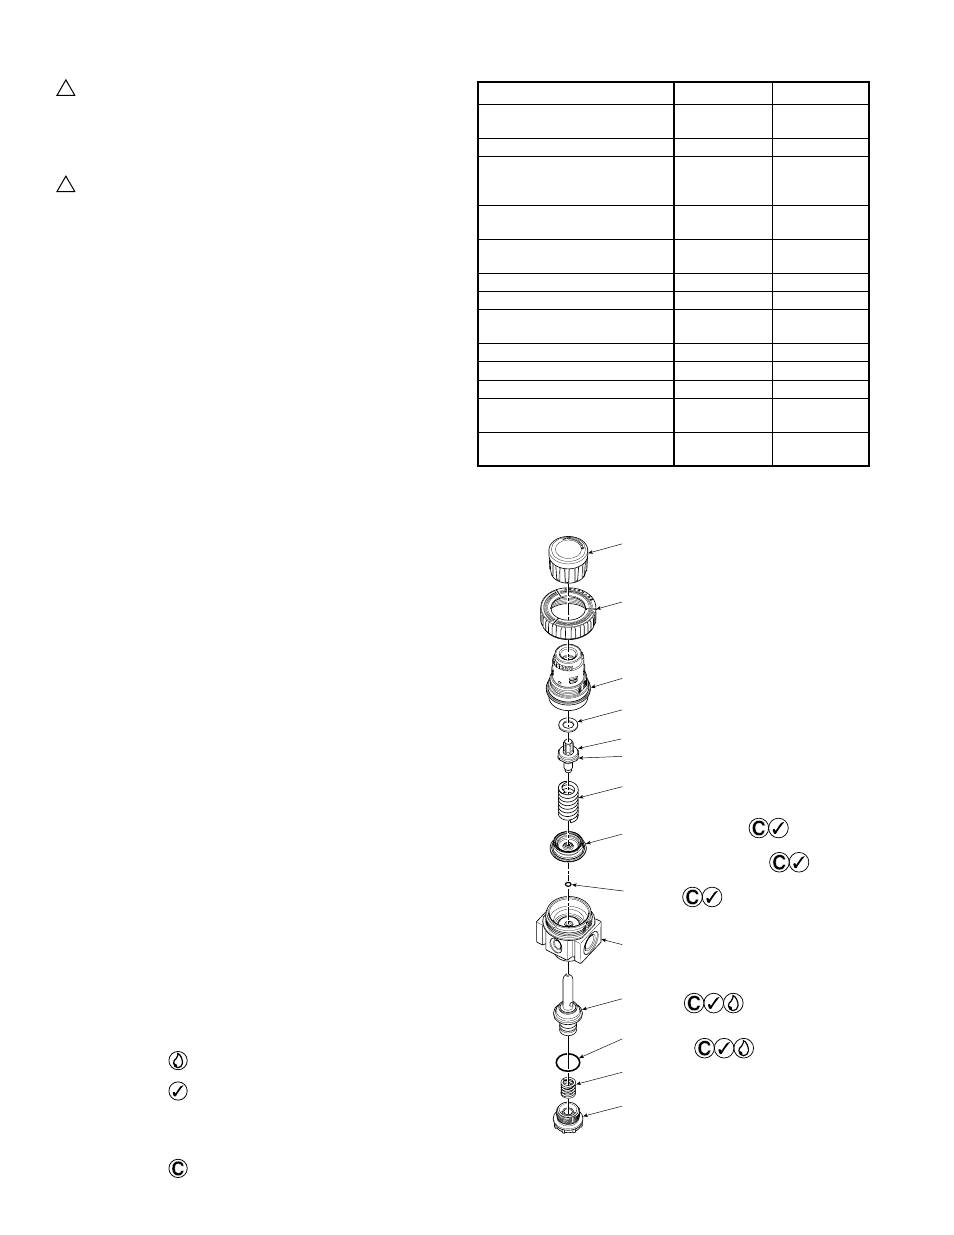
1/4" and 3/8" R12 Regulator, and 1/4" and 3/8" P12 Precision Regulator
83-956-000
Figure 1:
R12 and P12
Regulators
Knob
Collar
(Hand tight
plus 1/4 turn)
Bonnet
Washer
Adjusting Screw
Drive Nut
Control Spring
Spring,
Valve Return
O-Ring,
Bottom Cap
O-Ring,
Vent Seal
(Not used on 27RC)
Diaphragm Assembly
(Includes Upper Diaphragm Plate
& Lower Diaphragm Plate)
Bottom Cap
Torque:
2.3 to 2.8 Nm
(20 to 25 in. lb.)
Valve
Assembly
Body
Service Kits Available
Description
R12
P12
Air Pilot Conversion
(Relieving)
GRP-96-350
—
Bonnet Assembly
RRP-96-308
—
Gauges:
Low Pressure
RRP-96-664
RRP-96-664
0 to 414 kPa (0 to 60 PSIG)
Low Pressure
0 to 207 kPa (0 to 30 PSIG)
RRP-96-663
RRP-96-663
Standard Pressure
0 to 1103 kPa (0 to 160 PSIG)
RRP-96-665
RRP-96-665
Mounting Bracket Kit
GPA-96-313
GPA-96-313
Regulator Control Knob
RRP-96-300
—
Springs:
862 kPa (125 PSIG)
RRP-96-301
RRP-96-301
414 kPa (60 PSIG)
RRP-96-302
RRP-96-302
206 kPa (30 PSIG)
RRP-96-303
RRP-96-303
1379 kPa (200 PSIG)
RRP-96-304
RRP-96-304
Non-Relieving
Regulator Repair Kit*
RRP-96-307
—
Relieving Regulator
Repair Kit*
RRP-96-306
RRP-96-305
*Grease in kit is silicone free
Lightly grease with provided lubricant.
Inspect for nicks, scratches, and surface
imperfections. If present, reduced service
life is probable and future replacement
should be planned.
Clean with lint-free cloth.
!