Top Flite Wristcrat User Manual
Page 9
tubing, clean each end with a #11 blade and care-
fully insert it into the stab pivot hole just cleared
out, do not glue Now assemble the wing to the
fuselage followed by attaching the stabilizer
halves to the fin, just press in place for now What
we're going to check for now is alignment We
want to view the airplane head-on at a bit of a
distance Place it on a table, facing you, and back-
off a few paces, sighting directly at the front Is the
wing sitting properly on the fuselage? Are the
stabs tilted in relationship to the wing/fuselage or
do they look "right"? If everything seems to line-
up, we can proceed to finish sheeting the top, rear
of the fuselage If it doesn't, we need to know
which way to twist the fin to make everything line-
up properly because once the top rear sheeting is
installed, it "locks" the fuselage firmly in place
thus making any such corrections extremely dif-
ficult, if not impossible.
If the alignment appears to be OK, remove the stab
halves, leave the wing in place and carefully cut
and glue the 1/16" balsa sheet (applied crossgrain,
as shown) top, rear decking in place back to the
leading edge of the fin However, if some align-
ment is needed by having to pull the top of the fin
left or right, now is the time to do it, before apply-
ing the top, rear sheeting This is how it's done Set
the assembled airplane on a large, flat table Place
weights (magazines, lead, whatever) on top of the
wing center section, thus holding it firmly in place.
Again sighting directly at the front of the model,
determine which way the fin has to be tilted Pull
off a long length of masking tape and stick it to the
top of the fin Pull against the tape until the fin is in
the right position and stick the other end to the
table, thus preventing the fin from shifting Once
satisified that it is now properly aligned, cut, fit
and glue the top, rear sheeting in place as earlier
described Let the sheeting dry before removing
the masking tape from the fin and you'll find that
the fin is now properly aligned Disassemble the
wing and stabilizer halves from the fuselage Use
your sanding block to now sand the top, rear
sheeting and the forward radio hatch and nose
block piece flush with the fuselage sides You can
also now sand the top forward hatch and nose-
block contours to shape as shown on the plans, no
need to round corners yet.
D 17. From your parts bag, locate the 1/4" shaped
fin/fuselage fairing Use your sanding block to ad-
just the angles if needed and glue in place As
shown, this is now trimmed to fair the fin leading
edge into the top, rear of the fuselage
Finally, push the 1/4" length of aluminum tubing
that's in the rear pivot hole about halfway out, app-
ly just a bit of adhesive to its outer surface
(5-minute epoxy or slow cure CA) and push it back
in place in the fin.
With the exception or contouring and final san-
ding, your fuselage should be complete
FINAL ASSEMBLY
Its often been said that the difference between a good
model and a great one is sandpaper and the willingness
and ability to use it This is the point in construction that
can literally make or break the performance and the look
of your model Since the WRISTOCRAT is an obvious
candidate for use of Monokote™, you would do well to
keep in mind that the surface preparation of the wood
will dictate the finished, covered look of your model
When we reference the use of "filler" in the following
text, we have found that some of the best products to
use are those such as "MicroFill" or Model Magic Filler
or something similar These products dry quickly, are
very light and Monokote goes over them nicely. Look for
these at your local retailer
Let's start with the fuselage since the other components
should, by now, be sanded and about ready to use
D 1. Note the lower left corner of Cross Section C-C on
the plans This demonstrates about the correct
amount of radius that can be and should be sand-
ed into the fuselage bottom As this sanding
radius moves aft, toward the fin post and the
fuselage diminishes in width, the result will be
pleasant looking oval shape Next, sand the radio
hatch and nose block sections to a nice, rounded
look right down to the nose Using a rougher grit of
paper at first, followed by something like #220 will
do the job nicely The last section to tackle is the
top, rear of the fuselage, back to and including the
fin fairing and fin leading edge Take every effort
needed to sand this structure to the point that it
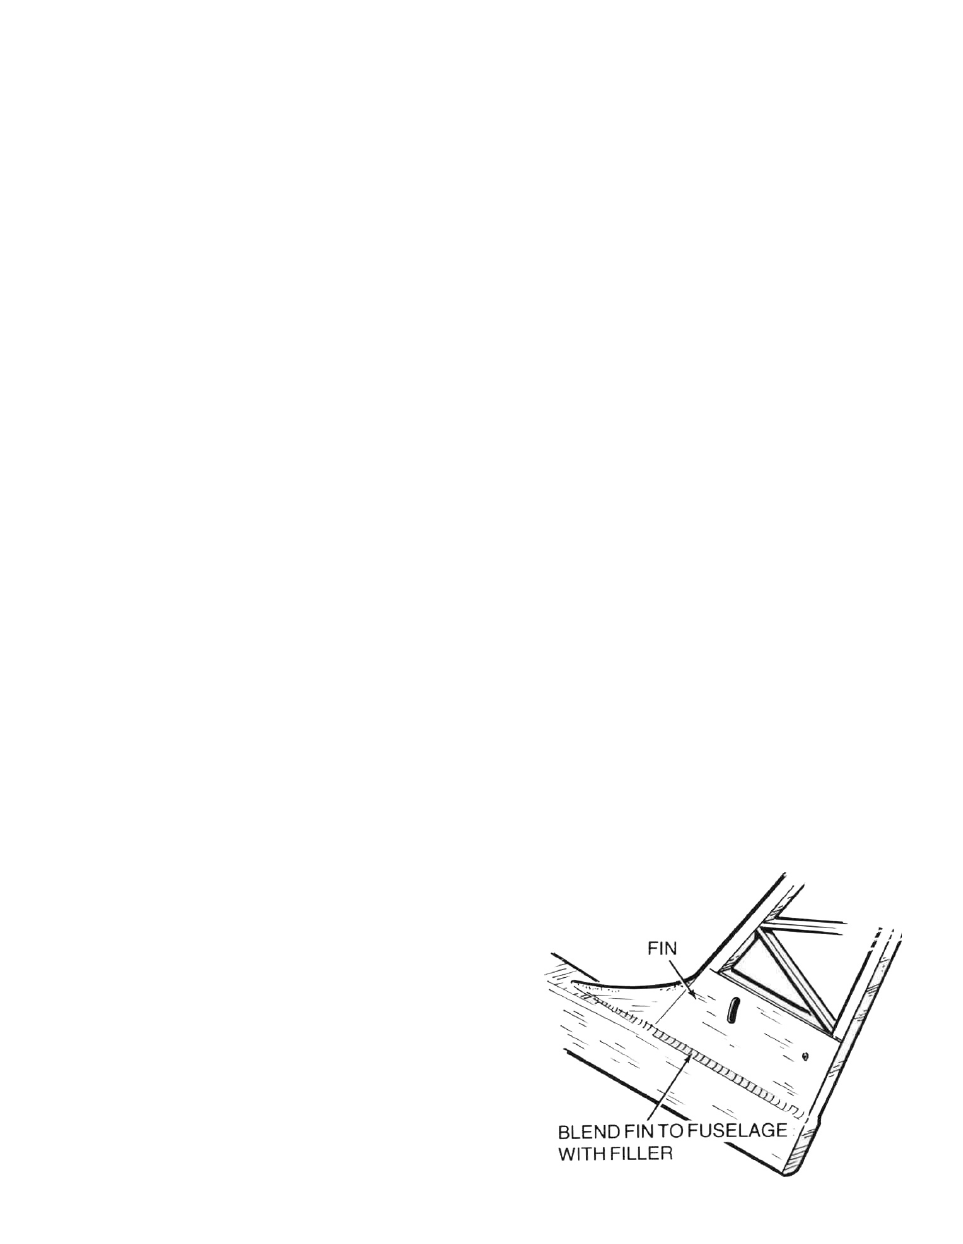
looks and feels like one piece You will note that
where the T-1 fin sides meet the fuselage sides,
there is a disparity in wood thickness, resulting in
a kind of "lip" On our prototypes, we handled this
by sticking a length of masking tape, lengthwise,
about 3/16" above this joint, on T-1 Then we careful-
ly sanded down the fuselage side(s) to as close to
T-1 as possible (the masking tape was there to pro-
tect T-1 in case we got too close) Then with the
tape still in place, we used filler to "fair-in" this
joint, feathering the material carefully When the
filler was dry, the tape was removed and we used
very light sandpaper to finish feathering the joint.
9