Top Flite TOPA1020 User Manual
Page 13
❏
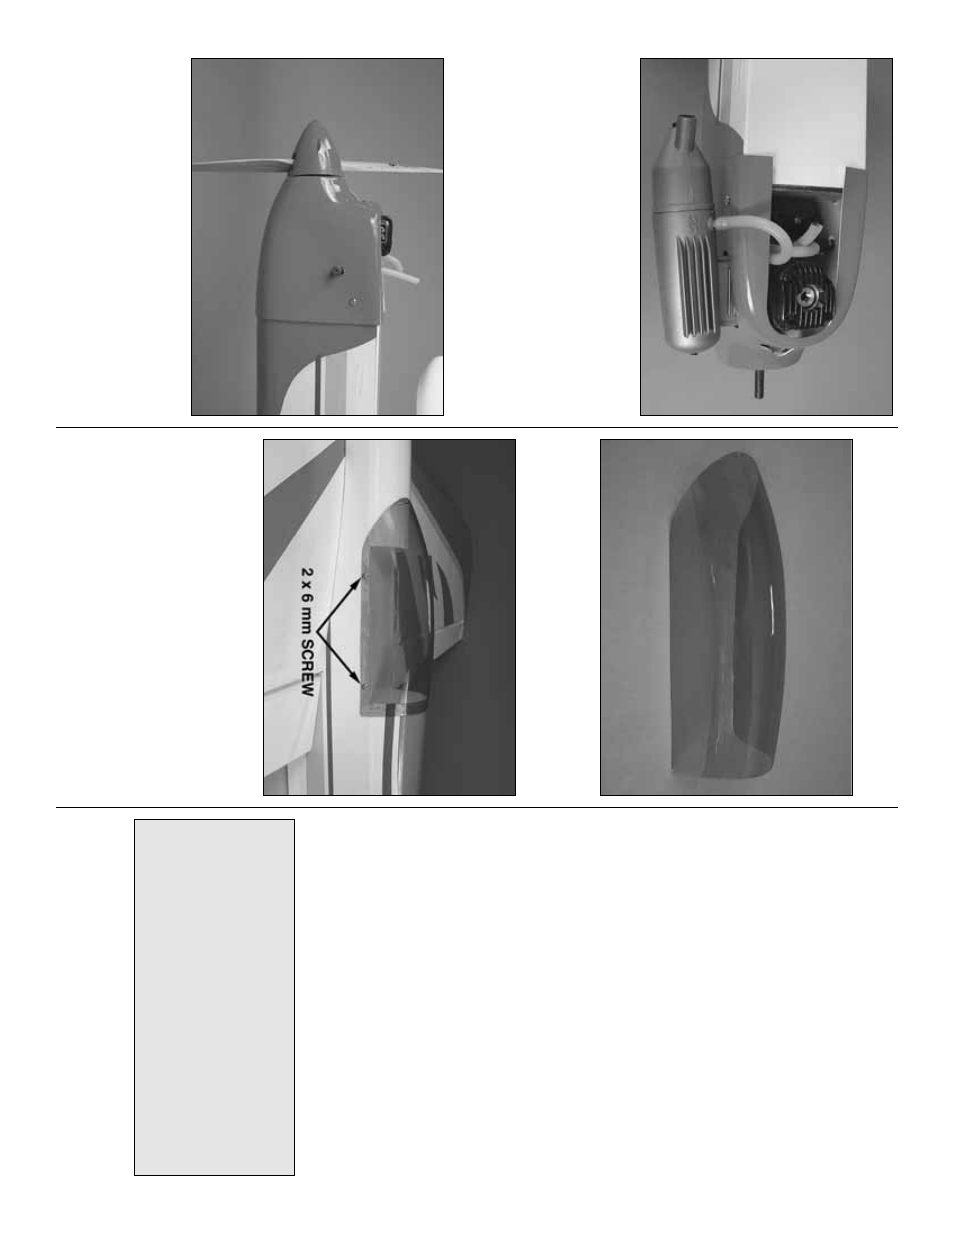
8.
Reattach the co
wl and secure the m
uffler to the
engine
.Depending on the engine being used, y
ou ma
y
need to dr
ill small access holes into the co
wl to tighten
the m
uffler scre
ws
.
F
or the engine sho
wn, an allen k
e
y
w
as inser
ted through the hole f
or the needle v
alv
e and
the air intak
e
.
When filling the tank, fuel will o
verflo
w
through the v
ent line when full.
A 3 x 6 mm scre
w is
included with the kit to be used as a fill line plug.
❏
9.
Reinstall the 2" [51 mm] spinner and propeller
.
Install the Canop
y
❏
1.
T
rim the
canop
y
along the molded cut lines
.
❏
2.
Use masking tape to tempor
ar
ily secure the
canop
y to the fuselage
.
D
rill f
our 1/16" [1.6 mm] holes
,
e
v
enly spaced, on the bottom sides of the canop
y and
into the fuselage
.
Thread a 2 x 6 mm self-tapping
scre
w
into each hole and bac
k it out.
Use thin CA glue
to harden the scre
w
holes
.
Attach the canop
y to the
fuselage using f
our 2 x 6 mm self-tapping scre
w
s
.
Appl
y the Decals
1.
Use scissors or a shar
p hob
b
y
knif
e to cut the
decals from the sheet.
2.
Be cer
tain the model is clean and free from oily
finger
pr
ints and dust.
Prepare a dishpan or small
b
u
c
k
et with a mixture of liquid dish soap and w
a
rm
w
ater–about one teaspoon of soap per gallon of w
ater
.
Submerse the decal in the soap and w
ater and peel off
the paper bac
king.
Note:
Ev
en though the decals ha
ve
a
“stic
ky-bac
k”
and are not the w
ater tr
ansf
er type
,
submersing them in soap and w
ater allo
ws accur
ate
positioning and reduces air b
u
b
b
les under
neath.
3.
P
osition the decal on the model where desired.
Holding the decal do
wn, use a paper to
w
e
l to wipe
most of the w
ater a
w
a
y.
4.
Use a piece of soft balsa or something similar to
squeegee remaining w
a
ter from under the decal.
Apply the rest of the decals the same w
a
y.
GET
THE MODEL READ
Y
T
O
FL
Y
Balance the Model (C.G.)
At this stage the model should be in ready-to-fly
condition with all of the systems in place including
the engine
, landing gear
, and all hardw
are
.
More than an
y other f
actor
, the
C.G.
(balance
point) can ha
v
e
the
greatest
eff
ect on ho
w a model
flies
, and ma
y deter
mine whether or not y
our first
flight will be successful.
If y
ou v
alue this model and
wish to enjo
y
it f
or man
y flights
,
DO NO
T
O
VERLOOK
THIS IMPOR
T
ANT PR
OCEDURE.
A
model that is not proper
ly balanced will be
unstab
le and possib
ly unfly
ab
le
.
- 13
-