Top Flite TOPA0290 User Manual
Page 68
the ser
v
o end of the stabiliz
er pushrod until the
top
of the stabiliz
er control rod is e
v
en with the seam
betw
een the top and bottom stabiliz
er mounts
.
A
piece of wire with an L-bend on the end can be used
as a
“gauge
.”
With the gauge under the control rod,
adjust the ele
v
ator until the top of the gauge is e
v
en
with the seam.
Note:
The plane in the sk
etch is
upside-do
wn because the model will be upside-do
wn
dur
ing this procedure
.
❏
4.
No
w that the stabiliz
er has been set up
, secure
the n
ut on the bellcr
ank with threadloc
k
e
r.
Also loc
k
the wheel collars that are on both sides of the s
w
iv
el
cle
vis onto the stabiliz
er control rod.
Use a small drop
of threadloc
k
er on both set scre
ws in the collars
.
❏
5.
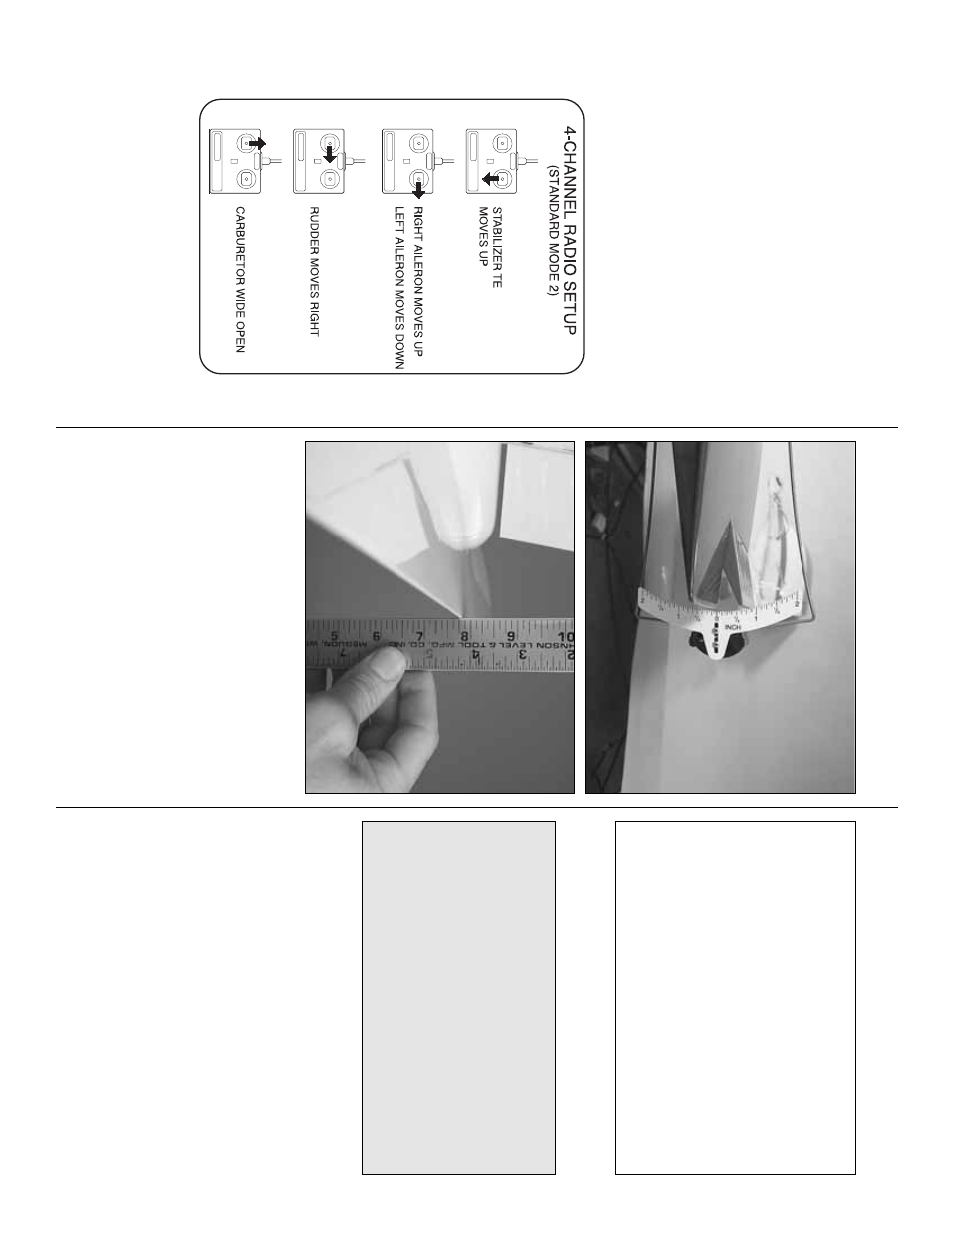
Mak
e
cer
tain that the control surf
aces and the
carb
uretor respond in the correct direction as sho
wn
in the diag
ra
m.
If an
y of the controls respond in the
wrong direction, use the ser
v
o
re
v
ersing in the
tr
ansmitter to re
v
erse the ser
v
os connected to those
controls
.
Be cer
tain the control surf
aces ha
v
e
remained centered.
Adjust if necessar
y.
SET THE
CONTR
OL THR
O
W
S
❏
Use a Great Planes AccuThro
w (or a r
uler) to
accur
ately measure and set the control thro
w of each
control surf
ace as indicated in the char
t that f
ollo
ws
.
A r
uler will ha
v
e
to be used on the stabiliz
er
.
RECOMMENDED CONTR
OL SURF
A
CE
THR
O
W
S
IMPOR
T
ANT
:
The Piper Arro
w has been
e
x
tensivel
y
flo
wn and tested to arr
iv
e at the
thro
ws at which it flies best.
Flying y
our model at
these thro
ws will pro
vide y
ou with the g
reatest
chance f
or successful first flights
.
If,
after y
ou ha
v
e
become accustomed to the w
a
y the Arro
w flies
,
y
ou w
ould lik
e to change the thro
ws to suit y
our
taste
, that is fine
.
H
o
w
e
v
er
, too m
uch control thro
w
could mak
e the model difficult to control, so
remember
,
“more is not alw
a
ys better
.”
HIGH RA
TE
LO
W RA
TE
AILER
ONS
7/8"[22mm] up
1/2"[13mm] up
7/8"[22mm] do
wn
1/2"[13mm]
do
wn
ST
ABILIZER
1/2"[13mm] up
1/4"[6mm] up
1/2"[13mm] do
wn
1/4"[6mm] do
wn
R
UDDER
1"[25mm] r
ight
3/4"[19mm] r
ight
1"[25mm] left
3/4"[19mm] left
FLAPS
1-1/2"[38mm] full do
wn
4-CHANNEL
TRANSMITTER
TRANSMITTER
4-CHANNEL
TRANSMITTER
4-CHANNEL
TRANSMITTER
4-CHANNEL
- 68
-