Top Flite TOPA0290 User Manual
Page 33
❏
5.
If b
uilding w
o
rking flaps
, mount the flap ser
v
o
s
to tw
o more sets of mounting b
loc
ks
.
Note that while
the aileron ser
v
os are mounted to the hatches in a
“mirrored”
image
, the flap ser
v
os are
not
mirrored
(so that the flaps will w
o
rk
together (instead of in
opposition as do the ailerons).
It will be easier to hook up the ailer
ons bef
ore
joining the wing halves,
so go ahead and do so
as instructed belo
w
.
But it will be better to hook
up the flaps after the model has been co
vered
and the flaps ha
ve been permanentl
y joined to
the wing with the hing
es.
❏
6.
Enlarge the holes in the aileron ser
vo
ar
ms with a
Hob
bico Ser
vo
Hor
n Dr
ill (HCAR0698) or a 5/64" [2mm]
dr
ill.
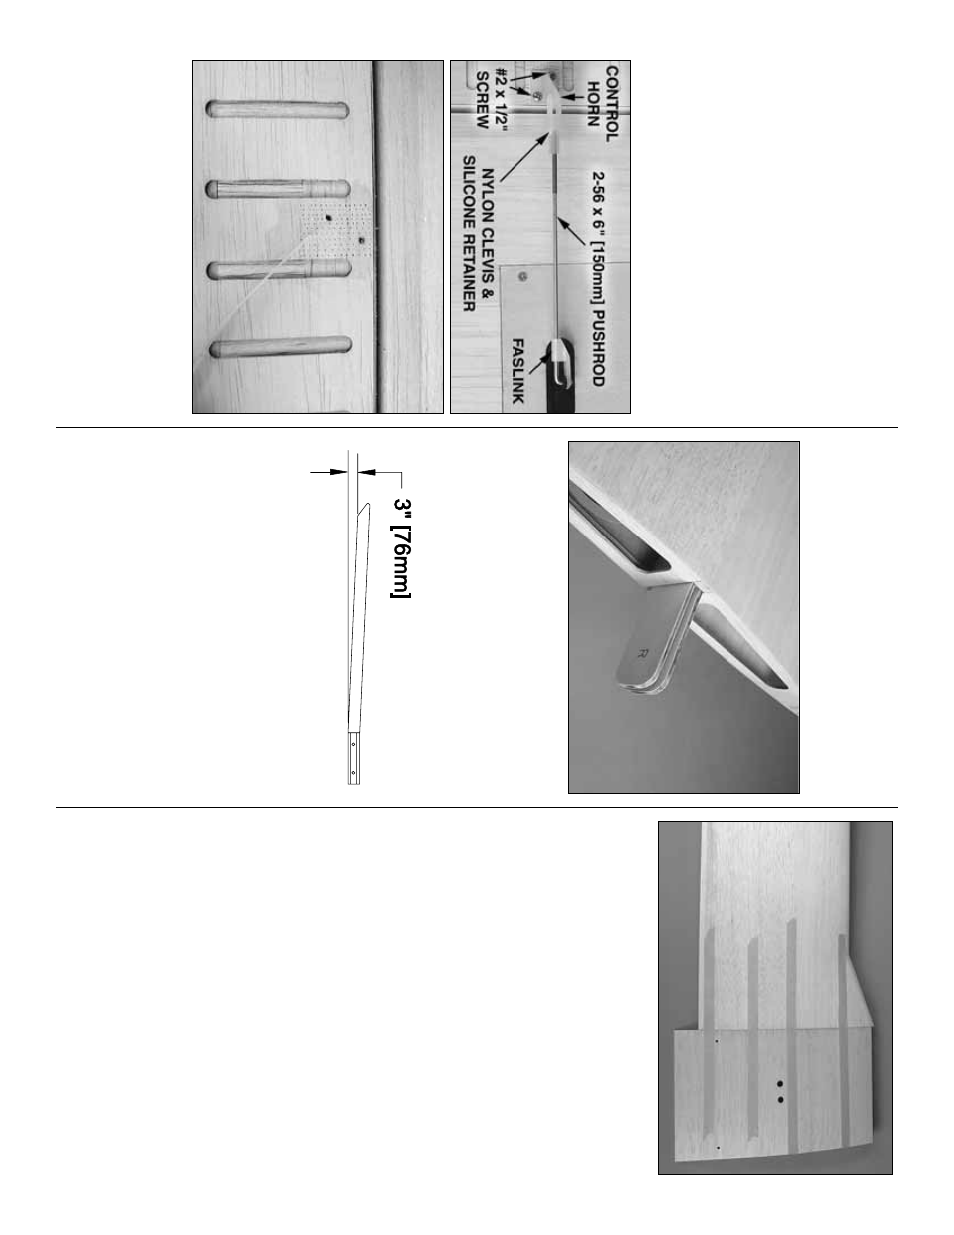
Connect the ailerons to the ser
vos using the
hardw
are sho
wn in the photo
.
D
rill 1/16" [1.6mm] holes
into the ailerons f
or the scre
ws that mount the hor
ns
.
P
o
ke
se
ve
ral pinholes into the ailerons and w
et the area
with a f
e
w drops of thin CA to harden the balsa.
JOIN THE
WINGS
❏
1.
Remo
v
e
the flaps and ailerons from both
wing panels
.
❏
2.
T
est fit the die-cut 1/8" [3.2mm] plyw
ood
wing
joiner
s
into each of the three wing panels
.Note that the
ends of the joiners mar
ked
“R”
are the ends that go into
the center panel.
Mak
e adjustments as necessar
y to
get the joiners to fit into the wing panels
, then test fit the
wing panels together with the joiners
.
❏
3.
Tightly tape the outer panels to the center
panel.
There should be no gaps
.
Chec
k the dihedr
al
b
y
la
ying the center panel flat and measur
ing the
distance betw
een the w
o
rkbench and the bottom of
the tips under the spar
.
The distance should be 3"
[76mm], b
ut a v
a
riance of plus or min
us 3/8" [10mm]
is acceptab
le
as long as both panels are the same
.
❏
4.
Prepare f
o
r gluing the panels together—this
should be done one panel at a time
.Gather all the items
necessar
y including 30-min
ute (or longer) epo
xy
,
mixing utensils
, w
ax paper
, masking tape
, paper to
w
e
l
squares and denatured alcohol f
o
r clean
up
.
❏
5.
Mak
e
sure an
y par
ts-fit prob
lems in joining the
wings ha
v
e
been resolv
ed—there w
on’t be time to
correct prob
lems once y
ou star
t gluing.
Mix a batch
of 30-min
ute epo
xy—1/2 oz.
[15cc] should be more
than enough to do the job
.
Apply epo
xy to the r
ib on
the end of the outer panel and to the inside of the
outer panel where the joiners go
.
Apply epo
xy to the
joiners and inser
t them into the outer panel.
Coat the
inside and outside of the outer panel the same w
a
y,
then slide the tw
o together
.W
ipe a
w
a
y
e
xcess epo
xy
as it ooz
es out.
Use plenty of masking tape on the
top and bottom of the wing to
tightl
y
hold the panels
together
.
Contin
ue to wipe a
w
a
y
e
xcess epo
xy as
y
ou mak
e sure the panels are accur
ately aligned.
Do
not disturb the wing until the epo
xy has fully
hardened.
Hint:
It will be m
uch easier to wipe e
xcess
epo
xy from the wing bef
ore it has hardened than it
will be to tr
y sanding if off after it has hardened.
❏
6.
After the epo
xy from the pre
vious step has
hardened remo
v
e the masking tape and join the
other panel to the assemb
ly
.
❏
7.
If y
ou ha
v
en’t y
et done so
, fill the corr
ugations
with lightw
eight balsa filler
, allo
w to dr
y,
then
lightly sand smooth.
Set the wing in a saf
e place while y
ou are w
o
rking on
the fuselage
.
- 33
-