Top Flite TOPA0706 User Manual
Page 23
23
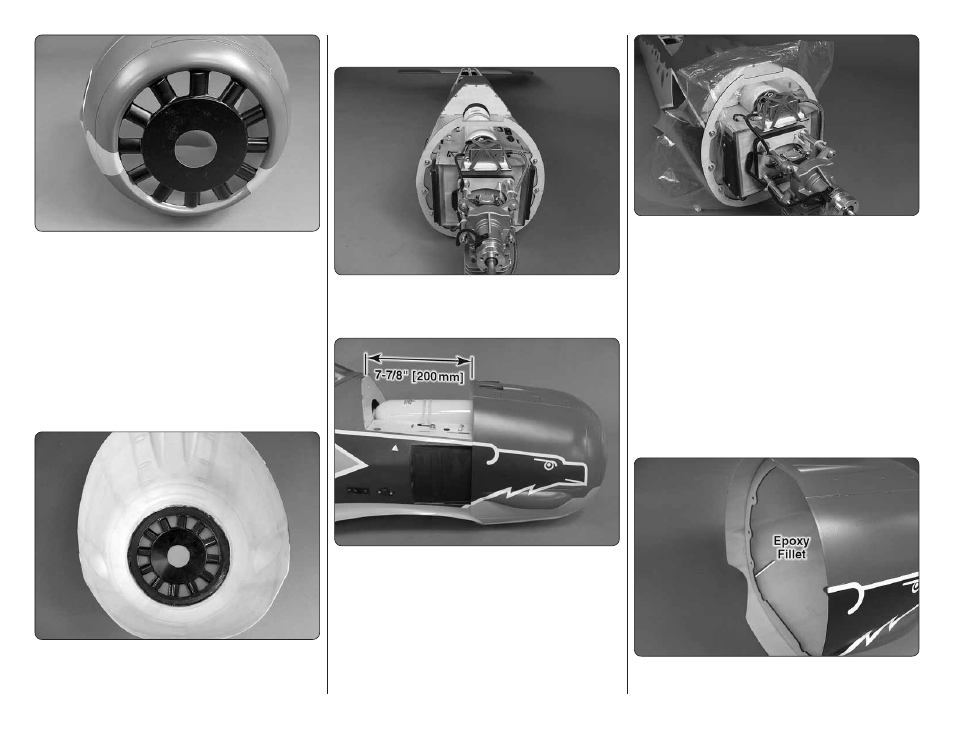
❏
3. Center the plastic fan in the cowl opening. Apply
a couple drops of thin CA to the joint between the fan
and the cowl to hold it in place.
❏
4. Lightly sand the inside of the cowl around the edge
of the plastic fan. Clean the area with a paper towel
dampened with denatured alcohol.
❏
5. Apply a bead of epoxy to the back of the outer
ring of the fan and the front and edge of the plywood
fan ring. Position the plywood ring on top of the plastic
fan. Place weight on the ring to hold it in position until
the epoxy cures.
❏
6. Use epoxy to make a fi llet between the cowl and
the edge of the plywood fan ring. For a stronger fi llet
milled fi berglass can be mixed with the epoxy.
See page 35 for instructions on how to make a
long 7/64" Hex-ball Wrench.
❏
7. Attach the plywood cowl ring to the front of the
fuselage with six 6-32 x 5/8" socket head cap screws,
#6 lock washers and #6 fl at washers.
❏
8. Test fi t the cowl over the engine. The bottom of the
cowl will need to be trimmed to fi t over the engine head.
For right now just get the cowl fan centered around the
engine drive washer and the cowl in the correct position
7-7/8" [200mm] from the back of the air tank tray.
❏
9. Remove the cowl and the cowl ring. Cut a hole in
the center of the plastic bag the cowl came in and slide
the plastic bag over the front of the fuselage so that it
covers the fi rewall. Reinstall the cowl ring. The bag is
to prevent glue from getting on the fuselage when the
cowl is glued to the cowl ring.
❏
10. Sand the inside of the cowl where the cowl ring
contacts the cowl. Then, clean it with a paper towel
dampened with denatured alcohol.
❏
11. Mix up 1/2 oz. [4 drams] of 30-minute epoxy. Apply
the epoxy to the inside of the cowl where it contacts the
cowl ring. Slide the cowl over the cowl ring, centering
it over the drive washer on the engine and aligning it
correctly on the fuselage. Use masking tape to hold it
in position until the epoxy cures.
❏
12. Remove the cowl using the included long hex
wrench. Use epoxy to make a fi llet between the cowl and