Ignition controller 7, Pilot 7 – Reznor HEEDU Parts Manuals User Manual
Page 7
Form P-EEDU, P/N 263547R1, Page 7
Step 4 - Attach
terminal to Ignition
Controller Model G60
or G67BG/NG-2
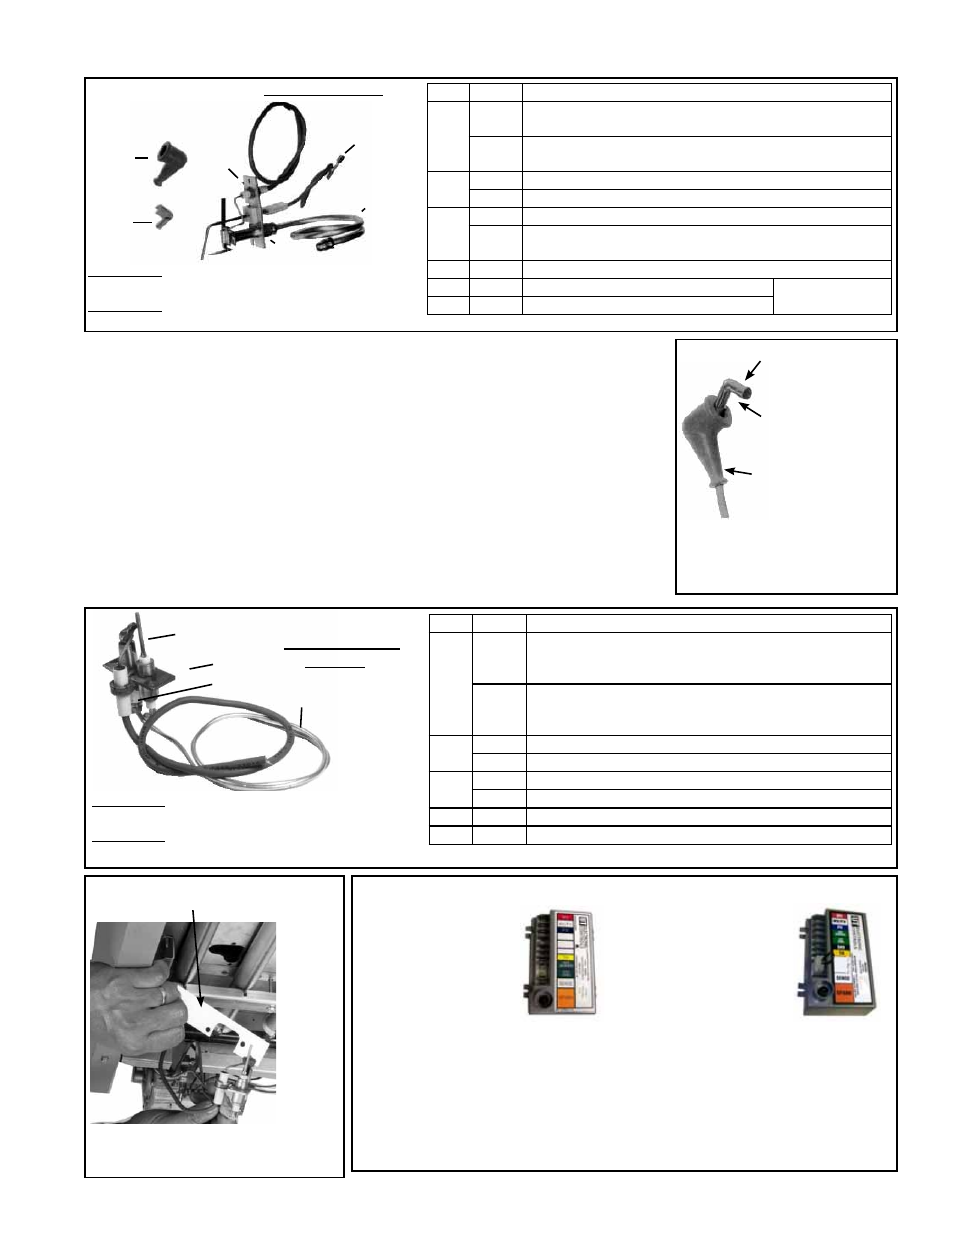
Steps 2 & 3 - Attach
90° Crimp-on Terminal
Step 1 - Slip Boot
over end of wire
Horizontal Spark Pilot - Prior to Series 6
P/N 110861 - Complete Replacement Pilot Kit for
Horizontal, Natural Gas, Spark Pilot
P/N 110862 - Complete Replacement Pilot Kit for
Horizontal, Propane, Spark Pilot
Instructions for connecting ignitor lead in replacement spark pilots above to Model G60
or G67BG/NG-2 Ignition Controllers (Not applicable to ignition controllers G67BG-5 or
G770NGC-4; Items 59 and 60 are not used when installing replacement pilot on heaters
with these controllers.):
1. Identify the ignitor wire attached to the pilot electrode. Slip the 90° protective boot on to
the wire as illustrated.
2. On the "open" leg of the 90° crimp-on terminal (P/N 112647), locate a flat, triangular spike
tab pre-punched in the metal. With the tip of a small, straight screwdriver, force the spike
tab toward the inside of the connector. Straighten the tab to a vertical position.
3. Insert the ignitor wire into that same connector leg (just to the 90° bend) and push the wire
on to the protruding spike tab, making sure that the tab penetrates the insulation. (Do not
strip the ignitor wire.) Using a crimping tool or pliers, squeeze the sides of the terminal to
form a "C" shape. The ignitor wire should now be firmly held by the terminal.
4. Slide the protective boot over the terminal. Holding the boot, attach the 90° Rajah terminal
to the ignitor lead Rajah connector on the Model G60 or G67BG/NG-2 ignition controller.
Ignition Controllers
P/N 97204, Pilot Hole
Cover Plate
Beginning with Series 6 Models, be
sure to re-attach the pilot hole cover
plate when installing a pilot.
P/N 110853 - Complete Replacement Pilot Kit for
Vertical, Natural Gas, Spark Pilot
P/N 110854 - Complete Replacement Pilot Kit for
Vertical, Propane, Spark Pilot
61
64
Vertical Spark Pilot
- Beginning with
Series 6
62
63
Protective boot and terminal
installed on the ignition
controller end of the ignitor
wire
Pilots and Ignition Controllers
55
57
56
58
59
60
Code P/N Component Description
55
61145 Pilot Assembly, Natural Gas, with orifice, less pilot tubing
and less flame sensor lead; Baso J992HXW7221
61146 Pilot Assembly, Propane Gas, with orifice, less pilot tubing
and less flame sensor lead; Baso #J992HXW4209
56
63088 Orifice only, Natural Gas (7221)
37801 Orifice only, Propane Gas (4209)
57
5145 Pilot Tubing, 22" long
9664 Nut with breakaway ferrule (2 required when replacing
pilot tubing)
58
50450 Flame Sensor Lead, 16"
59 112647 Crimp-on 90° Rajah terminal connector
May not be used;
see below.
60 112648 90° Boot Terminal Protector
Code P/N Component Description
61
97534
Pilot Assembly, Natural Gas, with orifice, less pilot
tubing and less flame sensor lead; Johnson #J982H-
KW-9731-715
97535
Pilot Assembly, Propane Gas, with orifice, less pilot
tubing and less flame sensor lead; Johnson #J982H-
KW-9733-410
62 103034 Orifice only, Natural Gas, Johnson #9731-715 (brass)
98695 Orifice only, Propane Gas, Johnson #9733-410 (black)
63
98698 Pilot Tubing, Johnson #B10499-995-11, 1/8" O.D.x18" lg
97572 Compression Fitting, #FTG75 (2 required)
64
98697 Flame Rod, Johnson #Y75AA-3
65
97575 Flame Sensor Lead, 21" (not illustrated)
Ignition Controller
for Intermittent
Spark Pilot without
Lockout, P/N 257009
(Serial No. Code 94)
Ignition Controller
for Intermittent Spark
Pilot with Lockout,
P/N 257010
(Serial No. Code 95)
To replace previously used recycling ignition controller without lockout
(Serial No. Code 62 or 66), order Replacement Kit,
P/N 257472, and
Bracket, P/N 258221.
To replace previously used recycling ignition controller with lockout (Serial
No. Code 63, 65, or 84) order Replacement Kit,
P/N 257473, and Bracket,
P/N 258221.
NOTE: To identify the ignition code in the serial number, see page 2.