KERN & SOHN TD 225-0.1US User Manual
Instruction manual td_us, Sauter gmbh

Sauter GmbH
Ziegelei 1
D-72336 Balingen
E-Mail: [email protected]
Tel: +49-[0]7433- 9933-199
Fax: +49-[0]7433-9933-149
Internet: www.kern-sohn.com
Instruction Manual
TD_US
TD_US-BA-e-1310
1
DIGITAL THICKNESS GAUGE
Model: TD 225-0.1 US
Table of contents
1. Features
2. Specifications
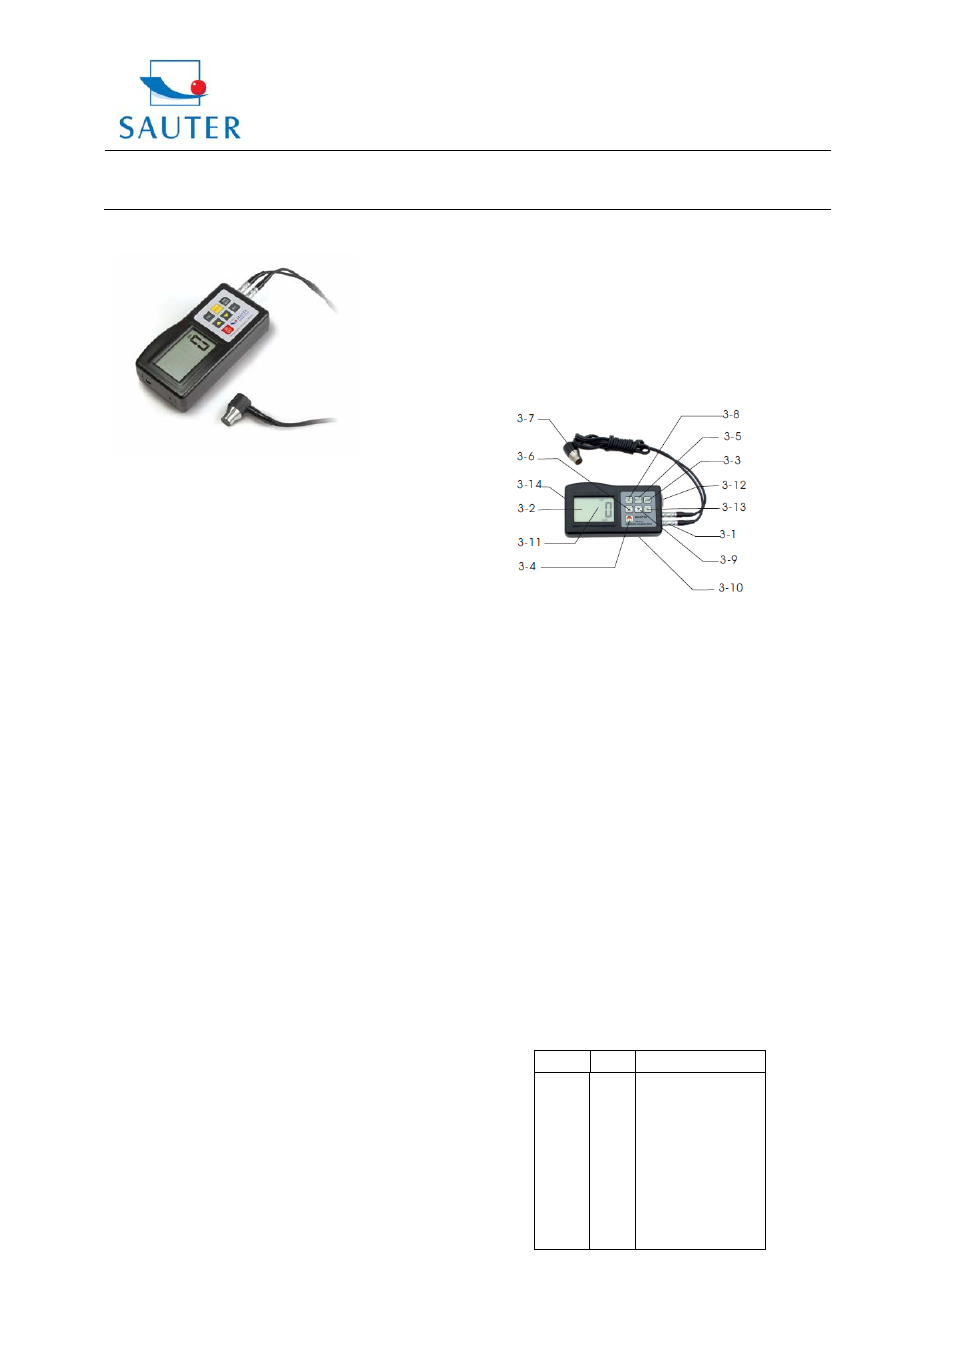
3. Front panel description
4. Material selection
5. Calibration
6. Measuring procedure
7. Measuring by velocity setting
8. Battery replacement
9. Declaration of conformity
Annotation: It is strongly recommended to calibrate
the new instrument before the first use, as
described in paragraph 5. By doing this it
will be achieved a much better measure-
ment result right from the start.
1. Features
* The exclusive Micro- computer LSI offers high
measurement accuracy.
* The instrument offers high power of emission and a
wide spectrum of receiving sensitivity.
Sensors of different frequencies can be identified.
Rough surfaces, even cast iron, can be measured.
It is used in almost all kinds of industries.
* Convenient to measure the thickness of many materials,
e.g. steel, cast iron, aluminium, red copper, brass, zinc,
quarz glass, Polyethylen, PVC, grey cast iron, nodular
cast iron.
* Automatic power-off to preserve batteries.
* Date transfer to PC possible. Cable and software can be
obtained as optional accessory.
2. Specifications
Display: 4 digits, 10mm LCD
Range: 1.0 to 200mm (45# steel)
Resolution: 0.1mm / 0.001 inch
Accuracy: ± (0.5%n+0.1)
Sound velocity: 500 to 9000m/s
Power supply: 4×1.5V AAA (UM-4) battery
Operating conditions: Temperature: 0 to 50°C
Humidity: <80%
Size: 120 x 62 x 30mm (4.7 x 2.4 x 1.2 inch)
Weight: about 164g (not including batteries)
Accessories: Carrying case
Operation manual
Ultrasonic sensor
3. Front panel description
3- 1 Sensor plug
3- 2 Display
3- 3 mm/ inch key
3- 4 Power- key
3- 5 Material selection key
3- 6 Plus- key
3- 7 Ultrasonic sensor
3- 8 Calibration key
3- 9 Minus- key
3-10 Battery compartment/ cover
3-11 Coupling indicator
3-12 Base plate
3-13 Velocity key
3-14 RS-232C interface
4. Material selection
4.1 The instrument has to be switched on by the
Power- key 3-4.
4.2 The Material selection key 3-5 has to be pressed and
the display 3-2 will show the code `cdxx` or `xxxx`.
`cd` is the abbreviation for `code` and `xx` is a
number among 0.1 and 11 that stands for the material
to be measured as shown in the scale below.
. `xxxx` is a 4-digit number describing
the sound velocity of the material defined by the user.
The `cdxx` material relationship is as follows:
Nr.
Code
Material
1
2
3
4
5
6
7
8
9
10
11
12
cd01
cd02
cd03
cd04
cd05
cd06
cd07
cd08
cd09
cd10
cd11
xxxx
Steel
Cast iron
Aluminium
Red copper
Brass
Zinc
Quarz glass
Polyethylen
PVC
Grey cast iron
Nodular cast iron
Sound velocity
