Front panel controls and indicators, Fr ont panel contr ols & indicators – Citation Stereo Receiver User Manual
Page 13
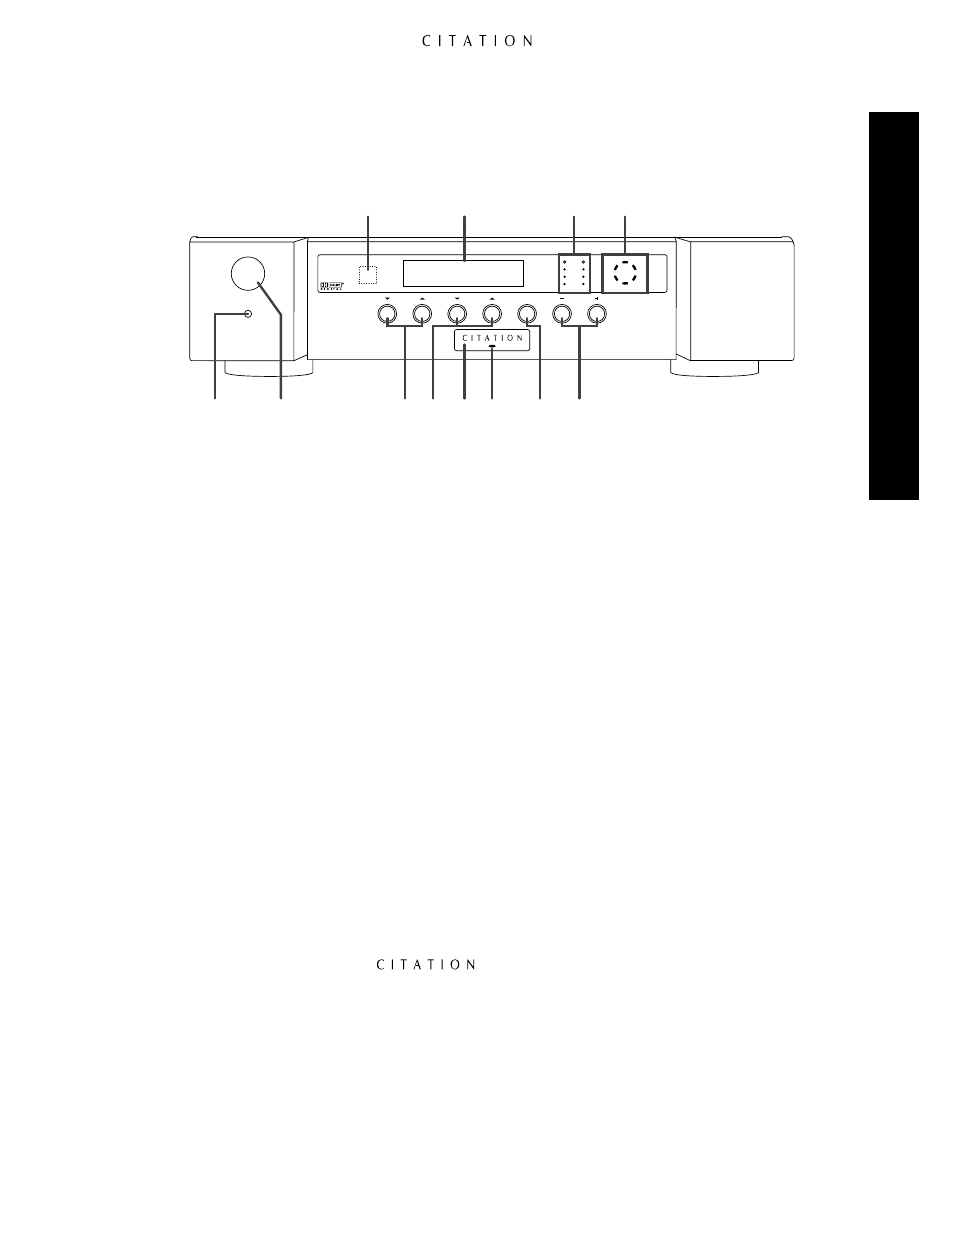
Front Panel Controls and Indicators
5.0 AV Controller
Watch
Listen
Mute
Volume
Standby
On / Off
CLIP
RIGHT
LEFT
+10dB
0dB
-10dB
FRONT
BACK
LEFT
RIGHT
Prog 8 : DVD
Dolby Digital Vol=35
@
!
)
9
1
2
3 4 5 6
7
8
13
Fr
ont Panel Contr
ols & Indicators
1
Master Power Button
2
Standby Button
3
Watch Selectors
4
Listen Selectors
5
Power Indicator
6
Standby LED
7
Mute Button
8
Volume Control
9
Steering Logic Display
)
Level Indicators
!
Information Display
@
Remote Sensor
1
Master Power Button:
This button is the main power control for the 5.0. Press it in until the tip
of the button is flush with the front panel to turn the unit on. For normal use, this button should
remain in the ON position, with the Standby button or remote control used for turn on/off in nor-
mal use. To turn the unit fully off, press the button in so that the stem pops out to the extended
position. When the button is in the OFF position, the 5.0 will not respond to commands from the
remote control or external control systems.
2
Standby Button:
Press this button lightly to turn the 5.0 on or off. Note that in order for this
button to operate the 5.0, the
Master Power
button
1
must be in the ON position, as indicated
by the appearance of the green
Standby LED
6
.
3
Watch Selectors:
Press these buttons to select an input from the Watch List. The first press of
either Watch button will display the last input program selected from the list, and subsequent presses
of the button will scroll up or down through the list of choices. When the desired input program is
displayed, it will take effect after a brief pause. For information on programming the Watch List, see
page 43.
4
Listen Selectors:
Press these buttons to select an input from the Listen List. The first press of
either Listen button will display the last input program selected from the list, and subsequent presses
of the button will scroll up or down through the list of choices. When the desired input program is
displayed, it will take effect after a brief pause. For information on programming the Listen List, see
page 43.
5
Power Indicator:
The word
illuminates in blue when the 5.0 is ON and in full
operation. When this indicator is not lit, but the
Standby LED
6
below is green, the unit is in the
Standby mode. When both indicators are dark, the
Master Power
button
1
is in the OFF position,
or the unit is not connected to a live AC power source.
6
Standby LED:
When this indicator glows green, the 5.0 is in the Standby mode, and it is ready to
be turned ON or OFF when either the
Standby
2 å
, or the
Watch
3 ç
or
Listen
4 ƒ
buttons
are pressed. When the Standby LED is out, but the
Power Indicator
5
is illuminated in blue, the
unit is ON. When both of these indicators are dark, the 5.0 has either been turned off with the
Master Power
button
1
or is not plugged into a live AC power source.