Quick reference information – Juniper Systems Archer Quick Start User Manual
Page 2
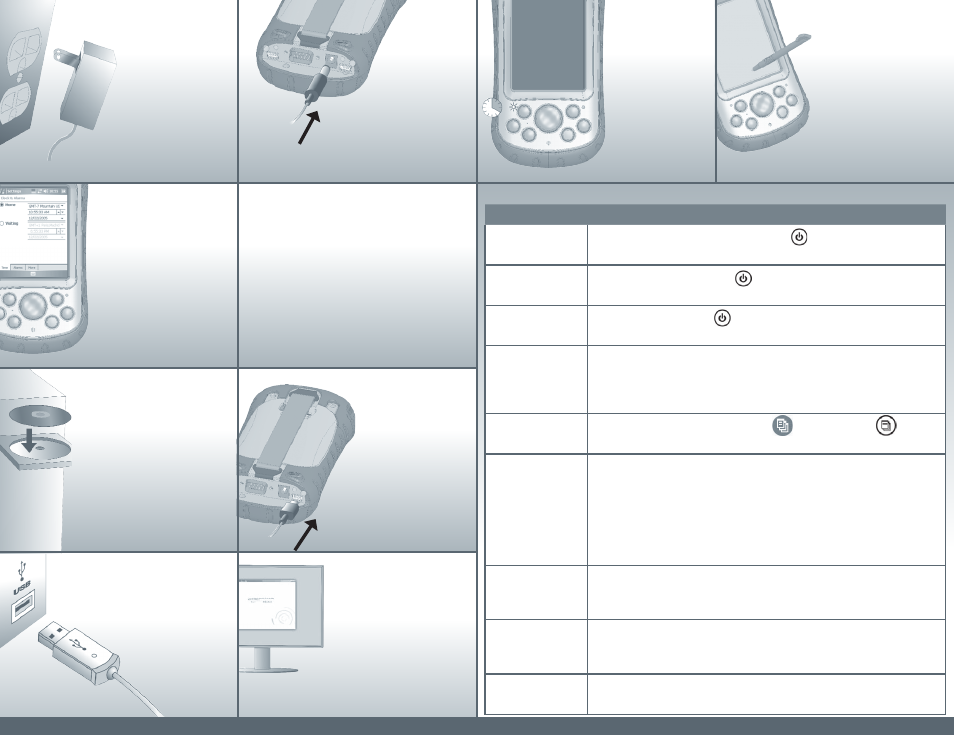
Step Four: Create
a connection
with a desktop
computer
Microsoft
®
Windows
®
2000 or XP
®
users: Follow
Step 4 to install ActiveSync
®
, a program that lets
you install applications onto your Field PC.
Microsoft Windows Vista
®
users: You have
basic file sync capability with your desktop
computer without installing any additional
software. To use these basic sync options,
connect the Field PC and desktop PC with a
USB cable. For full sync support, download and
install Microsoft Windows Mobile Device Center
®
.
2c.
A flashing red light
signals the device is
charging. Charge six
hours for full charge.
Note: If the Field PC
suspends and the
flashing red LED
turns off, the device
keeps charging.
3a.
Using the stylus, follow the
instructions on the display
to calibrate the device and establish
basic settings. Note: To best protect the
touchcreen, first apply a screen protector.
4a.
Run the Getting Started Disc on your
desktop computer and follow the screen
directions for installing the latest version
of ActiveSync
®
. Do this before attaching
the USB cable to the desktop or Field PC.
4b.
Plug the USB Client end
(mini B) into your Field
PC when the ActiveSync
instructions direct you to.
4c.
Plug the USB host
end (full size A)
into your desktop
computer.
Step Two:
Charge the
battery pack
2b.
Plug the other end
of the wall charger
into the DC jack on
the Field PC. Note:
The device turns on
after a few seconds.
Step Three:
Establish
settings
4d.
Establish a partnership by
following the instructions on
the desktop computer screen.
3b.
Create a device name for
synchronization by tapping
Start > Settings > About >
Device ID tab.
Your Field PC is now field
ready. Important: Read
the license agreement
before using the Field PC.
Action
Steps
Suspend and resume
the Field PC
To suspend the device, press the power button briefly and release.
Note: To wake the device from suspend, press the power button again.
Reset or turn off the
device
1. Hold down the power button for about 4 seconds. A menu appears.
2. Tap Reset or Power Off, then tap OK or Cancel if you are powering off.
Manually reset the
device
Hold down the power button for 10 seconds or until the screen goes dark.
The Field PC resets after a few seconds.
Turn off the backlight
1. Tap Start > Settings > System > Brightness.
2. In the Brightness window that appears, tap the Battery Power tab.
3. Drag the Backlight slider all the way to the left (Dim). If the light does not turn
off, tap the Dim arrow once.
Manage open
applications
1. Tap on the Applications Manager icon or press the button .
2. Select a program and choose Activate (switch programs), Stop, or Stop All.
Insert or remove CF
or SD cards
1. Suspend the device.
2. Remove the stylus from its slot.
3. Unscrew the top cap screws with a screwdriver until you can remove the top
cap from the device. Do not try to remove the screws from the top cap.
CAUTION: When the top cap is removed, the device is not sealed.
4. Insert or remove the card.
5. Replace the top cap and tighten the screws. (See the user manual for torque specs.)
Replace the battery
pack
1. Suspend the device.
2. Follow Steps 1A through 1G of this quick start guide, removing the battery
pack after Step 1C.
Use on-device help
1. Tap Start > Help. (For application-specific help, open the application first.)
2. Select an option from the Help menu or tap on the Contents or Search keys at
the bottom of the screen.
Access the user
documentation
Open the User Documentation CD, which contains the reference guide, the license
agreement, and a copy of this guide.
Quick Reference Information
2a.
Mount the plug onto
the wall charger (if it is
not already assembled)
and plug the wall
charger into an outlet.