Troubleshooting guide – Philips FW391C User Manual
Page 20
Attention! The text in this document has been recognized automatically. To view the original document, you can use the "Original mode".
Troubleshooting Guide
m
3
w’
Warning! Under no circumstances should you try to repair the set yourself, as this will invalidate the warranty.
if a fault occurs, check the points listed below before taking the set in for repair.
Should any problems persist after you have made these checks, consult your nearest dealer or service center.
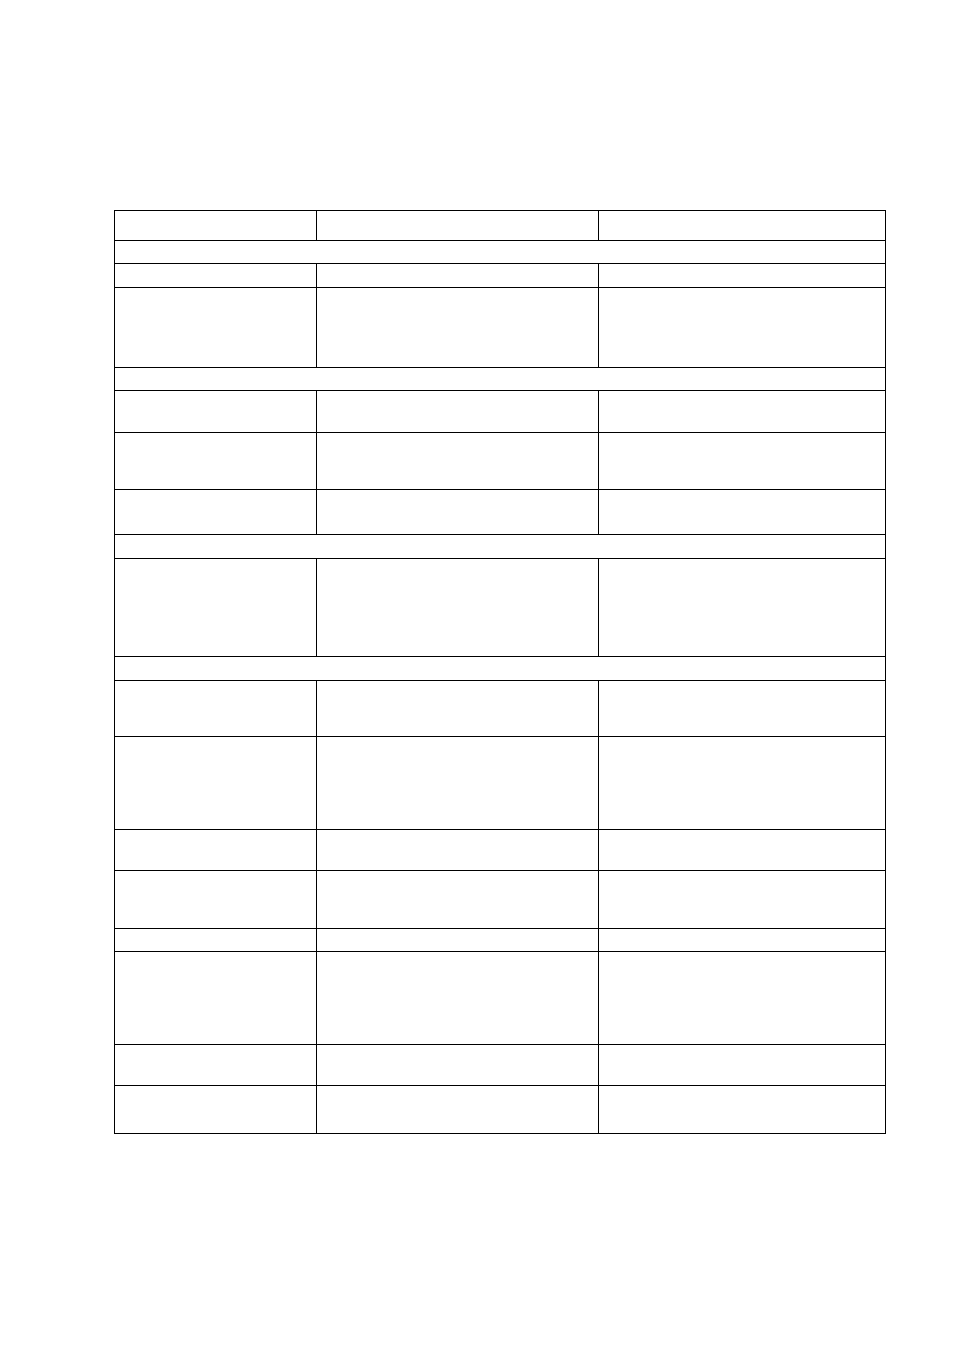
Symptom
Cause
Remedy
Radio Reception
The STEREO indicator flashes.
The signal is too weak.
Adjust the antenna.
Severe hum or noise
The signal is too weak.
The TV or VCR is too close to the stereo system.
Adjust the antenna.
Separate the stereo system from the TV or VCR.
Connect an external antenna for better
reception.
Cassette Deck Operation
Recording is not possible.
No cassette in the cassette deck.
The small tab has been broken.
Insert a blank cassette into the cassette deck.
Put a piece of clear adhesive tape over the opening.
Recording or playback cannot be
made or there is a decrease in
audio level.
Dirty tape heads.
Magnetic build-up in the record/playback head
See section on cassette deck maintenance.
Use a demagnetizing cassette.
Excessive wow or flutter, or sound
drop-out.
Contamination of the capstans or pressure
rollers.
See section on cassette deck maintenance.
CD Player Operation
“NO IJI5C“ is displayed.
The disc is inserted upside down.
Moisture condensation.
There is no disc in the selected CD tray.
The CD is dirty, badly scratched or warped.
Place CD with printed side up.
Wait until lens has adjusted to normal room
temperature.
Inserta CD.
Replace or clean the CD.
General
Set not working.
Set does not react when buttons are pressed.
Press POWER ON to switch the unit off, then
switch it on again. Or, unplug the AC power plug
from the wall outlet, then plug it in again.
No or poor sound.
Volume is not turned up.
The headphones are connected.
Speakers are not connected or are connected
wrong.
Turn VOLUME clockwise.
Disconnect the headphones.
Check that the speakers are connected correctly.
Make sure that the stripped speaker wire is
clamped.
Reversed left and right sound.
Speakers are connected wrong.
Check the speaker connections and
speaker location.
Lack of bass sound (or apparently
imprecise location of musical
instruments sound).
Speakers are connected wrong.
Check the speaker connection for proper phasing,
red/black wires to red/black terminals.
Clock blinking.
There was a power outage.
Reset the clock.
Remote control has no effect on
the set.
The distance to the system is too large.
Batteries are inserted incorrectly.
Batteries are dead.
Wrong sound source is selected.
Reduce the distance.
Insert the batteries correctly.
Replace the batteries.
Select the sound source before pressing the
function button, (PLAY, PREV/NEXT, etc.)
Timer networking
Timer not on.
Dubbing/recording is active.
Press TIMER 0N»0FF on the set to switch
on the timer.
"PRE55 VEfia TO E;;ir
is displayed.
Demo mode is switched on.
Press POWER ON or DEMO to switch off demo
mode.
18