Interlogix NX-592E User Manual
Page 8
8
NX-592E NetworX Cellular Module Installation Sheet
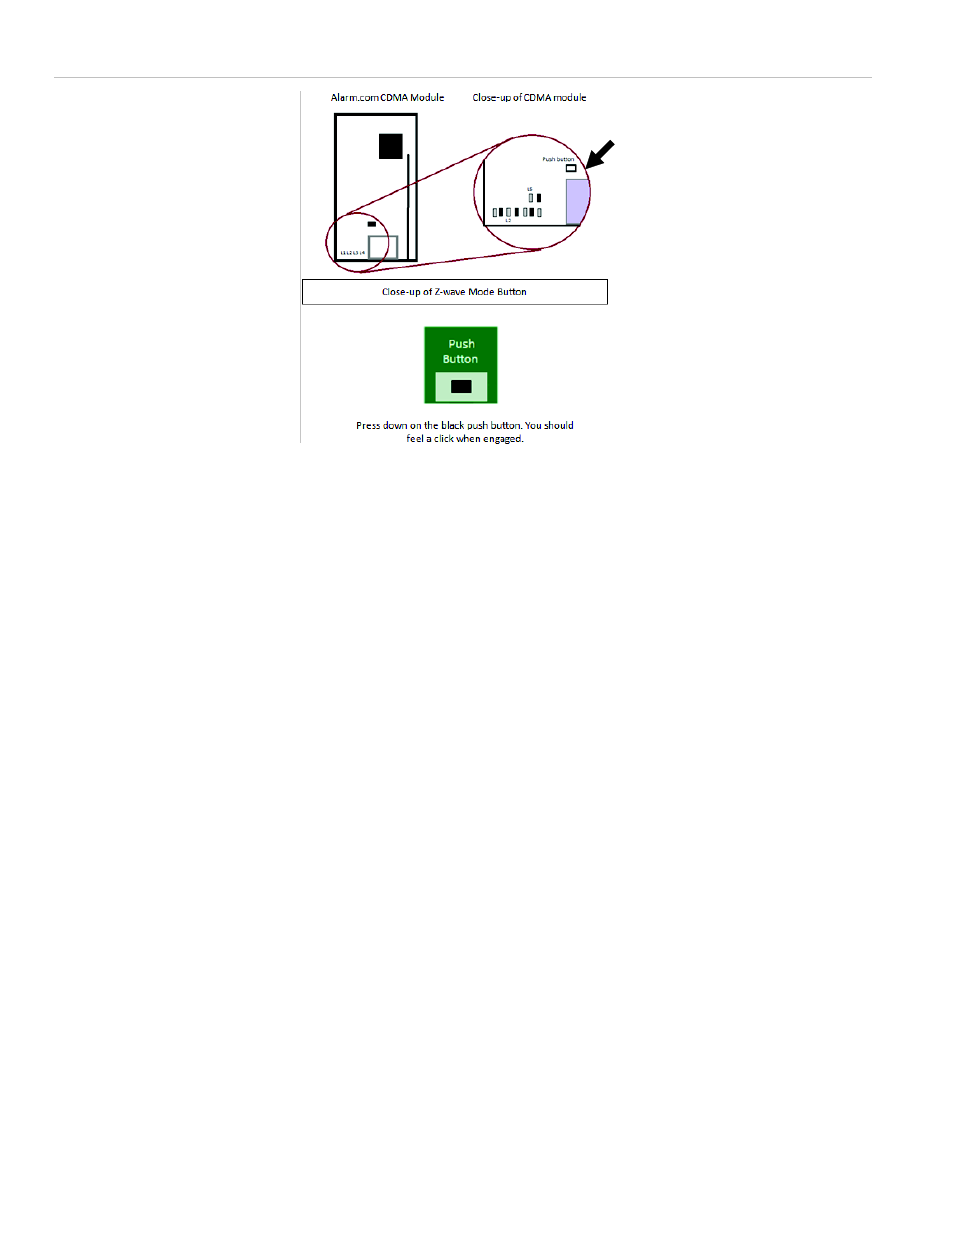
Figure 6: Z-Wave module overview
Adding z-Wave devices
Make sure the NetworX panel is connected to AC power when
enrolling Z-Wave devices.
When adding devices, first add the devices closest to the
Alarm.com system, and then move outwards.
Devices must be within 6 ft of the Alarm.com module when
adding it to the network. Install each of the Z-Wave peripherals
in their
desired locations, following the manufacturer’s
instructions. Then follow the instructions to add (include) each
device into the Alarm.com module’s network. If a device will
not be within 6 ft. of the Alarm.com module in its permanent
installation location, include it in the network before installation
or use a controller (controllers are not available for locks, see
below).
If installing a portable Z-Wave controller, first add the controller
to the Alarm.com Z-Wave network using the NetworX panel,
and then use the portable controller to add the remaining
devices to the network while the devices are in their permanent
locations. (Locks cannot be added to the controller, and will
need to be added by the Alarm.com module.) Devices must be
within 6 ft. of the controller if a controller is being used to learn
in devices.
Add a Z-Wave dev
ice to the Alarm.com module’s network
(Device Inclusion)
1. Put the Alarm.com module into Z-Wave Add mode.
On the Alarm.com module, press and hold down the Z-
Wave Mode button for a few seconds, until the LED L2
begins flashing a 4-blink pattern to indicate Z-Wave Add
mode. (See Figure 6 on page 8) for illustration of how to
press the button.)
Alternatively, use a portable Z-Wave controller to add
devices to the network. (See the section on Controllers for
details).
2. Press buttons on the Z-Wave device to add.
Once the module (or controller) is in Z-Wave Add mode,
press the appropriate buttons on the Z-Wave device to
add it to the network. See Device-specific instructions (or
the instructions that came with the device) for more
information.
3. Confirm the Z-Wave device is added successfully.
Once the device has been added successfully, the panel
will beep, and the yellow LED L2 will become solid and
stay solid for 1 minute (allow up to 5 seconds for
confirmation once the device has been triggered).
To add another device, repeat the steps above. (You do not
need to wait for the solid light to go away before holding down
the Alarm.com Z-Wave button to enter Add mode again.
See Table 6 on page 5 or
“Z-Wave Troubleshooting” on page
12 for more information on interpreting the Z-Wave LEDs on
the module.
Checking the Devices list with Alarm.com
Once you’ve added the devices, the customer website will
automatically update the Devices list (under the emPower tab)
within about 2 minutes of the last device being added. (To
manually trigger the update sooner, you can perform a cellular
phone test at the panel.) You can also view the Z-Wave
devices through the Alarm.com Dealer website by pulling up
the customer account and clicking on the emPower Devices
link in the left-hand navigation.
Testing device communication with Alarm.com
Once the Z-Wave devices have been installed in their
permanent locations and are displayed in the device list on
Alarm.com, we recommend sending a remote command to
each device (e.g., turn on a light; adjust the target temperature
at a thermostat) to verify that it is successfully communicating
with the Alarm.com module.