Install the engine & fuel tank – Great Planes Yak-54 1.60 ARF - GPMA1411 User Manual
Page 19
If you are installing a brand of glow engine other than the O.S.
1.60 FX, read through the installation instructions for the O.S.
1.60 FX. The procedure should be similar. The most important
thing is to be sure to follow the spacing dimensions from the
engine drive washer back to the firewall.
If you are installing the Fuji-Imvac BT-43 EI or other gasoline
engine, skip ahead to the instructions for mounting that
engine. If you will be using another brand of gasoline engine,
read through the installation instructions for the Fuji-Imvac
BT-43 EI. You should find the mounting instructions for the
Fuji-Imvac BT-43 EI helpful in determining the best way to
mount your particular brand of gasoline engine.
❏
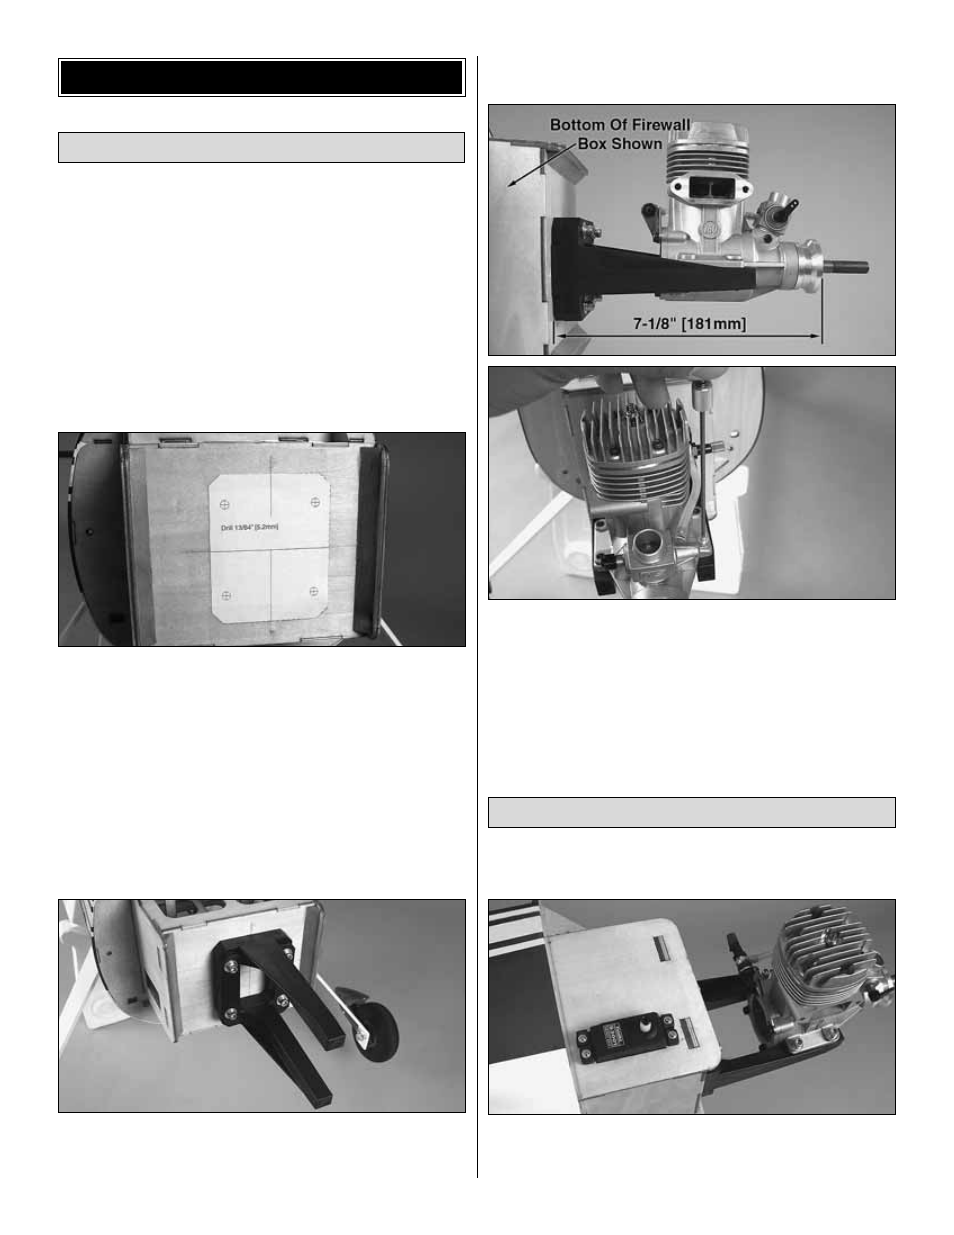
1. Cut the template out of the back cover page of this
manual for mounting the O.S. 1.60 FX. Use tape or spray
adhesive to hold the glow engine mount template to the
firewall. Align the vertical and horizontal lines on the
template with the embossed lines on the firewall.
❏
2. Use a large T-pin or a wire sharpened on the end to transfer
each bolt hole center mark on the template into the firewall.
❏
3. Drill 13/64" [5.2 mm] holes at the marks. Apply a few
dabs of epoxy to the front of four 8-32 blind nuts. Use an
8-32 x 1-1/4" [32 mm] bolt with a few #8 washers to draw the
blind nuts into the back of the firewall.
❏
4. Attach the engine mount to the firewall as shown
using four 8-32 x 1-1/4" [32 mm] SHCS, four #8 flat washers
and four #8 lock washers. When installing the mount, be
sure that you have the mount positioned allowing the engine
to be mounted on its side.
❏
5. Place the engine in the mount. The distance from the
firewall to the front of the drive washer is 7-1/8" [181 mm].
Use a Great Planes Engine Hole Locator or a small drill bit
to mark the engine mounting holes into the engine mounts.
❏
6. Take the engine off the mount. Then drill 9/64" [3.6 mm]
holes at the marks. Use an 8-32 tap to cut threads into the holes.
❏
7. Mount the engine to the mount with four 8-32 x 1"
[25 mm] SHCS, four #8 flat washers and four #8 lock washers.
❏
1. Connect the throttle servo to a 12" [305 mm] servo
extension. Secure the connection using heat-shrink tubing.
❏
2. Attach the throttle servo to the firewall box as shown
using the hardware included with the servo. Harden the
mounting holes with thin CA glue.
Install the Throttle Servo (Glow Engine)
Glow Engine Installation
INSTALL THE ENGINE & FUEL TANK
19