Great Planes PT-40 Kit (original) User Manual
Page 37
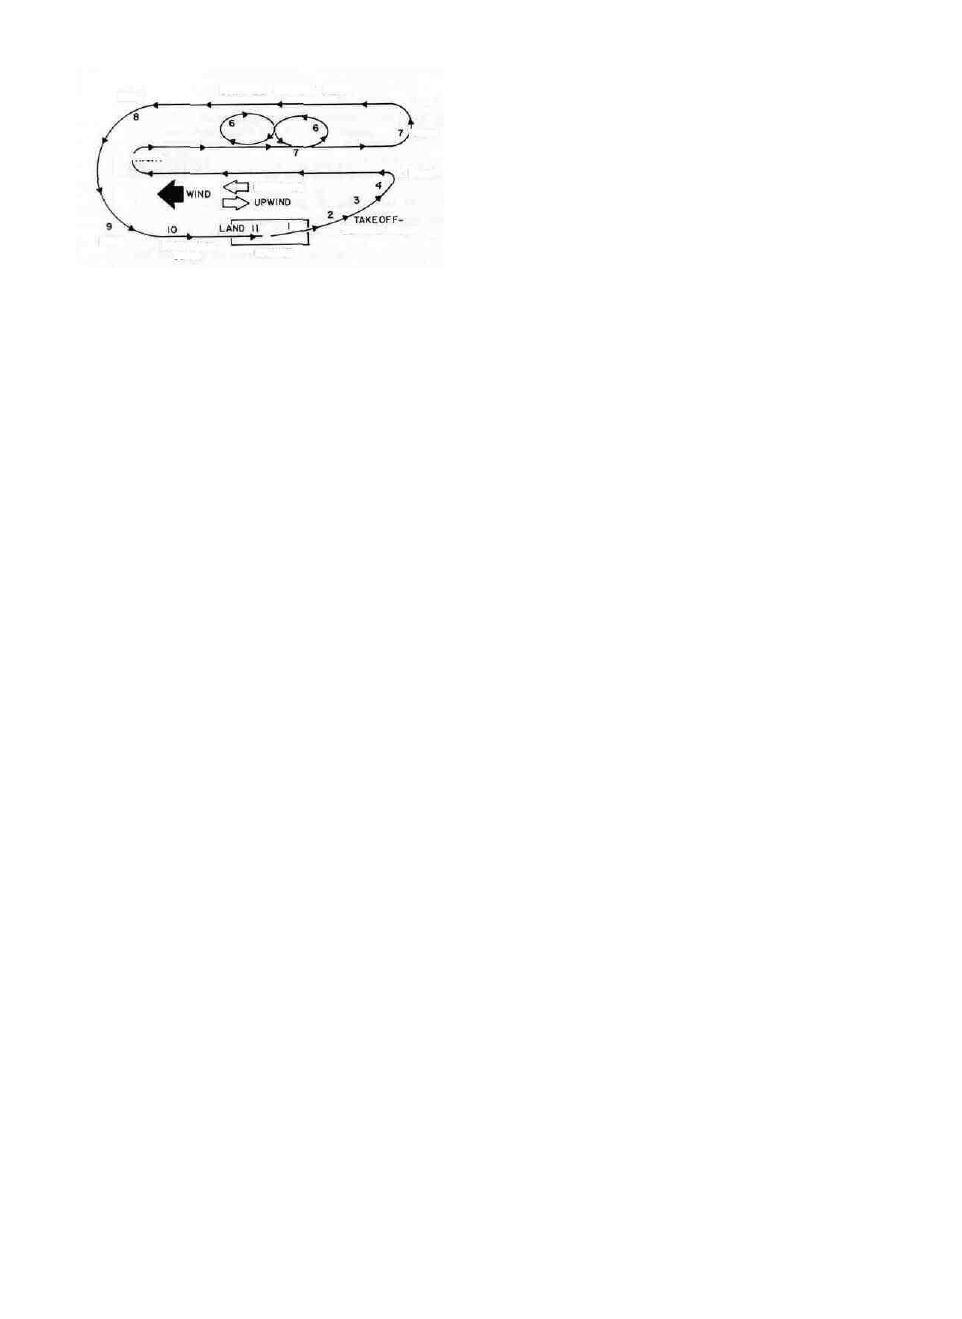
DOWNWIND
1 Head the model into the wind Release the model
and slowly advance the engine to full throttle
2 Make gentle right or left stick movements to correct
the take off run and make the model run straight
down the runway
3 As the speed builds up, give a slight amount of
"up elevator", pulling back on the elevator stick, and
the plane will fly itself off the ground Don't give too
much up elevator You don't want the nose to rise so
the model climbs too steeply
4 Reduce the throttle slightly to give a nice gentle
rate of climb Keep the wings level with right and
left rudder with Wing A or right and left ailerons
with Wing B Fly the plane to about 100 to 150 feet
Don't fly it so far away that you can't see it
5 Make a wide, gentle turn to the left by giving left
rudder or left aileron stick Keep turning until the
model is heading downwind, which is back toward
you Level the wings by centering the stick You may
have to give a little opposite stick to level it out
6 After the model passes you, start a very gentle left
turn Level it out and now do 2 or 3 figure eights,
which are a series of right and left turns
7 After the last figure eight left turn, keep the plane
flying upwind for a ways and then prepare for your
landing Make a gentle left turn and fly downwind
past where you are as far as you flew upwind
8 Make a gentle left turn and fly upwind and start
to judge where you want to land
9 Line the plane up with the runway Don't worry
too much if you don't land on the runway the first
time Just getting the plane down in one piece is
your primary goal
10 When you are sure you can reach the runway, cut
the throttle slowly to give the plane a gentle down-
ward glide, not too steep Keep the wings level Don't
bring the nose up too much as the plane may stall
(the wings will lose their lift and the plane will tend
to drop and go out of control)
11 If you are going to land short of the runway, give
a little power to bring it in If you are overshooting
the runway and the plane is low enough and you
have room in the grass, land it If you are too high,
give it throttle, a little up elevator, get back into the
pattern and come around again for another try
After the model is on the ground after that first
flight, you can stand back and say "I did it'" even
though the pattern you flew may not have been per-
fect and the plane didn't do what you wanted it to
do Hopefully, you got the model down in one piece
Turn off the transmitter and then the receiver Check
out the model Is the prop still ok All the screws
tight Any dings in the covering Always check the
plane after each flight Fix any problems on the
ground They sure won't get fixed in the air
Make the model airworthy again, fuel it up and
take her up again Try flying the pattern again and
again until you feel comfortable Then try flying a
pattern you make up.
Remember, practice and practice You will have
a few setbacks, we all do when learning Just don't
give up and have fun while you leam Radio Control
model airplane flying is one of the most rewarding
hobbies around It just takes a little work and practice
to get there
CHANGING FROM 3 TO 4 CHANNEL
VERSION
If you have constructed Wing A and set up your
PT40 for 3-channel operation, it will serve you well
during the initial training phase of learning to fly
R/C After you have become proficient at soloing your
3 channel PT40 (which may require 50 to several
hundred flights), you will then be ready to fly a more
maneuverable airplane with 4 channels of control
(including ailerons)
Assuming your PT40 is still in good condition,
you may wish to convert it to a 4-channel version
The best way to do so is to purchase a new PT40
wing kit and build it up following the wing B instruc-
tions
Or: You may carefully cut the tapered trailing
edge off your wing and use it along with the aileron
torque rod hardware to make ailerons for your wing,
following the wing B instructions Note that this will
produce a wing that has ailerons and the full dihedral
of Wing A We think you will find the results to be
satisfactory
Or: You may cut the wing in half down the
center joint, cut away the covering in the center rib
bays, re- join the wing halves at the Wing B dihedral
angle, gluing in the plywood dihedral braces
found in the die-cut "B" sheet, cut off the tapered
trailing edge and use it along with the aileron torque
rod hardware to make ailerons for your wing follow-
ing the Wing B instructions Then re-cover the center
of the wing Although this method produces a true
"Wing B", it is the most difficult, so we urge you to
seek the help of an experienced modeler.
KEEP MODEL AVIATION A SAFE SPORT!
GOOD LUCK AND GREAT FLYING!
37
SAMPLE FLIGHT PLAN
LEFT
/RIGHT
TAKEOFF-GENTLE
CLIMB
LEFT
DOWNWARD
GLIDE
5 LEFT
'LEFT
RUNWAY