Join the control surfaces painting, Install the stab and fin – Great Planes RV-4 40 Kit - GPMA0180 User Manual
Page 45
CONTROL SURFACES AND DETAILS
❏
1. Ends, bottoms, then tops of elevators, ailerons and flaps.
❏
2. One, then the other side of the rudder.
Once you have the stab, fin and fuselage covered you can
permanently install the stab and fin to the fuselage.
❏
1. Mount the wing to the fuselage. Then, insert the stab
into the slots in the fuselage. Measure the distance from the
tip of the stab to the tip of the wing on the right side of the
fuselage. Measure the same point on the left side of the
fuselage. Adjust the stab until both sides measure the same.
❏
2. If you covered the center section of the stab, mark the
outline of the fuselage on the stab with a felt tip marker.
Then, cut away the covering in the center section so that
you can achieve a good glue joint between the balsa stab
center section and the stab base on the fuselage. When
cutting the covering away be careful not to cut the balsa
wood. Cutting the balsa wood can weaken the structure!
❏
3. Glue the stab to the fuselage with 6-minute epoxy,
checking the distance from the stab to the wing before the
glue cures.
❏
4. After the glue has cured on the stab, insert the fin into
the slots in the fuselage. Mark the outline of the fuselage onto
both sides of the fin. Remove the fin and cut the covering,
being careful not to cut into the balsa wood structure.
❏
5. Be sure the fin is 90 degrees to the stab. Then, glue the
fin to the fuselage with 6-minute epoxy.
At this stage all of your plastic pieces should have the
seams filled with Bondo or putty. If you haven't already done
so, wet sand the plastic parts with 400-grit wet-or-dry
sandpaper so the paint will adhere. Spray the cowling and
wheel pants with at least one coat of Top Flite LustreKote
®
primer. Wet sand the the plastic parts between coats with
400-grit sandpaper. Use Great Planes 1/8" [3mm] EZ-Mask
Flexible Masking Tape (GPMR1000) for masking sharp
lines. A Top Flite Tack Cloth (TOPR2185) is useful to remove
dust before you paint. LustreKote paint gives a matching
finish to your MonoKote finish.
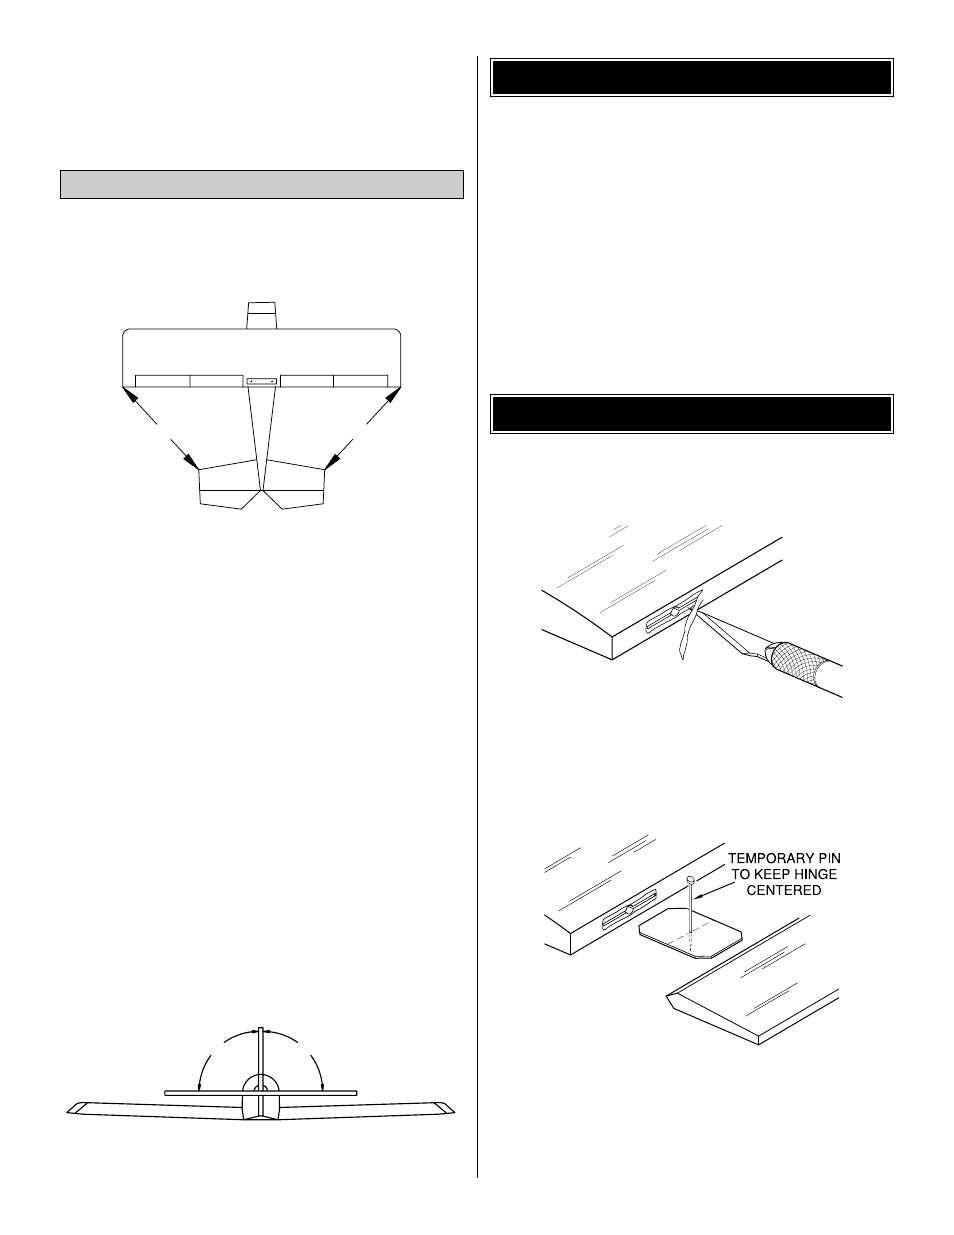
After the control surfaces are covered, you can permanently
install the hinges into the control surfaces.
❏
1. Start with the stab and elevators. Remove a small strip
of covering from the hinge slot.
❏
2. Fit the hinges in the stab and elevator (without glue).
❏
3. Join the elevators to the stab with the hinges. If the
hinges do not remain centered as you join the elevators to
the stab, remove the stab and insert a pin in the center of
the hinge to keep them centered. Make sure there is
approximately a 1/64" [.4mm] gap between the elevators
and the stab so you do not glue them together.
AWAY FROM THE SLOT
CUT THE COVERING
JOIN THE CONTROL SURFACES
PAINTING
90˚
90˚
B = B
B
B
Install the Stab and Fin
45