Great Planes RV-4 40 Kit - GPMA0180 User Manual
Page 12
❏ ❏
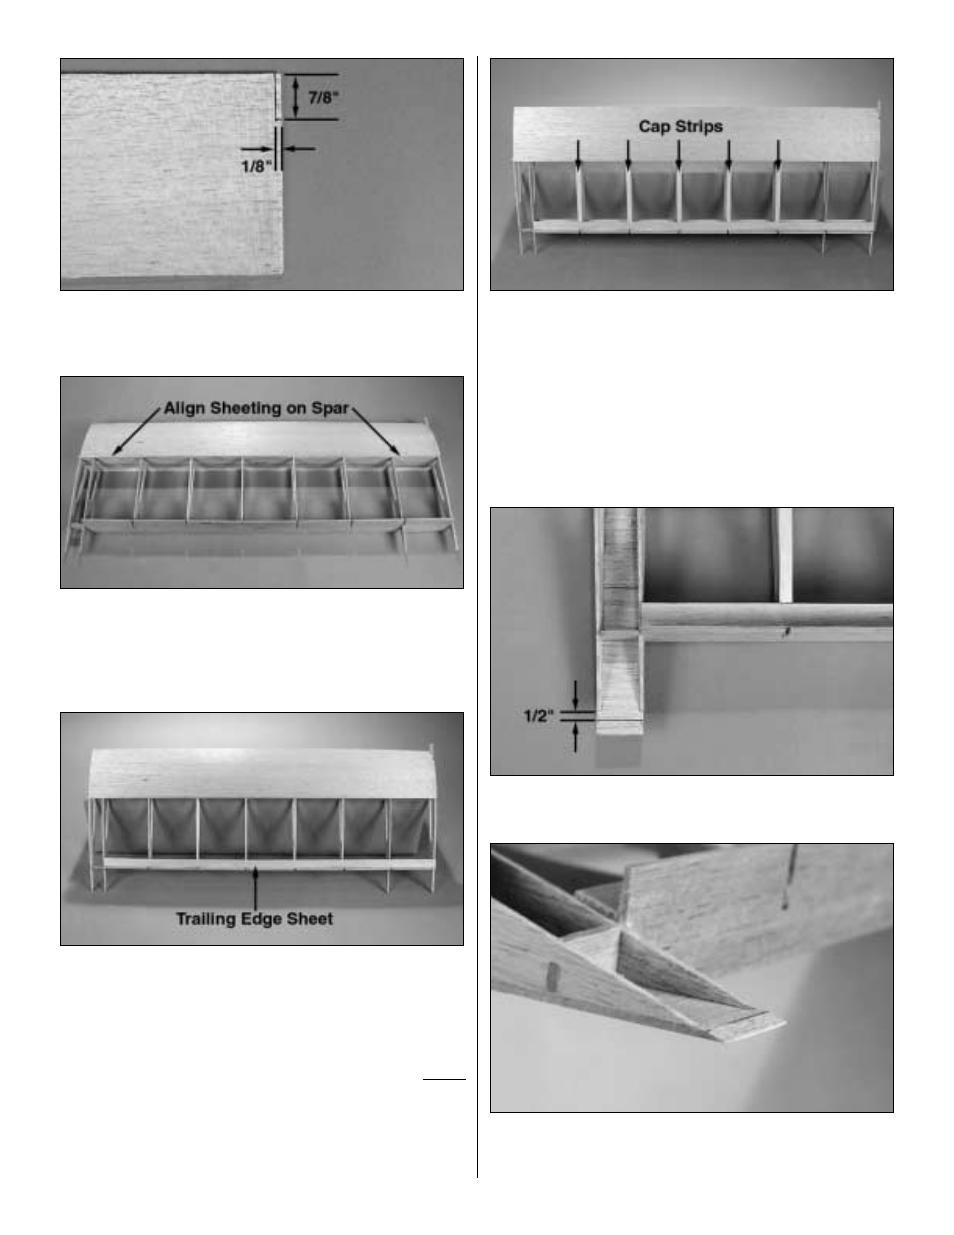
13. Locate a 3/32" x 4" x 30" [2.4 x 102 x 762mm] balsa
sheet. Cut a notch on the end of the sheet 7/8" [22.2mm]
from the L.E. and 1/8" wide.
❏ ❏
14. Glue the 3/32" x 4" x 30" [2.4 x 102 x 762mm] balsa
sheet in place on the top of the wing. Align the sheet with
the trailing edge and on top of the wing spar when gluing it
to the wing.
❏ ❏
15. Glue the 3/32" x 5/8" x 30" [2.4 x 15.9 x 762mm]
balsa wing trailing edge sheet in place. Now would be a
good time to add some thin CA to all joints to be sure that
everything is glued together well.
❏ ❏
16. Turn the wing over and sheet the bottom of the wing
the same way you did the top of the wing. NOTE: You do not
need to cut the notch in the 3/32" x 4" x 30" [2.4 x 102 x
762mm] balsa sheet as you did for the top of the wing.
❏ ❏
17. Glue the 3/32" x 5/8" x 30" [2.4 x 15.9 x 762mm] balsa
wing trailing edge sheet in place on the bottom of the wing.
❏ ❏
18. Locate the 3/32" x 5/16" x 24" [2.4 x 7.9 x 610mm]
balsa cap strips. Cut the cap strips to fit between the
forward sheeting and the trailing edge sheeting. Use the
plan as your guide to identify the ribs that should be cap
stripped. Cap strip both the top and the bottom of the wing.
❏ ❏
19. Sheet the bottom of the wing between the outboard
W2 ribs from leftover 3/32" x 4" x 30" [2.4 x 102 x 762mm]
balsa sheet. Extend the sheeting 3/4" [19mm] beyond the
end of the ribs.
❏ ❏
20. After the sheeting is glued in place make a line across
the sheet, 1/2" [13mm] from the trailing edge of the W2 ribs.
❏ ❏
21. Using a sanding bar, bevel the end of the balsa
sheeting to match the wing rib. Sand from the end of the
sheeting up to the line you drew.
12