Assemble the cowl – Great Planes RV-4 40 Kit - GPMA0180 User Manual
Page 41
Skip steps 7-11 If you did not install functional flaps.
❏ ❏
7. Install a servo into the flap servo bay in the right wing
following the radio manufacturer’s instructions. Temporarily
plug the flap servo into the receiver and then turn on the
radio and transmitter. Activate the switch that will be used for
the flaps so that the servo is in the position for the flaps
retracted. Install a servo arm onto the servo. The servo arm
should be installed at approximately 45 degrees to the servo
case and the arm should be pointing toward the center of
the wing. Enlarge the end hole in the servo arm of the
elevator and rudder servo with a 1/16" [1.6mm] drill bit.
❏ ❏
8. Locate a 2-56 x 12" [305mm] wire pushrod. Cut the
pushrod to a length of 4-3/4" [121mm]. On the threaded end
of the pushrod attach a clevis retainer and clevis by turning
it onto the threaded end approximately 25 turns.
❏ ❏
9. Attach the clevis to the control horn. Then, slide the
clevis retainer in position on the clevis. Center the aileron
and make a mark on the wire pushrod where it meets the
outer hole in the servo arm. Make a 90 degree bend in the
wire on the mark you have made.
❏ ❏
10. Insert the wire into the servo horn and retain it in
place with a nylon FasLink.
❏ ❏
11. Attach a 6" [152mm] servo extension to the flap
servo. Apply a piece of heat shrink tubing or tape to the
connectors to be sure they cannot pull apart.
❏ ❏
12. Attach a 12" [305mm] servo extension to the aileron
servo. Apply a piece of heat shrink tubing or tape to the
connectors to be sure they cannot pull apart.
❏ ❏
13. Route each of the leads through the wing. The leads
should exit the wing through the hole in the top of the wing
center section.
❏
14. Repeat steps 1 -14 for the left wing panel.
❏
15. The leads for the flap and ailerons need to be connected
together with a “Y” harness. (If you are using an 8 or 9 channel
radio you may have the ability to plug each of the lines into
separate channels in your receiver. See the radio instruction
manual before deciding which way you will proceed.)
❏
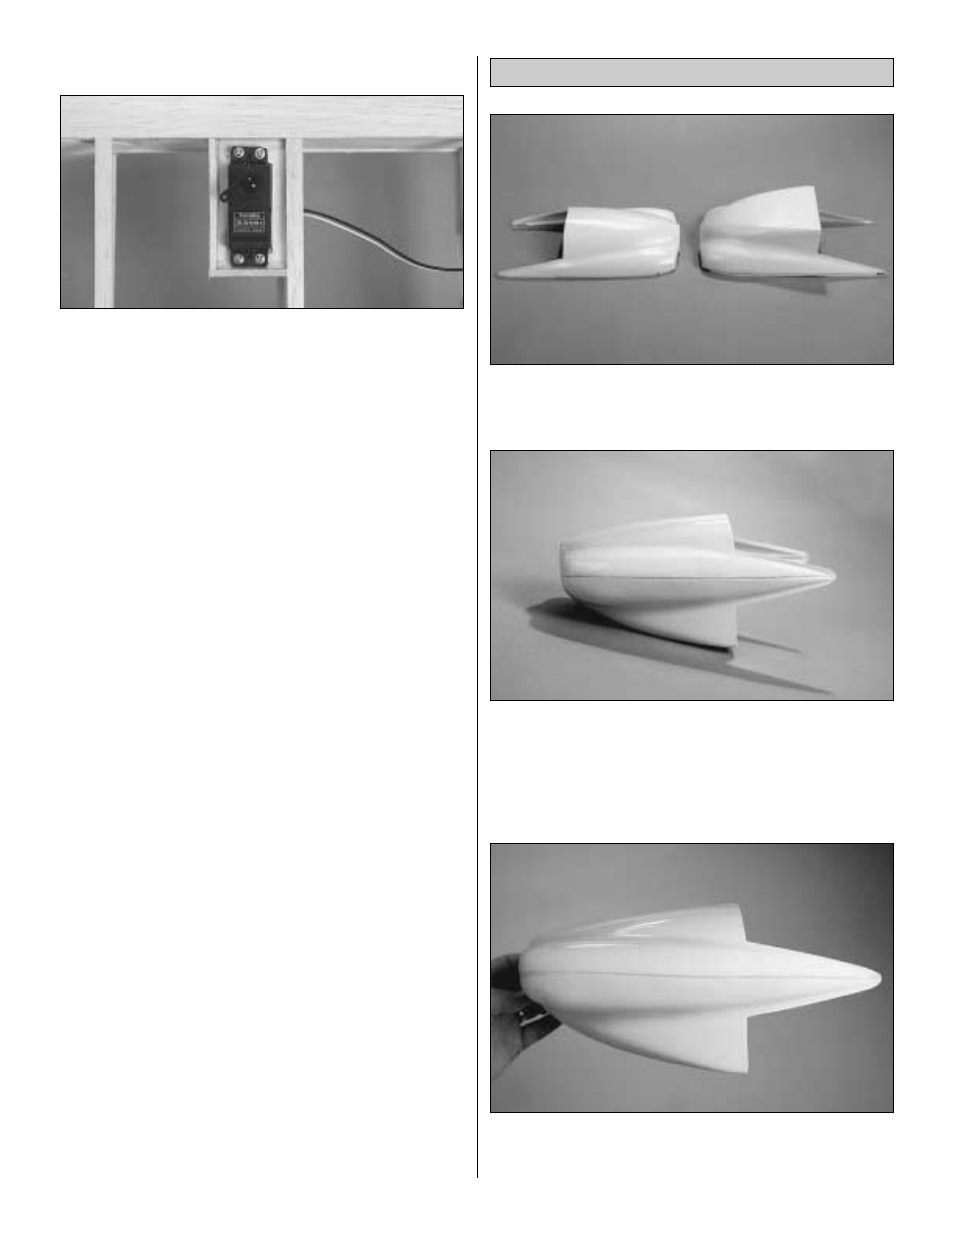
1. Cut out the two halves of the ABS cowl. Cut the cowl
halves on the cut lines. When cut properly there will be
interlocking tabs to glue the sides of the two halves together.
❏
2. Glue the two halves of the cowl together with medium
CA. Work on one side first, applying glue to a small section
at a time. Use CA accelerator sparingly or not at all as it can
cause the ABS plastic to get brittle. Work your way around
the cowl until it is completely glued together. Use pieces of
leftover ABS plastic to reinforce the cowl in the front.
❏
3. Apply a plastic filler such as Bondo
®
to fill the seam where
the cowl halves are joined. After the filler has cured, sand the
seam until the two cowl halves blend smoothly together.
Assemble the Cowl
41