Assemble the fuselage install the stabilizer – Great Planes Cirrus SR22 .46-55 ARF - GPMA1363 User Manual
Page 10
10
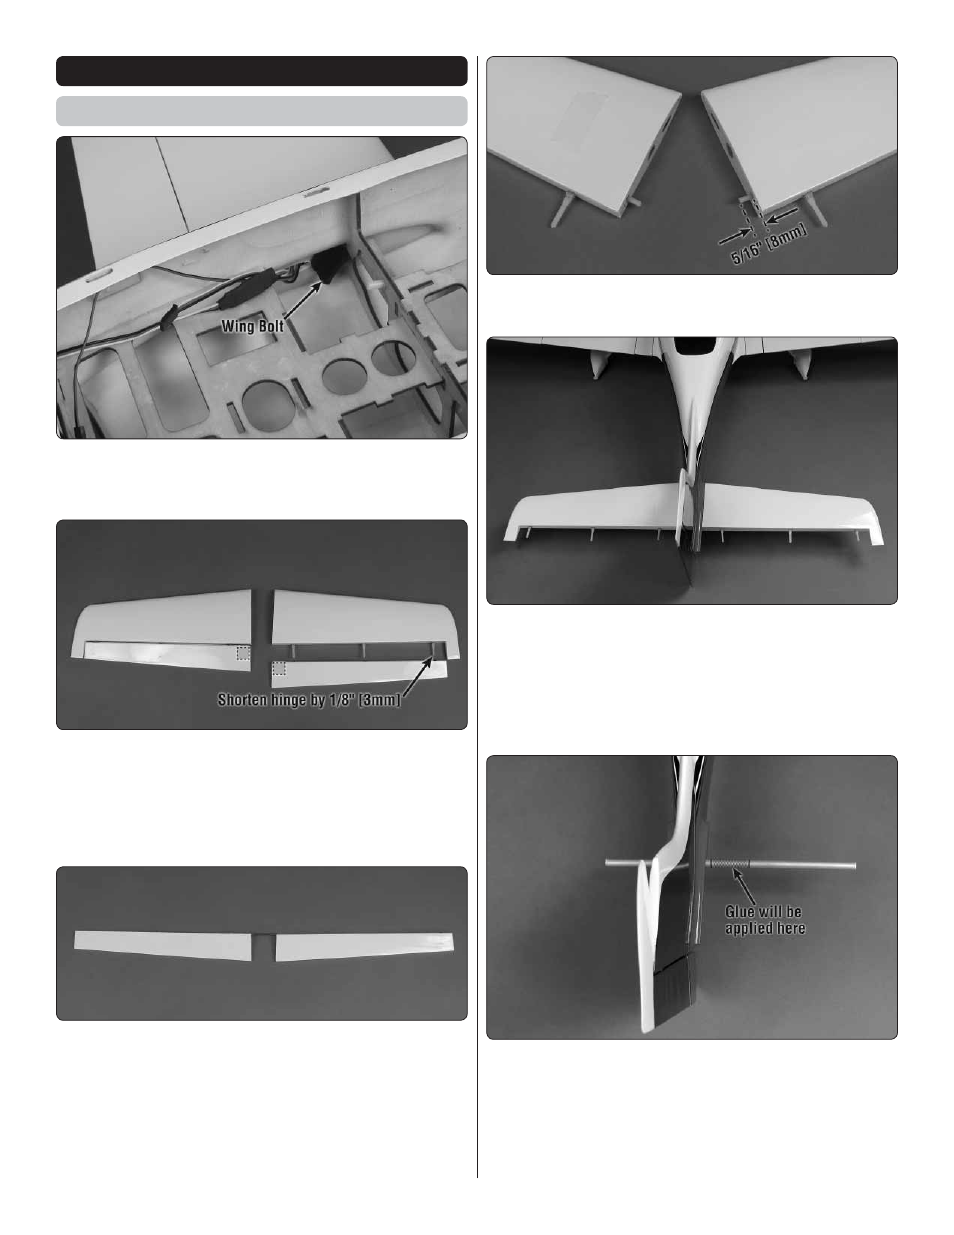
ASSEMBLE THE FUSELAGE
Install the Stabilizer
❏
1. Insert the carbon fi ber wing joiner tube in the fuselage.
Slide the two wing halves onto the tube and secure the wing
halves to the fuselage with two 1/4-20 nylon wing bolts.
❏
2. Test fi t the elevator halves on the stabilizer halves
using the six pivot point hinges. The two hinges that are
inserted in the elevator halves at the tip need to be shortened
1/8" [3mm]. Note on one side of the elevator halves there is
a hardwood plate under the covering for the elevator control
horn screws. This side should be face downward.
❏
3. Place a piece of tape on the left elevator half and the
left stabilizer half to identify that they go together. Remove
the elevator halves from the stabilizer halves. Insert the
elevator joiner wire in the elevator halves and place the
assembly on a fl at surface. Check that both trailing edges of
the elevators are fl at on the surface. If they are not, remove
and bend the elevator joiner wire slightly and check again.
Also mark the left side of the elevator joiner wire.
❏
4. Use epoxy to glue the two 1/8" x 5/8" [3 x 16mm] nylon
stabilizer dowels 5/16" [8mm] into the root of the stabilizers.
❏
5. Slide the 5/16" x 9-3/4" [8 x 248mm] aluminum
stabilizer joiner tube through the fuselage. Temporarily
install the two stabilizer halves on the aluminum stabilizer
joiner tube.
❏
6. View the plane from the aft end. Check that the stabilizer
and wing are parallel to each other.
❏
7. Remove the stabilizer halves and tube. Use sandpaper
to roughen the aluminum tube. Clean the tube with a
paper towel dampened with denatured alcohol. Reinstall
the aluminum tube, centering it in the fuselage. Mark the
aluminum tube on both sides of the fuselage where they
meet. Pull the tube out one side so that glue can be applied
between the lines (do not apply the glue yet).