GME TX3520 User Manual
Page 27
t X 3 5 1 0 / t X 3 5 2 0 / t X 3 5 4 0
I n s t r u c t I o n m A n uA l
PA G E 2 7
a beep tone will be heard and the radio will not transmit.
Channel banks
selects the current receive-only channel bank. the receive-only
channel memory consists of 5 banks of 19 channels. channel
banks are labelled RX-A to RX-E.
cH Bank c
INSTaLLaTION
GENERaL
Your radio is supplied with a slim, slide on mounting cradle. As
the radio contains a built-in speaker, the cradle can be screwed
or bolted to any convenient location in your vehicle’s cabin
(under or above the dash or on the centre console) using the
mounting slots provided in the cradle.
In the case of the remote mount tX3520, the remote head can
be installed in a convenient location inside the cabin allowing
the main unit to be hidden away under the seat, in the glove
box or even in the boot if required. In this case an extension
speaker will also be required.
When planning your installation, avoid locations that are close
to heaters or air conditioners.
TX3510 & TX3540 INSTaLLaTION
For maximum sound projection from the internal speaker,
we recommend the cradle be mounted above the radio to
minimise any obstruction of the speaker. Alternatively, if it
is necessary to mount the unit in a less audible location, an
extension speaker can used. the extension speaker plugs into
the extension speaker socket on the radio’s rear panel.
Console mounting
A flush mounting DIn adapter mBD001 is available as an
optional accessory. the adapter includes mounting brackets
and a specially designed front panel escutcheon to suit most
vehicle installations. see your nearest GmE retailer for details.
Din Adapter mBD001
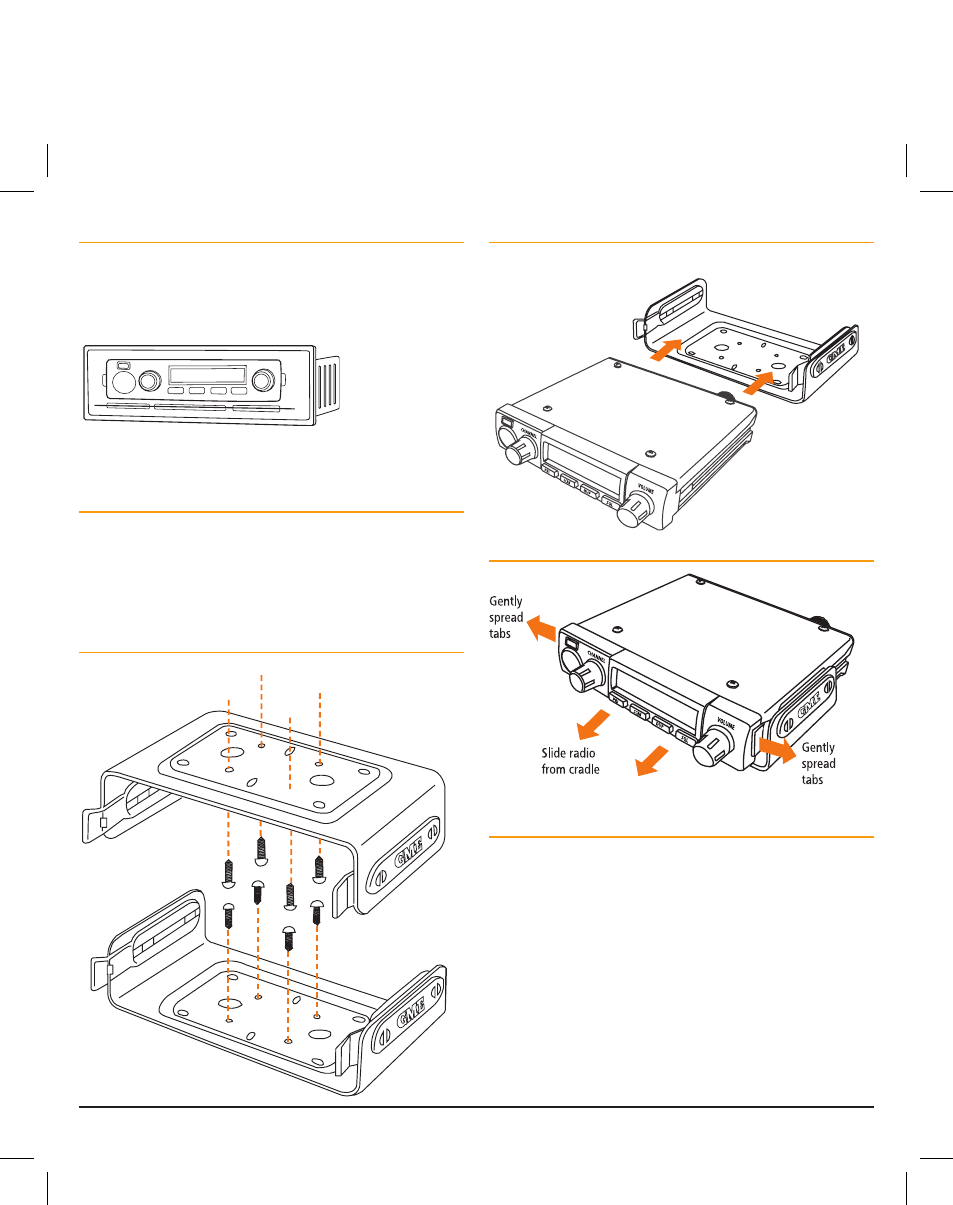
Installing the cradle
screw the mounting cradle to a firm surface then slide the
radio’s main unit into the cradle from the front until it clicks
into place. Finally, connect the power lead, antenna cable and
extension speaker (if required) to the sockets on the radio’s
rear panel.
Mounting the cradle
Fitting the radio
slide radio fully into cradle until it clicks into place.
Removing the radio
TX3520 INSTaLLaTION
the tX3520 remote head can be installed inside the cabin with
the main unit hidden away in the glove box, under the seat
or in the boot if required. Install the remote head bracket into
a convenient location near your driving position using screws
or double sided tape. loosen the gimbal knobs and slide the
remote head into the slots in the bracket. Adjust the remote
head for the desired angle then tighten the knobs.
the mounting of the main unit is identical to that of the
tX3510 and tX3540 models. If the main unit is installed in
a remote location, you will also need to install an extension
speaker inside the cabin. the extension speaker plugs into the
extension speaker socket on rear panel of the main unit.