Vcr display panel, 1 power button, 2 cassette compartment – Philips VR650 User Manual
Page 3: 3 wireless remote sensor, 4 stop/eject button, 5 play button, 6 ff (fast forward)/search button, 7 channel up/down buttons, 8 rew(ind)/search button, 9 tva/cr button
Attention! The text in this document has been recognized automatically. To view the original document, you can use the "Original mode".
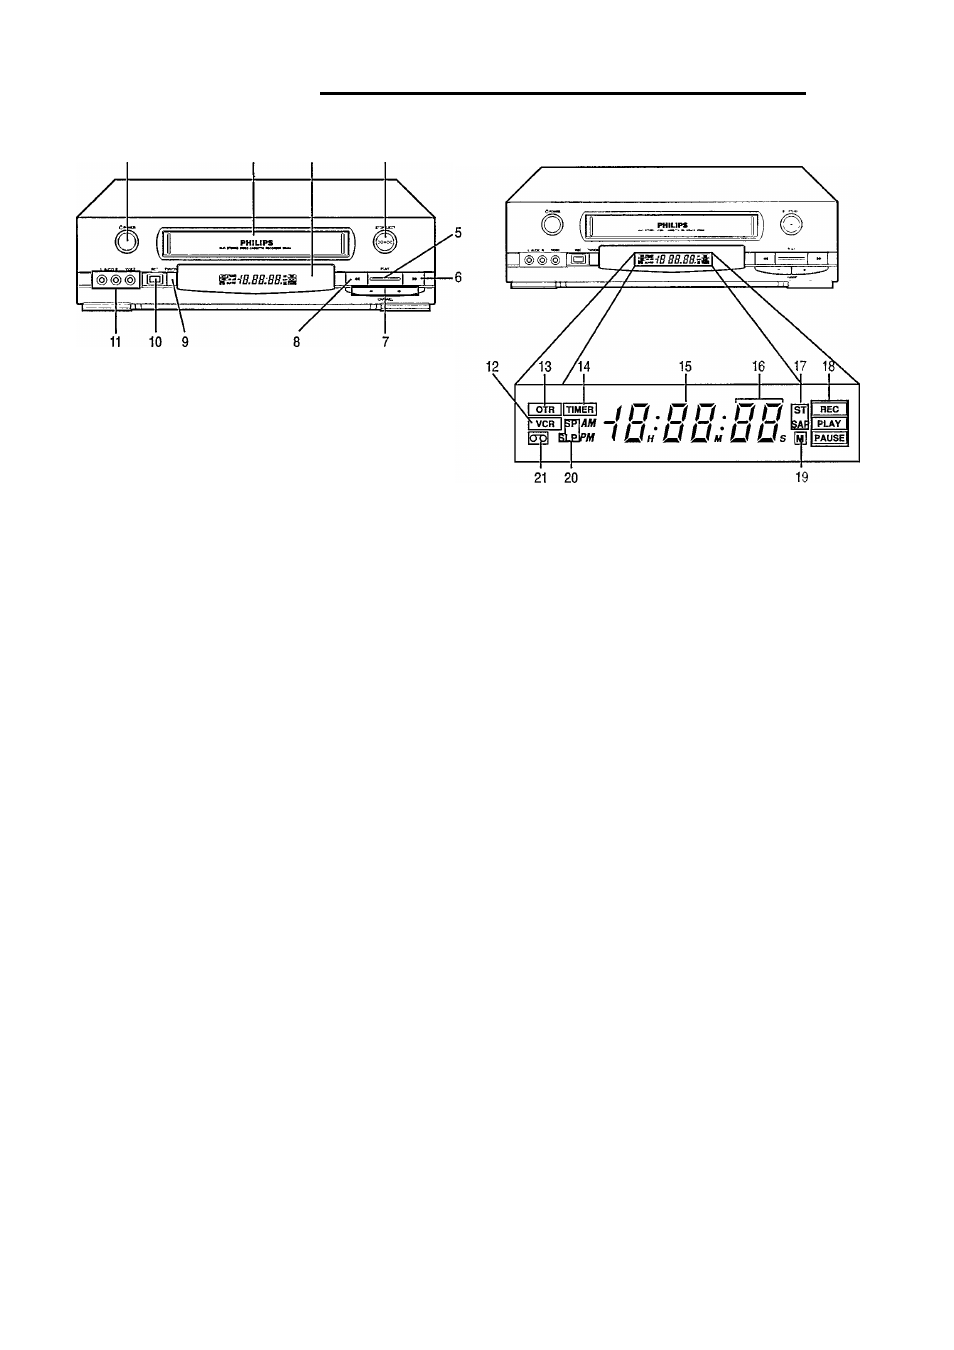
Front Panel
Description of Controls 3
VCR Display Panel
1 POWER Button
Press to turn the VCR (Video Cassette Recorder) on and
off. To set the VCR for unattended recordings after timer
settings have been completed.
2 Cassette Compartment
Where the video cassette is inserted.
3 Wireless Remote Sensor
Receives the signal from the (wireless) remote control.
4 STOP/EJECT Button
Press to stop the tape. Press again after the tape has
stopped to eject the cassette.
5 PLAY Button
• Press to play back a tape.
• Press to release the Slow or Search mode and return to
playback.
6 FF (Fast Forward)/SEARCH Button
Press to move the tape forward rapidly. Also, during
playback, press this button for rapid forward visual
search.
7 CHANNEL UP/DOWN Buttons
Press to scan up or down through the VCR’s channels.
8 REW(ind)/SEARCH Button
Press to rewind tapes. Also, during playback, press this
button for reverse visual search.
9 TVA/CR Button
Press to select the signal source that your TV receives.
TV position
(VCR indicator on the display panel: OFF)
To watch TV or to watch one program while recording
another.
VCR position
(VCR indicator on the display panel: ON)
To watch a tape, monitor a recording, or watch a TV
broadcast selected with the VCR’s channel selector.
10 REC(ord) Button
Press to start recording.
11 Front AUDIO/VIDEO IN(put) jack
For audio and video input connection from another VCR
or a portable video camera.
12 VCR Indicator
Lights up when the VCR mode is selected.
13 OTR Indicator
Lights up when the One Touch Recording (OTR) feature
is in use.
14 Timer Indicator‘TIMER”
Lights up when the VCR is set for unattended recording.
15 Digital Clock/Counter Indicator
After setting the clock, the present time is displayed.
When a tape is inserted, the tape counter is displayed.
16 Channel/Input Signal Indicator
Shows the channel number. (“L” means External Line
Input Signal is selected.)
Select Line mode by pressing NUMBER buttons 0-0.
To exit Line mode, press any other number, for example, 0-2.
17 Sound Program Indicator
Lights up when a Stereo or 2nd audio program is received.
ST - receiving Stereo program
SAP - receiving 2nd audio program
18 Mode Indicator
Displays which feature the VCR is currently performing.
REC - Recording
PLAY - Playback
PAUSE - Still, Slow, Record-Pause
19 Memory Indicator
Lights up when the Memory function is selected.
20 Speed Indicator “SP,” “SLP”
Shows the tape speed during recording and playback
(“SP”or“SLP”).
SP - Standard Play
SLP - Super Long Play
21 Cassette-Inside Indicator
Lights up when there is a cassette in the unit.