Crosman BP2563 User Manual
Page 9
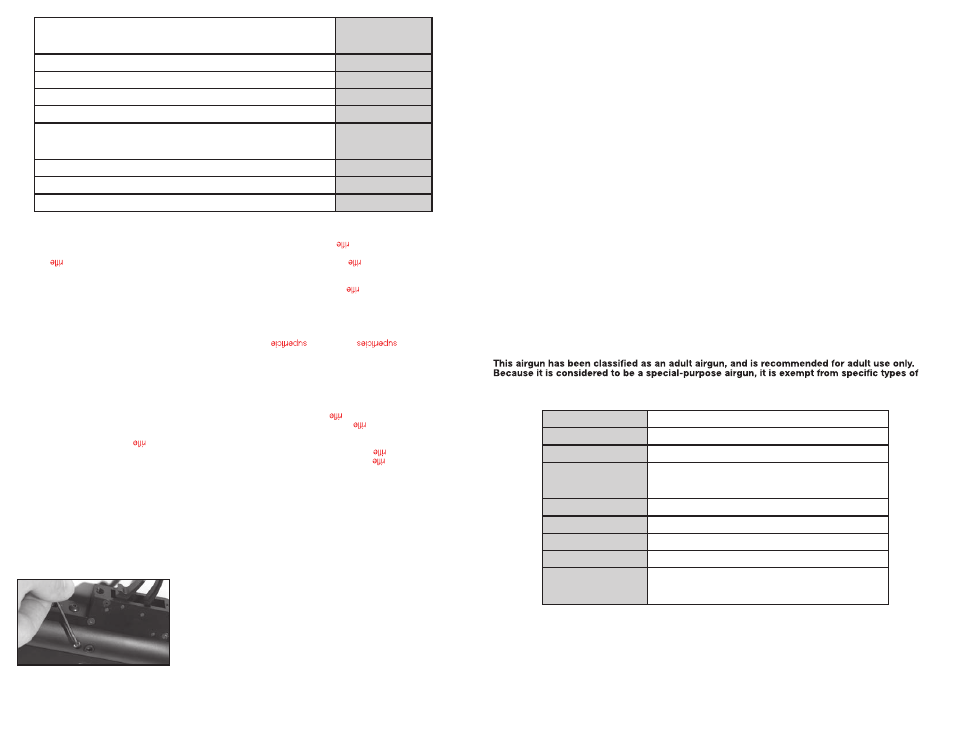
TIP: Turn the metering screw in all the way until it bottoms, counting how many turns it took to achieve the
desired velocity. Record this value for future reference. 4 - 41/2 turns out from the bottomed position will
completely clear the nose of the metering screw from the air path. Do not adjust the metering screw be-
yond this point. Though the metering screw will restrict air flow a great deal it will not completely shut off air
flow. For use with CO
2
it is recommended to use a more open setting (metering screw out to clear air path)
Replace and tighten the jam screw. Re-insert the action into the stock, and replace and tighten the stock screw.
11. Reviewing Safety
Never point the airgun at any person or at anything you do not intend to shoot.
•
Always treat the airgun as though it is loaded and with the same respect you would a firearm.
•
Always aim in a SAFE DIRECTION. Always keep the muzzle of the airgun pointed in a SAFE DIRECTION.
•
Always keep the airgun on safe until you are ready to shoot.
•
Always check to see if the airgun is “ON SAFE” (see section 2A) and unloaded when getting it from
•
another person or from storage.
Always keep your finger off the trigger and out of the trigger guard until ready to shoot.
•
You and others with you should always wear shooting glasses to protect your eyes.
•
If your reading or prescription glasses are not safety glasses, make sure you wear shooting glasses
•
over your regular glasses.
Use .177 caliber (4.5mm) pellets only in your Model BP1763 or use .22 caliber (5.5mm) pellet only in
•
your Model BP2263. NEVER reuse ammunition.
Do not shoot at hard surfaces or at the surface of water. The pellet may bounce off or ricochet and hit
•
someone or something you had not intended to hit.
Place the backstop in a location that will be safe should the backstop fail.
•
Your backstop should be checked for wear before and after each use. All backstops are subject to wear
•
and will eventually fail. Replace your backstop if the surface is worn or damaged or if a ricochet occurs.
Do not attempt to disassemble or tamper with your airgun. Use an Authorized Service Station. Using
•
unauthorized repair centers or modifying the function of your airgun in any way may be unsafe and will
void your warranty.
Store airgun in a secure location.
•
Before you store your airgun, remove the clip, make sure there is no pellet in the chamber and make
•
sure the gun is un- cocked (see section 6).
Store this airgun charged with air or CO
•
2
to keep the valves closed against dirt.
Whenever you store the airgun, make sure it is “ON SAFE” (see section 2A.)
•
trigger pull, safety mechanism and drop tests.
SPECIFICATIONS
Mechanism
Bolt Action
Capacity
BP1763 / BP2263 10 Shot Clip / BP2563 8 Shot Clip
Power source
Compressed Air Or Co
2
(One Or The Other)
Caliber/Ammunition
Model BP1763 .177 Caliber Pellet
Model BP2263 .22 Caliber Pellet
Model BP2563 .25 Caliber Pellet
Weight
7.12 Lbs
Length
42.5 Inches
Barrel
Rifled Steel, Choked
Safety
Ambidextrous Lever
Velocity
Model BP1763 Adjustable Up To 1100 Fps
Model BP2263 Adjustable Up To 1000 Fps
Model BP2563 Adjustable Up To 900 Fps
que el rifle de ai
re
est
á pr
esur
izado
y haga únicamente los ajustes ident
ificados en este manual
.
El Marauder s
e pu
ede a
finar
pa
ra
distintas velocidades ajustando el to
rnillo de medición de la válvula. Est
o
requerir
á qu
e s
e quit
e la
culata
. Quit
e e
l to
rnill
o d
e la
culat
a
(Fig. 12
) (co
n un
a llav
e Alle
n d
e 3/16
” par
a
separar la culat
a del accio
nad
or.
Recuerde que el accionador está p
resuri
zado. Manténgalo apuntado en un
a
dire
cción segura.
No
quite los torn
illo
s d
el gua
rdam
onte ya que éste debe permanecer
con la culata
.
Con una l
lave Al
len de 5/64”, quite pr
im
ero la co
ntratu
erca
par
a pe
rmi
tir e
l
acces
o a
l to
rnillo
de medición. (fig. 13
)
(Asegú
rese de gu
ard
ar la co
ntratu
erc
a en un lugar seguro). Encuent
re
el to
rnillo de medic
ión
deb
ajo de la
co
ntratuerca que se quitó ant
e-
riormente. Con un
a llave A
llen
de 5
/64” gi
re el to
rnillo de medición e
n
sentido de las m
anecilla
s d
el reloj
para
restringir el flujo de ai
re hacia e
l
inter
ior del cañ
ón
y re
duci
r la veloci
dad de los diábolos.
CON
SEJO
: Gire
el to
rni
llo
de m
edici
ón
hac
ia
adentro totalment
e
hasta que toque f
ond
o, cont
and
o cu
ántas vueltas le tomó obtene
r
la ve
locidad des
ead
a. R
egist
re e
ste v
alor para consultarlo posteriormente. De 4 a 41/2 vueltas fuera de la
posición a fondo
lib
era
rá com
ple
tame
nte la punta del tornillo de medición de la ruta del ai
re. No ajuste e
l
tor
nillo
de medici
ón má
s allá
de e
ste
punto. Aunque el tornillo de medición
restringirá el flujo de ai
re en gra
n
medida, no lo cerrar
á po
r com
ple
to. Para el uso con C
O
2
se rec
omienda
que use un a
juste
más
abi
erto
(el
tor
nillo
de medici
ón fu
era
par
a liber
ar l
a ruta de aire
)
Ree
mplace y apriet
e la contr
atu
erc
a. V
uelva a insertar el accionador en la culata y reemplace y apriete e
l
tor
nillo
de la culat
a.
11.
Revisión de
la
segur
idad
• N
unca
apunt
e e
l
de
ai
re
a n
ing
una
pers
ona
o
a n
ing
una
cosa
a
la
que
no
ten
ga
inten
ción
de
disp
ara
rle
.
• Siemp
re
trate
el
de
ai
re
como
si estuvier
a cargad
o y
co
n e
l mism
o respet
o qu
e le
tendrí
a a
un
arm
a d
e fuego
.
• Apunt
e siemp
re
en
una
DIRECCIÓN
SEGURA
. Manteng
a siemp
re
el cañó
n de
l
de
ai
re
apuntado
en
una
DIRECC
IÓN
SEGU
RA.
• Manteng
a siemp
re
el
de
ai
re
con
el segu
ro
activado
hasta
que
esté
listo
para
disparar.
• Siemp
re
compruebe
que
el
de
ai
re
tenga
el segu
ro
activado
(“ON
SAFE”
) (ve
a la
secció
n 2A
) y
est
é desca
r-
gado
al r
eci
birlo d
e otr
a pe
rsona
o al
sacarlo después
de estar gu
ardad
o.
• Manteng
a siemp
re
el ded
o apartad
o de
l gatill
o y
fuer
a de
l gua
rdamont
e hast
a qu
e est
é list
o par
a dispara
r.
• Uste
d y
la
s demá
s persona
s debe
n siemp
re
usar anteojo
s d
e ti
ro
para
protege
r su
s ojos
.
• S
i su
s lente
s d
e lectur
a o
par
a ve
r n
o so
n d
e seguridad
, cuid
e d
e usa
r anteojo
s d
e ti
ro
encima
de
sus
lentes
normal
es.
• Us
e solament
e diábolo
s calib
re
.177
(4.5
mm) e
n s
u Model
o BP176
3 o
diábolo
s calib
re
.22
(5.5
mm) e
n s
u
Modelo
BP226
3. N
UNC
A re
utilic
e la
munición
.
• N
o dispa
re
a
dura
s o
a
la
de
l agua
. E
l diábol
o pued
e rebota
r y
golpea
r a
alguie
n o
alg
o qu
e
usted
no
te
nía
int
enc
ión
de
toca
r.
• Coloqu
e e
l respald
o e
n u
n luga
r qu
e se
a segu
ro
en
caso
de
que
falle
el r
espaldo.
• Deb
e revisars
e e
l desgast
e de
l respald
o ante
s y
despué
s d
e cad
a uso
. T
odos
los
respaldo
s s
e desgasta
n y
eventual
ment
e dej
ará
n d
e se
rvir.
Reemplace el
respaldo si
la
superficie
está desgast
ada o d
añada, o si
rebota l
a
munic
ión
.
• N
o intent
e desarma
r e
l
de
ai
re
ni l
o manipul
e indebidamente
. Us
e un
a Estació
n d
e servici
o autorizada
. E
l us
o
de c
entros de
repar
acio
nes no
aut
oriz
ados o la
modifi
caci
ón de
las fun
cion
es
del rifl
e de ai
re en cualquier
form
a
pued
e ser
ins
egu
ro y
anu
lará l
a g
arantía.
• Ante
s d
e almacena
r e
l
de
ai
re,
asegú
res
e d
e qu
e n
o est
é cargado
, n
i amartillado
. Almacen
e est
e
de
ai
re
car
gado
con
aire
com
prim
ido
o C
O
2
para mantener
las vá
lvulas
cerrad
as
contra la suciedad.
• Siemp
re
que
almacene
el
de
ai
re,
asegú
res
e d
e qu
e e
l segu
ro
esté
activado
(“ON
SAFE”
)
(vea
la s
ecc
ión 2A
.)
ESP
ECIF
ICACI
ONE
S
Mecanism
o
Acción
de c
err
ojo
Capac
ida
d
BP1763 / BP2263 C
arg
ador de
10 ti
ros
/
BP2563 Car
gador de
8 ti
ros
Fuente D
e E
nergí
a
Aire c
omprimid
o o
C
O
2
(uno
u
otro
)
Calibr
e/Munici
ón
Modelo BP1763
diábolo cal
ibr
e .1
77
Modelo BP2263
diábolo cal
ibr
e .2
2
Modelo BP2563
diábolo cal
ibr
e .2
5
Peso
3.2
3Kg
. (7.
12
lbs.
)
Lon
gitu
d
108
cm
(42.
5 pulgad
as)
Cañó
n
Acero
estriado
, re
gulado
Segu
ro
Palanc
a amb
idi
estr
a
Velo
cid
ad
Modelo BP1763
A
justable
hast
a 33
5.2
8 m/s
eg
(11
00 fps
)
Modelo BP2263
A
justable
hast
a 30
4.8
m/se
g (1
000
fps
)
Modelo BP1763
A
justable
hast
a 27
4.3
m/se
g (9
00 fps
)
13
9
9