Advertencia – Crosman BP2563 User Manual
Page 8
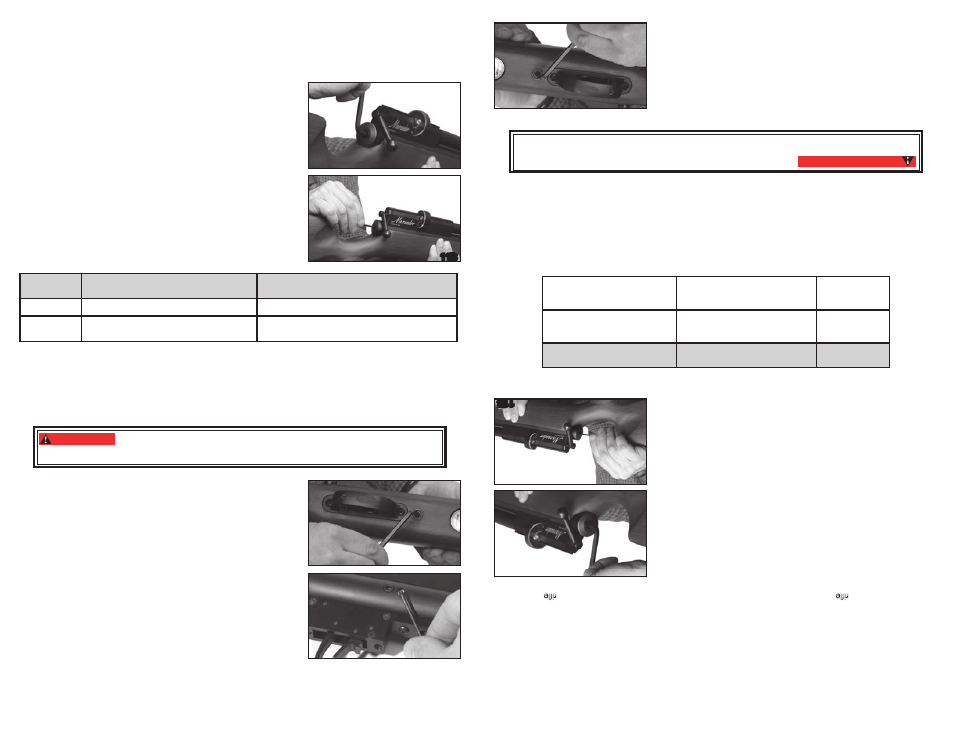
Hammer Spring Pre-load adjuster
Put the air rifle “ON SAFE” (see section 2A), remove the clip and keep the airgun pointed in a SAFE
•
DIRECTION. Remember that the airgun is pressurized and make only the adjustments identified
in this manual.
To increase the energy, turn the hammer spring preload adjuster clockwise (fig 11A), up to 6 revolutions,
using a ¼” Allen wrench.
NOTE: More revolutions will simply cause the adjuster to spin but will
not yield any higher force. Increasing the preload will be required to
facilitate use of higher fill pressures.
The striker can be accessed through the hammer spring preload
adjuster using a 1/8” Allen wrench (fig 11B). Turning the striker
clockwise will shorten the hammer stroke and turning counter
clockwise will lengthen the stroke. A long stroke length will yield higher
hammer energy while a short stroke length will yield lower hammer
energy. The striker can be adjusted inward by up to 12 revolutions.
A starting point for low fill pressures would start with a low hammer
spring preload tension and a shorter hammer stroke.
A starting point for higher fill pressures will require more hammer
spring preload tension and a longer hammer stroke. Refer to the chart
below for suggested combinations of these adjustments based on fill
pressures.
Fill
Pressure
Hammer Spring Preload
Hammer Stroke
Higher
Increase, turn adjuster in (Clockwise)
Increase. Turn Striker out (Counter Clockwise)
Lower
Decrease, turn Adjuster out (Counter
Clockwise)
Decrease. Turn Striker in (Clockwise)
TIP: Too little hammer energy at high fill pressures may result in very low velocities which is the result
of partial valve lock. See the Overfill section (3C) to correct. Make only the adjustments identified in this
manual. Do not attempt to adjust any other parts of a pressurized airgun, or make any repairs to a
pressurized airgun.
Tuning the air rifle to obtain various velocity profiles can be achieved through the adjustment of the hammer
spring and the striker and should be done in harmony with each other. Start slow to understand how each
one affects the air rifle’s performance. Experience and testing is the best way to understand these capabilities.
WARNING:
Do not attempt to repair the airgun or to disassemble to correct an over
fill or valve lock. Never repair a pressurized gun. Parts can fly from the airgun at dangerous
speeds when it is disassembled while pressurized.
C. Tuning for Various Velocities
The Marauder air rifle has been factory set to an efficient velocity that
will suit most hunting and target uses. If you, as the owner, wish to
alter the factory settings you should do so only after reading the follow-
ing instructions carefully. Unless you are experienced with working with
airguns, Crosman Corporation suggests seeking the aid of a qualified
gunsmith to perform these velocity adjustment procedures.
Put the air rifle “ON SAFE”, remove the clip and keep the airgun
pointed in a SAFE DIRECTION. Remember that the airgun is pressur-
ized and make only the adjustments identified in this manual.
The Marauder may be tuned for various velocities by adjusting the
valve metering screw. This will require removal of the stock. Remove
the stock screw (Fig 12) (using a 3/16” Allen wrench to separate the
stock from the action. Remember the action is pressurized. Keep it
pointed in a safe direction.
Do not remove the trigger guard screws as the trigger guard
should remain with the stock.
Using a 5/64” Allen wrench, remove the jam set screw first to allow access to the metering screw. (fig 13) (Be
sure to stow the jam set screw in a safe place). Find the metering screw beneath the jam set screw previously
removed. Using a 5/64” Allen wrench turn the metering screw clockwise to restrict the flow of air into the bar-
rel and reduce the pellet velocity.
11A
Adjusting the
Hammer Spring
11B
Adjusting the Striker
Hammer Spring
Pre-load adjuster
11B
12
13
B. Ajuste para
varias
pr
esiones
de
llena
do
El M
arauder está d
iseñado par
a a
finarse
de
m
odo que
fun
cio
ne
a v
arias
pr
esion
es d
e lle
nado,
desde
200
0
psi (138
bar)
hasta
3000
ps
i (2
07
bar
). Esto
se
ha
ce me
diante
el
ajuste
de la
prec
arga
de
resort
e del
m
arti
llo
y
la longitud de
recorrido
de
l m
art
illo
. En
cua
lquier
caso
, e
l a
just
e c
am
bia
la
ca
ntidad
de
ener
gía que
el m
arti
llo
genera al g
olpear una v
álvula.
Una
pr
esi
ón de ll
enado m
ás
alta
requie
re
más
en
ergí
a de
l martil
lo m
ientr
as qu
e
las p
resiones de llen
ado
más b
aja
s requie
ren
m
eno
s energ
ía
del
m
arti
llo
. S
e rec
omienda s
iemp
re an
otar
su
s
ajustes al afinar su rifl
e d
e ai
re.
El M
arauder se ha
ajust
ado
de
fá
bric
a a
una
presi
ón
de
lle
nad
o e
fici
ente
ade
cuad
a par
a la
mayo
ría
de lo
s
usos de cacería y ti
ro a
l blanco
. S
i ust
ed,
co
mo
prop
iet
ario
, des
ea
alter
ar lo
s aj
ustes d
e fá
brica
, debe
hac
erlo
únicamente después
de
leer
cu
ida
dosam
ente
las si
gui
entes
instruc
cio
nes
.
• Activ
e e
l segu
ro
del
de
ai
re
(“ON
SAFE”
) (ve
a la
secció
n 2A)
, quit
e e
l cargado
r y
manteng
a e
l
apunt
ado
en una
DIRE
CCIÓN
SE
GURA.
Recue
rde
que e
l rifle
de
aire
está
pr
esurizad
o y
ha
ga única
mente
los
ajustes
ident
i-
ficados en est
e manual
.
Para aument
ar la energí
a, g
ire
el aj
ustador
de
la p
rec
arg
a d
el r
esort
e
del martill
o en sentido
de l
as
man
eci
lla
s d
el r
eloj
(fig
. 11A
), h
ast
a 6
revoluciones c
on un
a lla
ve All
en
de ¼
”.
NOTA
: Más
revoluc
iones s
ólo
ha
rán que
el a
just
ador
gire
pe
ro n
o
rendirán ninguna fu
erza
adi
ciona
l. Au
mentar
la p
rec
arga será
ne
ces
a-
rio para fa
cilitar
el uso
de
pr
esi
one
s de l
lenad
o m
ás e
levad
as.
Se puede acceder a
l p
ercutor
media
nte e
l a
justador de la
prec
arg
a
del re
sorte del marti
llo
con una
lla
ve A
lle
n d
e 1
/8”
(fig
. 1
1B). G
irar el
percutor en sentido
de l
as
man
ecil
las
del
re
loj
reducir
á e
l re
corrid
o
del martill
o y gir
arlo
en sentido
contr
ario
al
de la
s m
ane
cillas de
l re
loj
prolongará el
rec
orrid
o. U
na long
itud
may
or de rec
orrid
o rend
irá
una
mayor energ
ía del
marti
llo
, mientr
as
que un
a long
itud
m
eno
r rend
irá
una menor energía del
mart
illo
. El
pe
rcutor
se pued
e ajustar
ha
cia
adentro por hasta 1
2 re
volucion
es.
Un punto de inicio
para
pr
esiones d
e ll
enad
o ba
jas
comen
zar
ía c
on
una tensión
baja d
e p
rec
arga d
el r
esorte del
mart
illo
y un
men
or r
eco
r-
rido del martillo
.
Un punto de inicio
para
pr
esiones d
e ll
enad
o más
alt
as
requerir
á
mayor tensi
ón de p
recarg
a d
el r
eso
rte del
mart
illo
y un may
or re
corr
ido
del m
artillo
. Co
nsulte
la t
abl
a qu
e
apare
ce abajo para
ver l
as
combin
aci
ones sugeridas de
est
os
ajust
es
con
bas
e en
las
pr
esio
nes de
llen
ado
.
Presión
de
llenado
Precarga
del
res
orte
del marti
llo
Recorrido
de
l marti
llo
Mayor
Aum
entar
, gi
rar e
l aj
ustad
or ha
cia
adent
ro
(en sentido d
e la
s mane
cil-
las
de
l rel
oj)
Aum
entar
Girar
el pe
rcut
or h
acia
afuera
(en sent
ido
contr
ario
al
de
las
man
ecilla
s de
l re
loj
)
Meno
r
Dis
minui
r, gi
rar e
l ajust
ador
ha
cia
afuera
(en sent
ido
contr
ario
al
de
la
s
man
eci
llas de
l rel
oj)
Dis
minui
r. Gi
rar
el
per
cutor
ha
cia
adent
ro
(en
se
ntido
de
la
s m
aneci
l-
las
de
l rel
oj)
CON
SEJO: Un
a muy ba
ja en
erg
ía
del
ma
rtillo
a a
ltas pre
siones d
e lle
nado pu
ede
dar
com
o resu
ltad
o
velocidades
muy ba
jas
como
result
ado
de un bl
oque
o pa
rcia
l de
la
válvu
la.
Vea
la
secc
ión sob
re L
lenad
o e
n
exceso para
cor
regirlo
.
Haga únicam
ente los a
justes identifi
cad
os en
est
e m
anua
l. N
o int
ent
e ajustar
nin
gun
a otr
a p
arte
de un r
ifle d
e
aire p
resurizado,
ni h
acer nin
gun
a re
parac
ión
a un
rifl
e de
aire
pr
esur
izad
o.
Afinar el rifle de a
ire
para obten
er v
arios p
erfil
es d
e ve
locid
ad pued
e consegu
irs
e ajustando
el res
ort
e de
l
martillo y el pe
rcuto
r, y deben
hac
erse
en ar
moní
a e
ntre
sí. Co
mien
ce le
ntame
nte
para entend
er có
mo c
ada
uno afecta
el dese
mpeño
de
l ri
fle
de
aire
. L
a e
xperien
cia
y
las pruebas son
la m
ejor
for
ma d
e ent
end
er esta
s
capacidades
.
No intente reparar el rifle de air
e ni desarmarlo para corregir un
llenado en exceso o un bloqueo de válvula. Nunca repar
e un arma presurizadas. Pueden
salir piezas volando del rifle de aire a velocidades peligr
osas cuando se desarma y presuriza.
ADVERTENCIA:
C. A
finar para diversas ve
loc
ida
des
El rifle de ai
re Marauder
se h
a a
justado
de f
ábr
ica
a un
a ve
locid
ad
eficiente ad
ecuada par
a la
may
oría
de l
os us
os d
e c
acer
ía y
tir
o
al blanco. Si usted, co
mo p
rop
ietar
io,
dese
a alt
erar
los
ajustes
de
fábrica, debe hacerlo únic
ament
e de
spués d
e le
er cu
idad
osa
ment
e
las sigui
entes instrucc
ion
es. A
menos que t
eng
a exp
erie
ncia
trab
a-
jando con rifles de
ai
re,
C
rosm
an C
orporat
ion sugi
ere
que
obt
eng
a la
ayuda de un arme
ro
cualificado
par
a re
aliz
ar estos
pr
oce
dim
ient
os
de
ajuste de la veloc
idad
.
Active el s
egu
ro de
l rifl
e d
e ai
re
(“O
N SAFE”
), qu
ite
el ca
rgador
y
mantenga el rifle apuntado
en un
a DIREC
CIÓ
N SEG
URA.
R
ecue
rde
11B
Ajuste del percutor
Ajustador de la precarga
del resorte del martillo
11B
11A
Ajuste del resorte
del martillo
12
8
8