Advertencia – Crosman BP2563 User Manual
Page 3
Your new airgun is unique because it operates on either air or CO
2
. To fill and shoot with CO
2
, an optional
CO
2
fill adapter must be purchased. This owner’s manual describes operating the gun with air, only. The
manual that comes with Crosman’s CO
2
adapter describes operation on CO
2
.
2. Operating the Safety
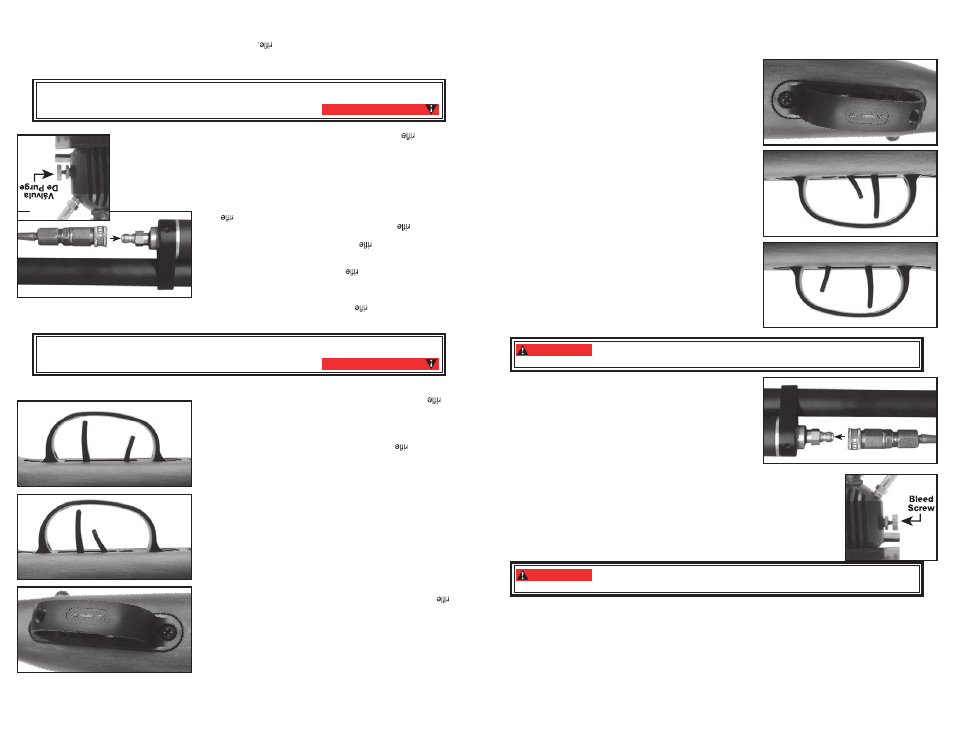
A. To Put the Airgun “ON SAFE:”
Locate the safety in front of the trigger.
•
The letters “F” (fire) and “S” (safe) on the bottom of the
•
trigger guard also indicate the appropriate position of the
safety (Fig 2A).
Push the safety towards the trigger to put the safety on.
•
The safety is on, and the airgun is “ON SAFE” when the
lever is in the rear position (near the trigger). (Fig. 2B)
Even when the safety is on, you should continue to handle the
airgun safely. Don’t point the gun at anything you don’t
intend to shoot.
Like all mechanical devices, an airgun safety can fail. Even
when the safety is “ON SAFE”, you should continue to handle
the airgun safely. NEVER point the airgun at any person. NEVER
point the airgun at anything you do not intend to shoot
B. To Take the Airgun “OFF SAFE”
Push the safety to the forward position (away from the trig-
•
ger). When the airgun is “OFF SAFE” it is ready to be fired
after following the instructions in this manual on how to fill
and load. (Fig. 2C)
3. Pressurizing the Airgun
This airgun is designed for use at pressures between 2,000 and
3,000 psi depending on how you, as the user, adjust (tune) the
gun to work.
WARNING:
Use only compressed air in this airgun. Use no other gasses—including
oxygen, which can cause a fire or explosion that may result in serious injury or death.
A. Pressurizing (Filling) the Airgun with a Hand Pump
Be sure to wear eye protection
•
Make sure the airgun is unloaded and not cocked. (See
•
section 6 for instructions on unloading and un-cocking.)
Read all instructions with your hand pump so you are famil-
•
iar with its operation. Use only a pump designed for filling a
pre-charged airgun and outfitted with a Foster #12FS quick
disconnect fitting. Do not use a standard air compressor or
bicycle pump.
Put the airgun “ON SAFE” (see section 2A).
•
Point the airgun in a SAFE DIRECTION.
•
Remove the threaded cap that covers the fill nipple on the airgun by turning
•
counter-clockwise.
Connect the quick-disconnect fitting on the hand pump hose to the fill nipple (fig. 3)
•
Make certain the bleed valve on the hand pump is fully closed (tighten in a
•
clockwise direction) (fig.4).
Start pumping and continue until the gauge needles on your pump and on the
•
airgun are between 2000 psi and 3000 psi depending on your desired tune.
DO NOT fill the airgun to more than 3000 psi. See “Overfill” information section 3C.
WARNING:
Disconnecting the fill hose from the airgun without bleeding the air first
may result in injury from hose whip as a result of pressure in the fill hose.
Open the bleed screw on the pump base rapidly in a counter-clockwise direction to COMPLETELY bleed
•
the hose. You must bleed the fill hose COMPLETELY to avoid hose whip from pressure in the fill hose.
Disconnect the pump from the fill nipple on the gun
•
Replace the cap over the fill nipple and tighten. Always keep the fill nipple capped to eliminate the pos-
•
sibility of dirt entering the check valve.
2A
2B
“ON SAFE”
2C
“OFF SAFE”
3
4
Su nuevo rifle de a
ire e
s s
ing
ula
r p
orque funciona ya sea con ai
re comprimido o con C
O
2
. Para llen
arlo y
dispararlo con C
O
2
, debe
adqu
irirse un
ad
aptad
or d
e lle
nado de CO
2
op
cional. Este manual del
pr
opi
etari
o
describe únicament
e el fun
cionam
iento del rifle con ai
re comprimido. El
manual que viene con el adaptado
r
de
CO
2
de Cro
sman des
crib
e e
l fun
cio
nam
iento con C
O
2
.
2. Operación
del
se
gur
o
A. Para poner
el
se
gur
o del
rifl
e de ai
re en posición d
e
activado (“ON S
AFE”
).
• Encuent
re
el segu
ro
delante
del gatillo
.
• La
s letra
s “F
” (fuego
) y
“S
” (segu
ro)
en
la
part
e inferio
r de
l gua
rda
-
monte
tam
bién
ind
ican
la
posi
ción
cor
rect
a del segu
ro
(Fig. 2A).
• Empuj
e e
l segu
ro
hacia
el gatillo
. E
l segu
ro
está
activado
y e
l
de
ai
re
suave
está
“ON
SAFE
” cuand
o la
palanc
a est
á e
n la
posición
más
retrasad
a (ce
rca
de
l gatillo)
. (Fig
. 2B
)
Incluso con el s
egu
ro ac
tiva
do,
deb
e seguir manipulando co
n
seg
uridad el rifle
de ai
re. NUNC
A a
punte con el rifle a nada a lo
que no tenga int
enc
ión
de
disp
ara
rle
.
Como
todos
los
dispositivos
mecánicos, e
l segu
ro
de
las
armas
de
aire puede fa
lla
r. In
clus
o con el
segu
ro activado (“ON SAFE”)
,
debe seguir m
anipu
land
o con
seg
uridad el rifle de ai
re. NUNC
A
apunte el rifle de
aire a
una
pers
ona.
NUNCA apunte con el arm
a
de
aire a nada a
lo
qu
e no
ten
ga int
ención de dispararl
e
B. Para poner
el
se
gur
o del
rifl
e de ai
re en posición d
e
desactivado (“OFF
S
AFE”
).
• Empuj
e e
l segu
ro
hacia
la
posición
delantera
(alejado
del gatillo)
.
Cuando
el
de
ai
re
está
con
el segu
ro
desactivado
(“OFF
SAFE”) est
á list
o par
a disparars
e despué
s d
e segui
r la
s
instrucc
iones de
est
e m
anu
al s
obr
e có
mo
llenar y carg
ar.
(Fig.
2C
)
3. P
resurizar e
l ri
fle d
e a
ire
Este
de
ai
re
está
diseñado
para
utilizarse
a p
resione
s ent
re
2,0
00 y 3,000 psi, d
epe
ndie
ndo
de la
forma en que usted, como
usuario, ajuste (a
fine) el
funcio
nami
ento del rifle.
Use únicamente aire comprimido en este rifle de air
e. No use
otros gases, entr
e ellos el oxígeno, que puedan causar un incendio o explosión y dar como
resultado graves lesiones o la muerte.
ADVERTENCIA:
A. P
resurizar (
llenar)
el
rifl
e d
e ai
re con una bomba de man
o
• Asegú
res
e d
e utiliza
r p
rotecció
n par
a lo
s ojo
s
• Ce
rció
res
e d
e qu
e e
l
de
ai
re
esté
descargado
y n
o amartillado
. (V
ea
la
sección
6 par
a obtene
r instruccione
s
sob
re
cóm
o descarg
ar y
desa
mart
illa
r.)
• Le
a toda
s la
s instruccione
s qu
e viene
n co
n s
u bomb
a manua
l
para
familiarizarse
con
su
operación. Us
e únicament
e un
a bomb
a
diseñada
para
llenar u
n
de
ai
re
precargad
o y
dotad
o d
e u
n
conector d
e desconexió
n rápid
a Foste
r #12
F . N
o us
e un
a co
m-
pre
sor
a d
e a
ire
co
mún n
i un
a b
omb
a de bici
clet
a.
• Activ
e e
l segu
ro
del
de
ai
re
(“ON
SAFE”)
. (Consult
e la
Secció
n
2A).
• Apunt
e e
l
de
ai
re
en
una
DIRECCIÓN
SEGURA
.
• Quit
e e
l tapó
n roscad
o qu
e cub
re
el nipl
e d
e llenad
o de
l
de
aire
girándol
o e
n sentid
o contrari
o a
l d
e la
s manecilla
s de
l reloj
.
• Conect
e e
l aditament
o d
e desconexió
n rápid
a d
e la
manguer
a d
e
la bo
mba
m
anu
al a
l ni
ple
de
llenad
o (fi
g. 3.
)
• Asegú
res
e d
e qu
e la
válvul
a d
e purg
a d
e la
bomb
a d
e man
o est
é totalment
e cerrad
a
(apri
éte
la en d
ire
cción d
e la
s ma
neci
llas d
el r
eloj) (fig.4)
.
• Empiec
e a
bombea
r y
continú
e hast
a qu
e la
s aguja
s de
l medido
r d
e s
u bomb
a y
de
l
rifle de
aire
estén
ent
re
200
0 ps
i y
300
0 psi según su afin
ación
de
seada.
NO
llen
e e
l
de
ai
re
a má
s d
e 300
0 psi
. V
ea
la
información
sobre
el
llenad
o e
n
exceso en la sec
ción
3C.
Desconectar la manguera de llenado del rifle de aire sin pur
gar
el aire primer
o puede ocasionar lesiones por latigazos de la manguera como resultado de la
presión que queda en la manguera de llenado.
ADVERTENCIA:
• Abr
a e
l to
rnill
o purgado
r d
e la
bas
e d
e la
bomb
a rápidament
e e
n sentid
o contrari
o a
la
s manecilla
s de
l relo
j par
a
purgar C
OMPLE
TAM
ENTE
la ma
ngu
era
. Debe purgar la mangu
era de llenado
COMPLE
TAMEN
TE para evita
r
que
lati
guee
po
r tener p
resi
ón.
• Desconect
e la
bomb
a de
l nipl
e d
e llenad
o de
l
• V
uelva
a coloca
r e
l tapó
n sob
re
el nipl
e d
e llenad
o y
apriételo
. Manteng
a siemp
re
el nipl
e d
e llenad
o tapad
o par
a
eliminar l
a posibilida
d d
e qu
e ent
re
suciedad
a la
válvul
a reguladora
.
2A
2B
Seguro activado “ON SAFE”
2C
Seguro desactivado “OFF SAFE”
3
4
3
3