Advertencia – Crosman BP2563 User Manual
Page 6
8. Removing a Jammed Pellet
A jammed pellet is usually the result of trying to fire the airgun when the pressure is too low. Before firing the
airgun make certain there is sufficient pressure for proper operation, by making sure the gauge needle is
pointing to the area between 1000 and 3000 psi.
WARNING:
In this procedure you will put a cleaning rod down the barrel of a charged
airgun. It is extremely important that while you are doing this the airgun be “ON SAFE”, the
bolt remains in open position and that your finger be kept away from the trigger. Failure to
follow this warning may result in serious injury or death.
Point the airgun in a SAFE DIRECTION.
•
Put the airgun “ON SAFE” (see section 2A.)
•
Open the bolt by pushing the bolt handle up and
•
pulling it all the way back until you hear two clicks.
With the bolt in the rearward position insert a
•
ramrod of the proper size into the barrel (start at
the muzzle). (fig 8) The barrel could be damaged if the proper sized cleaning rod is not used.
NOTE: The bolt must be cocked and open for the jammed pellet to clear the breech when it is pushed out
by the ram rod.
Using the ramrod push the pellet into the pellet loading port (forward of the bolt), remove and discard
•
the pellet. Do not reuse that pellet.
Point the airgun in a SAFE DIRECTION, close the action take “OFF SAFE” and fire.
•
Put the airgun “ON SAFE” (see section 2A.)
•
If you are not able to unjam your airgun by following this procedure, take no further action. Crosman
•
Corporation or an Authorized Service Station will unjam your airgun. (no cost during the warranty period)
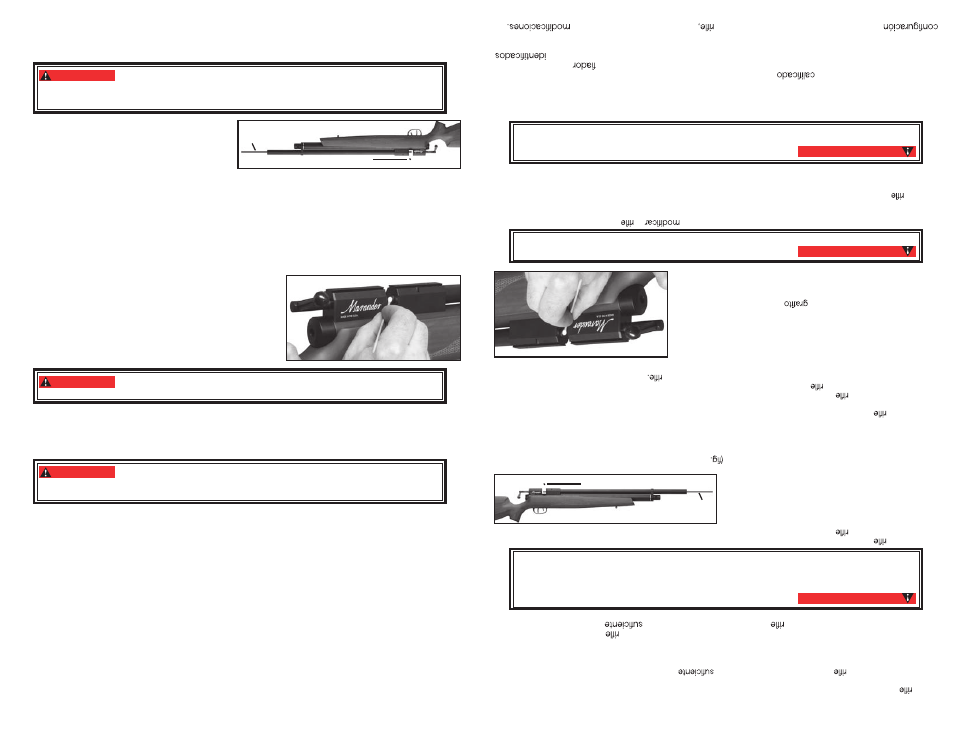
9. Maintaining Your Airgun
Apply Crosman silicone chamber oil (part number RMCOIL) on
the barrel o-ring every 3 months or 500 shots. Apply with a cot-
ton swab as shown in figure 9.
Apply a moly graphite EP grease to the sliding bolt mechanism
every 3 months or 500 shots.
Keep all petroleum-based lubricants away from the fill nipple.
They MUST NOT be introduced into the high pressure reservoir.
WARNING:
Use of petroleum-based lubricants in this area could result in an explosion
resulting in personal injury.
DO NOT MODIFY OR ALTER YOUR AIRGUN. Attempts to modify the airgun in any way inconsistent with
this manual may make your airgun unsafe to use, cause serious injury or death, and will void the warranty.
If you drop your airgun, visually check to see that it works properly before you use it again. If anything
seems changed, like a shorter or weaker trigger pull, this may mean worn out or broken parts. Call Cros-
man customer service for assistance before using your airgun again.
WARNING:
Do not attempt to repair the airgun or to disassemble to correct an over fill
or valve lock. Parts can fly from the airgun at dangerous speeds when it is disassembled
while pressurized.
10. Advanced Tuning Techniques
A. Adjusting the Trigger
The Marauder trigger assembly can be adjusted and customized but unless you are experienced in making
such adjustments, Crosman recommends that these adjustments to factory settings be made only by a
qualified gunsmith after reading all instructions. Adjusting the trigger assembly can result in a light trigger
pull, decreased sear engagement that could make the gun more susceptible to discharge when dropped or
jarred, or a non-functioning safety. Make only the adjustments identified in this manual.
NOTE: these adjustment features are for advanced shooters. Most shooters can use the settings
provided during manufacturing of the gun and should not need to make modifications.
The match grade trigger on your pellet air rifle is a two stage, fully adjustable unit. It has been factory
•
set to an efficient setting that will suit most hunting and target uses. If you, as the owner, wish to alter
the factory settings you should do so only after reading the following instructions carefully.
Put the air rifle “ON SAFE”, remove the clip and keep the airgun pointed in a SAFE DIRECTION.
•
Depressurize the airgun (see section 4)
Remove the stock screw (Fig 12) (using a 3/16” Allen wrench to separate the stock from the action.
•
Do not remove the trigger guard screws as the trigger guard should remain with the stock.
8
Rod
Pellet
9
segu
ro.
Debe colg
arse una
manta
grues
a detrás del
resp
aldo para evitar
reb
otes
en
caso
de
que no at
ine
al
respaldo
.
• S
u
de
ai
re
está
diseñado
para
tiro
al
blanc
o y
es
adecuad
o par
a usars
e baj
o te
cho
o a
l ai
re
libre
. Recue
rde
siem
pre
coloc
ar su bl
anco
con
cuidad
o. PIENSE
en
lo
que puede golpear si n
o atina a
l bl
anc
o.
• Ante
s d
e dispara
r e
l
de
ai
re,
asegú
res
e d
e qu
e ha
y
pr
esión
para
su
operación
cor
recta
. L
a aguj
a
del medid
or debe
est
ar apunt
ando
a un
áre
a ent
re 1000 y
30
00 psi en el m
edi
dor.
8. E
xtracción de un diábo
lo at
ora
do
Un
diábolo
atascado
es
habitualmente
resultad
o d
e lo
s intento
s d
e dispara
r e
l
de
ai
re
con
la
presió
n
demasiado
baja. Ante
s d
e dispara
r e
l
de
ai
re,
asegú
res
e d
e qu
e ha
y
pr
esión
para
su
operación
corre
cta, ce
rcior
ándos
e d
e que
la
agu
ja d
el m
edid
or esté
apunt
and
o a
la z
ona
ent
re 1
000
y 30
00 psi
.
En este procedimiento meterá una baqueta por el cañón de un
rifle de aire car
gado. Es en extremo importante que mientras esté haciendo esto el rifle de
aire tenga el segur
o activado (“ON SAFE”), que el cerrojo permanezca en posición abierta
y que mantenga el dedo apartado del gatillo. No respetar esta advertencia podría causar
lesiones graves o la muerte.
ADVERTENCIA:
• Apunt
e e
l
de
ai
re
en
una
DIRECCIÓN
SEGURA
.
• Activ
e e
l segu
ro
del
de
ai
re
(“ON
SAFE”)
.
(vea
la
Sección
2A).
• Abr
a e
l cer
roj
o empujand
o e
l m
ang
o d
e ést
e haci
a
arriba y tirando de é
l c
om
plet
ament
e h
aci
a atrás
hast
a qu
e e
scuche dos clics
.
• Co
n e
l cer
roj
o e
n la
posició
n má
s traser
a insert
e un
a
baqueta
del tamañ
o adecuad
o e
n e
l cañó
n (emp
e-
zando
por l
a boca)
. S
e pued
e dañ
ar e
l cañó
n s
i n
o
se
usa
una
baqueta
de
limpieza
del t
amañ
o cor
rect
o
8)
.
NOTA
: El
cer
rojo d
ebe est
ar am
art
illa
do
y a
biert
o para
que
el
diáb
olo
at
asc
ado s
alg
a de
la re
cámar
a a
l
empujarlo con la b
aquet
a.
• Co
n la
baqueta
, empuj
e e
l diábol
o a
l puert
o d
e car
ga
de
diábolos
(frent
e de
l cer
rojo)
, quit
e y
desech
e e
l diábolo
.
No vue
lva
a
utiliz
ar ese diábolo
.
• Apunt
e e
l
de
ai
re
en
una
DIRECCIÓN
SEGURA
, cier
re
la
acción, desacti
ve
el segu
ro
(póngalo
en
“OFF
SAFE”) y disp
are
.
• Activ
e e
l segu
ro
del
de
ai
re
(“ON
SAFE”)
. (ve
a la
Secció
n 2A)
.
• S
i n
o pued
e desatasca
r e
l
de
ai
re
siguiendo
este
procedimiento
, n
o emp
rend
a ningun
a otr
a acción
. C
ros
man
Corporation
o un
a Estació
n d
e servi
cio
autorizad
a le
desatasc
ará
n e
l
(est
o n
o tien
e cost
o dur
ant
e e
l períod
o
de
garantía)
9.Mantenimiento del r
ifle
de
ai
re
• P
ong
a ac
eite
de
recáma
ra
de
silico
na
Cro
sma
n (nú
mero
de
piez
a
RMCO
IL) e
n la
junt
a tó
ric
a d
el ca
ñón
ca
da
3 me
ses
o
cada
50
0
disp
aro
s. Ap
líque
lo
con
un
a to
runda
de
algodó
n com
o s
e m
ues
tra
en la figura
9.
• Apliqu
e un
a gras
a E
P d
e mol
y
al
m
ecanism
o de
l cer
roj
o
deslizante cada 3 m
eses
o
500 ti
ros
.
• Manteng
a todo
s lo
s lubricante
s co
n bas
e d
e petróle
o apartado
s
del nipl
e d
e llenado
. N
O DEBE
N int
roducirs
e e
n e
l depósit
o d
e
alta
presión
.
El uso de lubricantes con base de petróleo en esta área podría
dar como resultado una explosión que pr
ovoque lesiones personales.
ADVERTENCIA:
• N
O MODIFIQU
E N
I A
LTER
E E
L RIFL
E D
E AIRE
. Lo
s intento
s d
e
el
de
ai
re
de
cualquier form
a qu
e
no esté
indicada
en
este m
anual pued
en h
acer que
el rifle de ai
re no sea se
gur
o para
usarse,
oc
asionar
gra
ves
lesiones
o la
muerte
, y
anula
r la
garantía
.
• S
i s
u
de
ai
re
se
cae, r
evise
visualment
e qu
e fun
cion
e cor
rectament
e ante
s d
e volverl
o a
usa
r. S
i pa
rec
e qu
e
cualquier cos
a h
a cambiado
, com
o qu
e e
l gatill
o est
é má
s suav
e o
má
s du
ro,
pued
e se
r indic
ació
n d
e pieza
s
desgast
adas
o ro
tas. Llame a
servi
cio
al c
liente
de
Crosman para
obtener
ayuda antes de
vo
lver a usar e
l rifle
de
aire
.
No intente reparar el rifle de air
e ni desarmarlo para corregir
un llenado excesivo o un bloqueo de válvula. Pueden salir piezas volando del rifle de aire a
velocidades peligrosas si se desarma estando pr
esurizado.
ADVERTENCIA:
10. Técnicas avanzadas de afinac
ión
A. A
juste del gatillo
El conjunto
del gatillo
de
l Mar
aud
er se
puede
aj
ustar
y
persona
liz
ar,
pero
a
menos
qu
e ust
ed t
eng
a exp
eri-
encia
en
la
realizació
n d
e tale
s ajustes
, C
rosma
n recomiend
a qu
e esto
s ajuste
s a
lo
s valo
res
de
fábric
a sea
n
realizado
s sól
o po
r u
n arme
ro
despué
s d
e lee
r toda
s la
s instrucciones
. Ajusta
r e
l conjunt
o de
l g
a-
tillo
puede
dar com
o resultad
o un
a poc
a resistenci
a de
l gatillo
, meno
r enganch
e de
l
qu
e podrí
a causa
r
que
se
dispare
al
caers
e o
sacudirse
, o
qu
e e
l segu
ro
no
funcione. Hag
a únicament
e lo
s ajuste
s
en este manual
.
NOTA
: esta
s funcione
s d
e ajust
e so
n par
a tirado
res
avanzados
. L
a mayorí
a d
e lo
s tirado
res
puede
n usa
r la
pr
oporcionad
a durant
e la
fabricació
n de
l
y
no
deberían
tener qu
e hace
r
8
Baqueta
Diáb
olo
9
6
6