Advertencia – Crosman BP2563 User Manual
Page 5
Using an Allen wrench or screwdriver through the hole in the degassing tool (fig 5B) apply leverage to
•
turn the tool and force the internal valve open. This may require approximately 1-2 complete turns to
totally degas the airgun.
Remove the degassing tool completely from the airgun. Leaving the tool in the airgun will interfere with
•
the normal operation of the firing mechanism.
Cock the airgun and dry-fire (no pellet) in a SAFE direction to make certain all pressure has been
•
relieved from the airgun
Check the gauge to make certain all pressure has been relieved from the airgun.
•
5. Loading the Airgun
WARNING:
Use .177 caliber pellets only in your Model BP1763, .22 caliber pellets only
in your Model BP2263 and use .25 caliber pellets only in your Model BP2563. Never reuse
ammunition. Use of any other ammunition can cause injury to you or damage to the airgun.
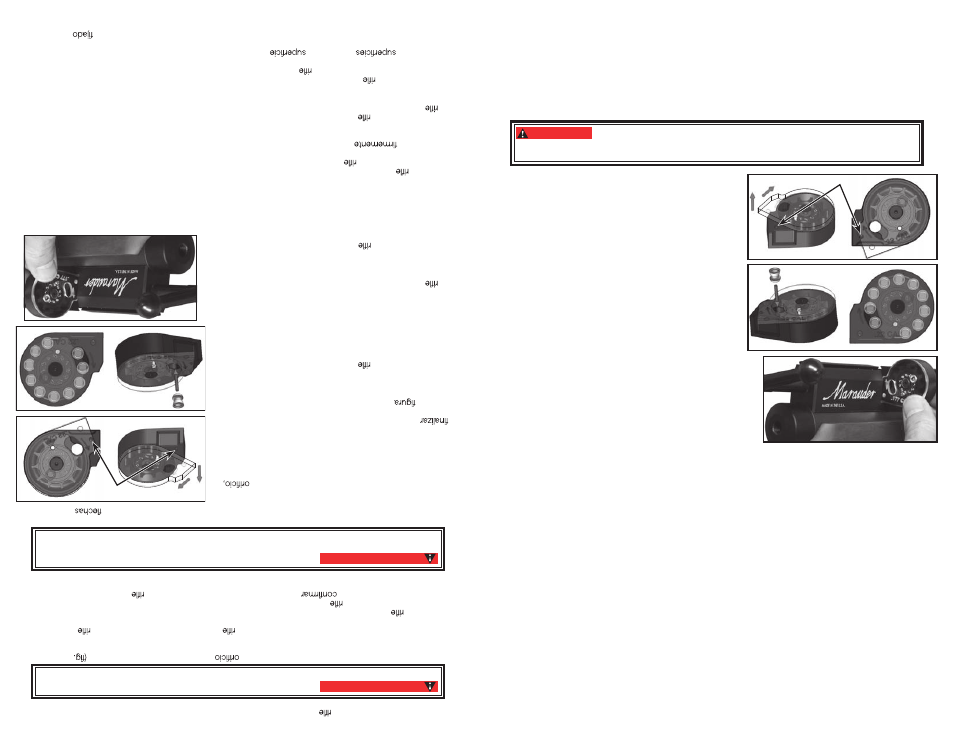
A. Loading the Clip
Lift the clear cover over the catch point and rotate in the
•
direction of the arrows (clockwise) per Figure 6A. Turn
until the cover appears as shown in Figure 6B.
Place a finger under the clip covering the hole, place
•
the first pellet in the clip, nose first (Fig. 6C). Make
certain the pellet does not protrude out the back of the
clip. In the event the pellet does protrude simply push
the pellet inward.
Rotate the cover counter clockwise and place the
•
remaining pellets into the clip. Upon completion of filling
the remaining positions rotate the cover until it comes to
rest at the catch point as shown in figure 6D. The clip is
now ready for use.
B. Inserting the Clip
NOTE: Following these directions will result in your gun
being loaded and ready to fire.
Put the air rifle “ON SAFE” (see section 2A) and point in
•
a SAFE DIRECTION.
Pull the bolt back to the cocked position.
•
With the cover of the clip facing the butt of the air rifle insert
•
the clip from the right side and push it inward until it snaps
into place. (fig 7)
Push the bolt forward fully and latch to chamber a pellet.
•
The air rifle is now ready to fire.
•
6. Un-Loading and Un-Cocking
A. Unloading- Removing the Clip
Put the air rifle “ON SAFE” (see section 2A) and point in a
•
SAFE DIRECTION
Push the clip out of the receiver from the left side.
•
Refill the clip and re-insert for continued shooting.
•
B. Un-Cocking
In the event you are finished shooting, remove the clip as instructed and un-cock the air rifle by the
following steps:
Point the air rifle in a SAFE DIRECTION.
•
Take the air rifle “OFF SAFE” (section 2B).
•
Pull the bolt back to the rear position.
•
While firmly holding the bolt in the rear position, pull the trigger.
•
Continue to hold the trigger back while sliding the bolt forward to the latched position.
•
Release the trigger.
•
Put the air rifle on “ON SAFE” (see section 2A).
•
The air rifle is now ready for storing.
•
7. Aiming and Firing Safely
Always point your airgun in a SAFE DIRECTION.
•
Follow the instructions for filling the air gun (sections 3A or 3B) and loading pellets (section 5A and 5B).
•
You and others with you should always wear shooting glasses to protect your eyes.
•
Do not shoot at hard surfaces or at the surface of water. The pellet may bounce off or ricochet and hit
•
someone or something you had not intended to hit.
Always choose your target carefully. It is best to shoot at paper bull’s-eye targets which are attached to
•
a safe backstop. A heavy blanket should be hung behind the backstop to prevent ricochet should you
miss the backstop.
Your airgun is designed for target shooting and is suited for both indoor and outdoor use. Always
•
remember to place your target carefully. THINK about what you will hit if you miss the target.
Before firing the airgun make certain there is sufficient pressure for proper operation. The gauge needle
•
should be pointing to the area between 1000 and 3000 psi on the gauge.
6A
6B
catch point
6C
6D
7
• Int
rodu
zca
la
herr
amient
a e
n e
l
de
ai
re
girá
ndol
a e
n d
irecció
n d
e la
s ma
necilla
s de
l relo
j h
ast
a qu
e si
ent
a re
sis
t-
encia
. Est
o ind
icará
qu
e la
punt
a d
e la
he
rramie
nta
ha
entr
ado
en
co
ntac
to
con
la
válvul
a int
ern
a.
Realizar el procedimiento siguiente expulsará el air
e del cañón a
gran velocidad. Asegúrese de que el rifle de air
e esté apuntado en una dirección SEGURA.
ADVERTENCIA:
• Usand
o un
a llav
e Alle
n o
un
desto
rnillado
r a
travé
s de
l
de
la
herramient
a d
e desgasad
o
5B
) hag
a
palanca
para
girar l
a herramient
a y
forza
r a
qu
e s
e abr
a la
válvul
a inte
rna
. Est
o pued
e requeri
r ap
roximadament
e
1 o
2
vuel
tas comp
let
as
para d
esg
asar totalm
ente el rifle
de ai
re.
• Quit
e la
herramient
a d
e desgasad
o completament
e de
l
de
ai
re.
Deja
r la
herramient
a e
n e
l
de
ai
re
interfer-
irá
con
la
operación
normal de
l mecanism
o d
e dispa
ro.
• Amartill
e e
l
de
ai
re
y dispa
re
en
vacío
(sin
diábolo) e
n un
a di
recció
n SEGUR
A par
a asegurars
e d
e qu
e s
e h
a
liberado
toda
la
presió
n de
l
de
ai
re
• Comprueb
e e
l medido
r par
a
qu
e s
e hay
a liberad
o tod
a la
pr
esión
del
de
ai
re.
5. Cargar el rifle
de
air
e
Use solamente diábolos calibre .177 en su Modelo BP1763 y
diábolos calibre.22 en su Modelo BP2263. Nunca r
eutilice la munición. El uso de cualquier
otro tipo de munición puede causarle lesiones o dañar el rifle de air
e.
ADVERTENCIA:
A. Cargar el car
gado
r
• Levant
e la
cubiert
a transpa
rent
e sob
re
el punt
o d
e enganch
e y
gí
rel
a e
n la
di
recció
n d
e la
s
(d
e la
s ma
n-
ecillas
del r
eloj) segú
n la
Figur
a 6A
. Gi
re
hasta
que
la
tapa
se
vea
co
mo s
e muestra
en
la fi
gur
a 6B
.
• Coloqu
e u
n ded
o debaj
o de
l cargado
r qu
e cub
re
el
coloque
el prime
r diábol
o e
n e
l cargado
r, empezand
o po
r la
nariz
(Fig. 6C)
. Ce
rció
res
e d
e qu
e e
l diábol
o n
o sob
resalg
a
por l
a part
e posterio
r de
l cargado
r. E
n cas
o d
e qu
e e
l diábol
o
sobresalga
, simplement
e empújel
o haci
a adent
ro.
• Gi
re
la
cubierta
en
sentido
contrario
al d
e la
s manecilla
s
del r
eloj y
coloqu
e lo
s diábolo
s restante
s e
n e
l cargado
r. A
l
el
llenad
o d
e la
s posicione
s restantes
, gi
re
la
cubierta
hasta
qu
e des
cans
e en
el
punto
de
eng
anche como se
mu
es-
tra
en
la
6D
. E
l cargado
r y
a est
á list
o par
a usarse
.
B. Colocación
de
l car
gado
r
NO
TA:
Segui
r esta
s indicacione
s dar
á com
o resultad
o qu
e
su rifl
e quede c
arg
ado y li
sto
par
a dispara
r.
• Activ
e e
l segu
ro
del
de
ai
re
(“ON
SAFE”
) (ve
a la
Secció
n
2A) y
apúntel
o e
n un
a DIRECCIÓ
N SEGURA
.
• T
ire
de
l cer
roj
o haci
a atrá
s a
la
posició
n trasera
.
• Co
n la
cubiert
a de
l cargado
r mirand
o haci
a la
part
e posterio
r
del r
ifle
de
aire
, ins
erte e
l c
argad
or d
esde el l
ado
de
rec
ho y
empújelo
hacia
adentro
hast
a qu
e ent
re
en
su
sitio
con
un
chasquido.
(fig
. 7
)
• Empuj
e e
l cer
roj
o haci
a adelant
e po
r complet
o y
ciér
rel
o par
a
meter u
n diábol
o e
n la
recámara
.
• E
l
de
ai
re
suave
está
ahora
listo
para
disparar.
6. Descarga y
desamart
illad
o
A. Descargar
- Extraer
el
cargado
r
• Activ
e e
l segu
ro
del
de
ai
re
(“ON
SAFE”)
. (ve
a la
Secció
n
2A) y
apúntel
o e
n un
a DIRECCIÓ
N SEGURA
.
• Empuj
e e
l cargado
r par
a sacarl
o de
l recepto
r desd
e e
l lad
o
izquierdo
.
• V
uelva
a llena
r e
l cargado
r y
reint
rodúzcal
o par
a segui
r disparando
.
B. Desamartil
lad
o
En caso de qu
e h
aya te
rmi
nad
o de
dispara
r, quite el cargador como se ind
ica y desamartille el rifle de ai
re
siguiendo los pas
os
sig
uie
ntes
:
• Apunt
e e
l
de
ai
re
en
una
DIRECCIÓN
SEGURA
.
• Desactiv
e e
l segu
ro
del
de
ai
re
(“OFF
SAFE”) (secció
n 2B)
.
• T
ire
de
l cer
roj
o haci
a atrá
s a
la
posició
n trasera
.
• Sosteniend
o
el
cer
roj
o e
n la
posició
n trasera
, ti
re
del gatillo
.
• Sig
a manteniend
o oprimid
o e
l gatill
o a
l tiemp
o qu
e desliz
a e
l cer
roj
o haci
a adelant
e a
la
posició
n d
e cier
re.
• Suelt
e e
l gatillo
.
• Activ
e e
l segu
ro
del
de
ai
re
(“ON
SAFE”
) (ve
a la
secció
n 2A)
.
• E
l
de
ai
re
está
ahora
listo
para
almacenarse.
7. Apuntar y
dis
parar
co
n se
gurida
d
• Siemp
re
apunte
el
de
ai
re
en
una
DIRECCIÓN
SEGURA
.
• Sig
a la
s instruccione
s par
a llena
r e
l
de
ai
re
(sección
3A
o
3B) y
carga
r lo
s diábolo
s (secció
n 5
A y
5B)
.
• Uste
d y
la
s demá
s persona
s debe
n siemp
re
usar anteojo
s d
e ti
ro
para
protege
r su
s ojos
.
• N
o dispa
re
a
dura
s o
a
la
de
l agua
. E
l diábol
o pued
e rebota
r y
golpea
r a
alguie
n o
alg
o qu
e
usted
no
tenía
intención
de
tocar.
• Elij
a siemp
re
su
blanco
con
cuidado. E
s mejo
r dispara
r contr
a diana
s d
e pape
l qu
e s
e haya
n
a
un
respald
o
6C
6D
7
6A
6B
Punto de enganche
5
5