Itititu, Ei' 3 – Kenmore 385. 17622 User Manual
Page 49
Attention! The text in this document has been recognized automatically. To view the original document, you can use the "Original mode".
f
STITCH
T. SELECTOR
2. LENGTH
CONTROL
3. TENSION
CONTROL
4. PREFER ’
FOOT ETC.
STRAIGHT : — — -
1
■ : :
c
|
d
RED ZONE
2 TO 6
A or C
ZIGZAG
AAA
RED
zone
2 TO 5
A
iTHBEE-STEP ZIGZAG
• AAA
t.W i \ t \
\
f V
V \
1. Slide'^aetEASE" fight
2. Select pattern "A"
3. Slide''FtEL£ASi:"lett
0.5TO 1.0 ‘
1 TO 4
A
BLIND (STRETCH)
1. Slide "RFI.EASF”. right
2. Select pattern “B"
3. Slido' RELEASe" left
1 TO 3
1 TO 4
A
■'■SHELL' ' : ■'
imk
1/ Slide ''RELEASE" right
2. Select pattern "C"
3. :Slida "RELEASE" left.:
1 TO 2 ■
3T0 9
.:■ A ■■
BOX ;
AAA
1. Slide "RELEASE" right
2. Select pattern "0"
3. Slide "RELEASE" left
1
1 TO 4
A
FAGOTING STITCH
w
1. Slide ''RELEASE" right
2. Select pattern "E"
3. Sl ide "RELEASE" left-
0.5 TO 2
3 T o a
A
STRAIGHT STRETCH
. , ■■■■:■■ T w . . - ■■■, BROWN
POSITION
2 TO 6
A or C
RICK-HACK
AAA
BROWN
POSITION
1 TO 4
A .
SMOCKING
/N/N/'Ni'
1. SIMe*'R£LEASe" right
2. Select pattern: "A'': ;
3. Slide "I1ELEASE" left
.BROWN
POSITION
. 1 T0 4
A
1. Slide "RELEASE" right
, BROWN
POSITION
1 TO 4
OVERCAST
vw
2 r.Se lect pM tern -."B ^ ^ •
3; Slide '«RELEASE" left
A
SERGtNG
UJJ
1. Slide "RELEASE" right
2- Select pattern "C"
3. Slide "RELEASE" left
, BROWN
POSITION
. 1 TO 4
■„ ..A:
ELASTIC
-1. 'Slide"RELEASE«'.:.right
2. Select ^pattern "D-*-'
3. Slide "RELEASE" left
BROWN
POSITION
1 T04 .
A
HERRING BONE STRETCH
t. .Slide"RELEASE" right
2^
Select pattern "E"
3. Slide "RELEASE" left
, BROWN.
.. POSITION
1 TO 4
A
BUTTONHOLE .
■ EI' 3 ■
BLUE ZONE
1 TO 5
SATIN
IMW
0.5 TO 1.0
1 TO 4
B
DARNING .
. Nil
. cio ^
ANY
NUMBER
1 TO 4 ..
F -
BUTTON SEWING
■ ■■ ■
ANY .
NUMBER.:
. 1 T0 4 .
A and F .
DECORATE WITH
....GEOMETie PATTERN
1. Slide "RELEASE" right
55. Select patierni :■
3. Slide "RELEASE" ieU
GREEN
. ZONE
1.T0 4 -
B
■ DECOFiATIVESTRETCH PATTERNS
V
...■ ■.■■:. ..................................................
1.
: S.lni8 R E LE ASE" right
2. Select pattern
3. Slide "RELEASE" leh
- BROWN
POSITION
1 TO 4
^ J
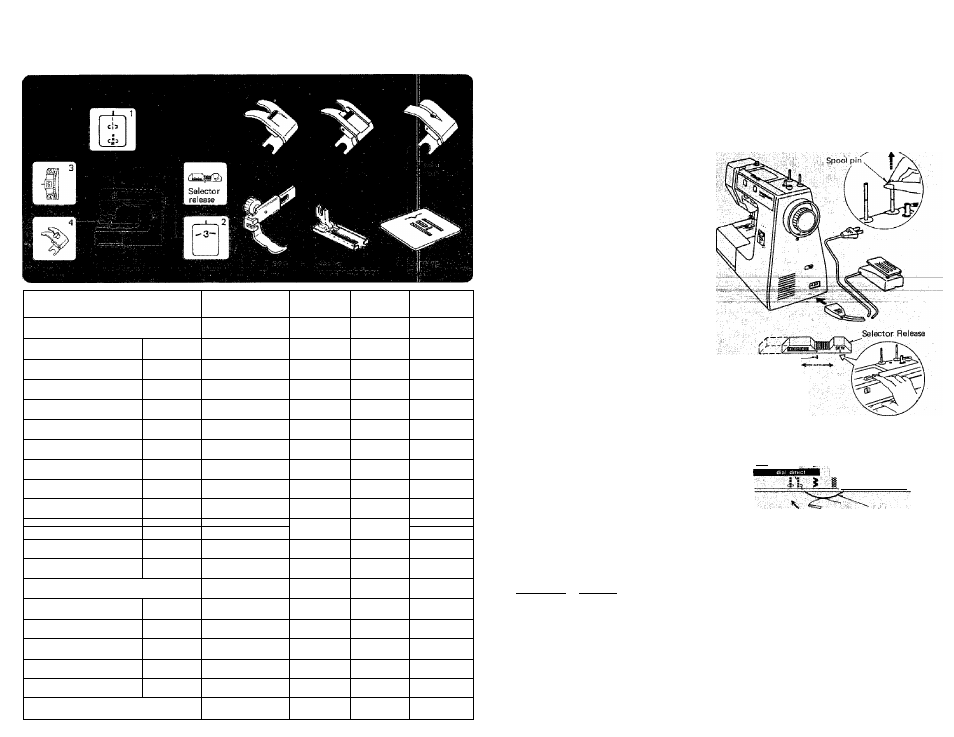
SETTING UP YOUR MACHINE
1. You'll find the spool pin: on the top
cover.
Pull up the spool pin. :
::
2.
Plug foot control into machine
receptacle. Then connect cord into
any 110 ~ 120 volt A.C. wall outlet.
3. Your Kenmore sewing machine has
been thoroughly oiled at the factory.
Be sure to wipe off the needle plate
area, bed plate and shuttle carefully
before sewing a garment." It is wise to
practice on a scrap of fabric so any
surplus oil is absorbed.
..........
STITCH SELECTOR
There are certain types of stitches that are Used
more often than others in your garment con
struction. Because of their frequent use, you will
soon realize the convenience offered to you by
this control. The desired stitch will be obtained
by turning the Stitch Selector.
-
All stitches printed in brown on the indicator
panel must be sewn with Stitch Length Control
set at ▼ positiori.
'
”
Setting mark @
Setting mark (t)v.
giiii
iTITITu
1) Raise the needle to its highest position.
.
2) Select the desired pattern at the setting mark(]}by turning the pattern selector dial. Dial
will not turn -past "SELECT" withoiit movlng selector release to the right.
When you select patterns A toj
.
a) First, slide the selector release to the right so that the "SELECT A to I" mark on the
selector, release meets the setting markl^on the machine.
.
b) Then, sélect the desired pattern at the setting markCDby turning the pattern selector dial.
Ù) Slide back the selector release to the left so that the “SEW" mark on the selector release
meets the setting. markd)on the machine. ■
.
.
.
Note; DO not turn the pattern selector dial while the needle is in the lower position. It may
cause the needle to break.
.