5 sequence for setting time delays, 1 manual time delay scenario 1, Operation – AERCO Boiler Valve Controller (BVC) PRIOR to Serial-12-840-1 User Manual
Page 33
OPERATION
33
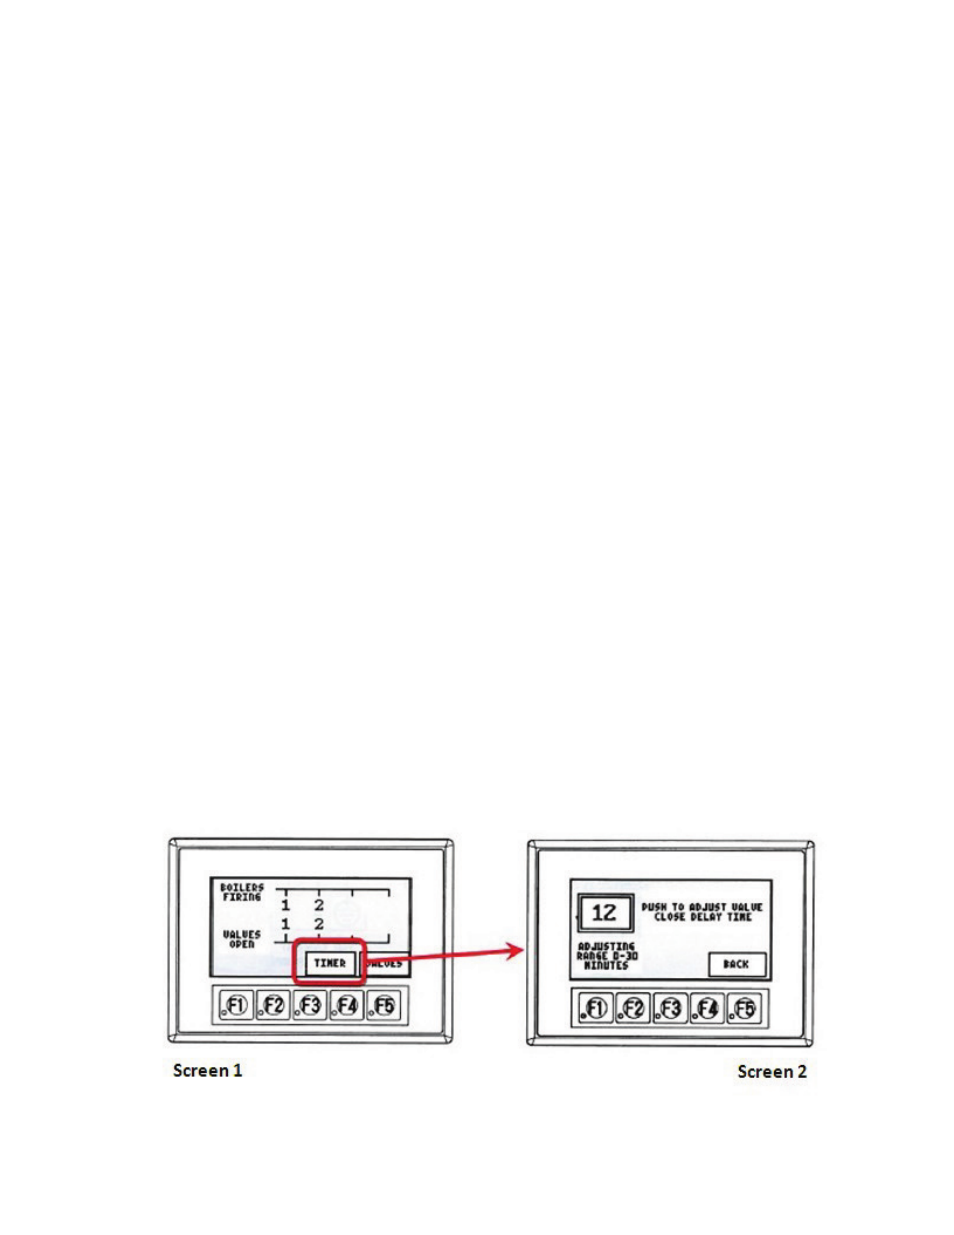
3.5 SEQUENCE FOR SETTING TIME DELAYS
The Main screen also has a “TIMER” touch screen button which is used to set valve closure
time delays from one through thirty minutes in one minute intervals. Setting a time delay on a
BVC’s valve closure action allows water to continue to flow through a boiler’s heat exchanger
even after the boiler stops firing in order to absorb the residual heat before closing the valve.
The factory default setting is two minutes. It is not recommended to set the time delay below this
value except for the purposes of servicing.
NOTE
Any time delay that is set will universally apply to all of the valves.
3.5.1
Manual Time Delay Scenario 1
1.
From the Main screen press the “TIMER” touch screen button (see Figure 16– Screen1).
2.
This brings the user to Screen 2 where the user may enter the time delay by first tapping the
numeric field in the upper left. The number in this field indicates what time delay is present.
Initially it will be set to two minutes by the factory. Once tapped a keypad along with four
touch screen buttons and an “Enter Time Delay” text box (at top of screen) appears as is
illustrated in Figure 17. If the “BACK” touch screen button was pressed instead, the user
would have navigated back to the Main screen.
3.
The user should now enter the desired time delay by using the touch screen keypad to tap
in the numeric value of the time delay in minutes desired. This number should be between 1
and 30 with a value of two minutes or greater recommended.
4.
The user may now choose to accept this value by pressing the “ENT” touch screen button to
enter the value selected for the time delay.
5.
The user could also choose to modify the current Time Delay by either backspacing or
clearing the “Enter Time Delay” text box altogether using the “CL” touch screen button and
starting all over.
Figure 16 - Manual Time Delay Scenario 1