Rane MM 42 User Manual
Page 16
Manual-
Utilities
Repeatedly pressing the UTILITIES button cycles through
the following useful pages.
Cue Bus Configuration
CUE BUS| CUE/PHONES PROCESSING MODE
1ON BUS| STEREO POST LATCH
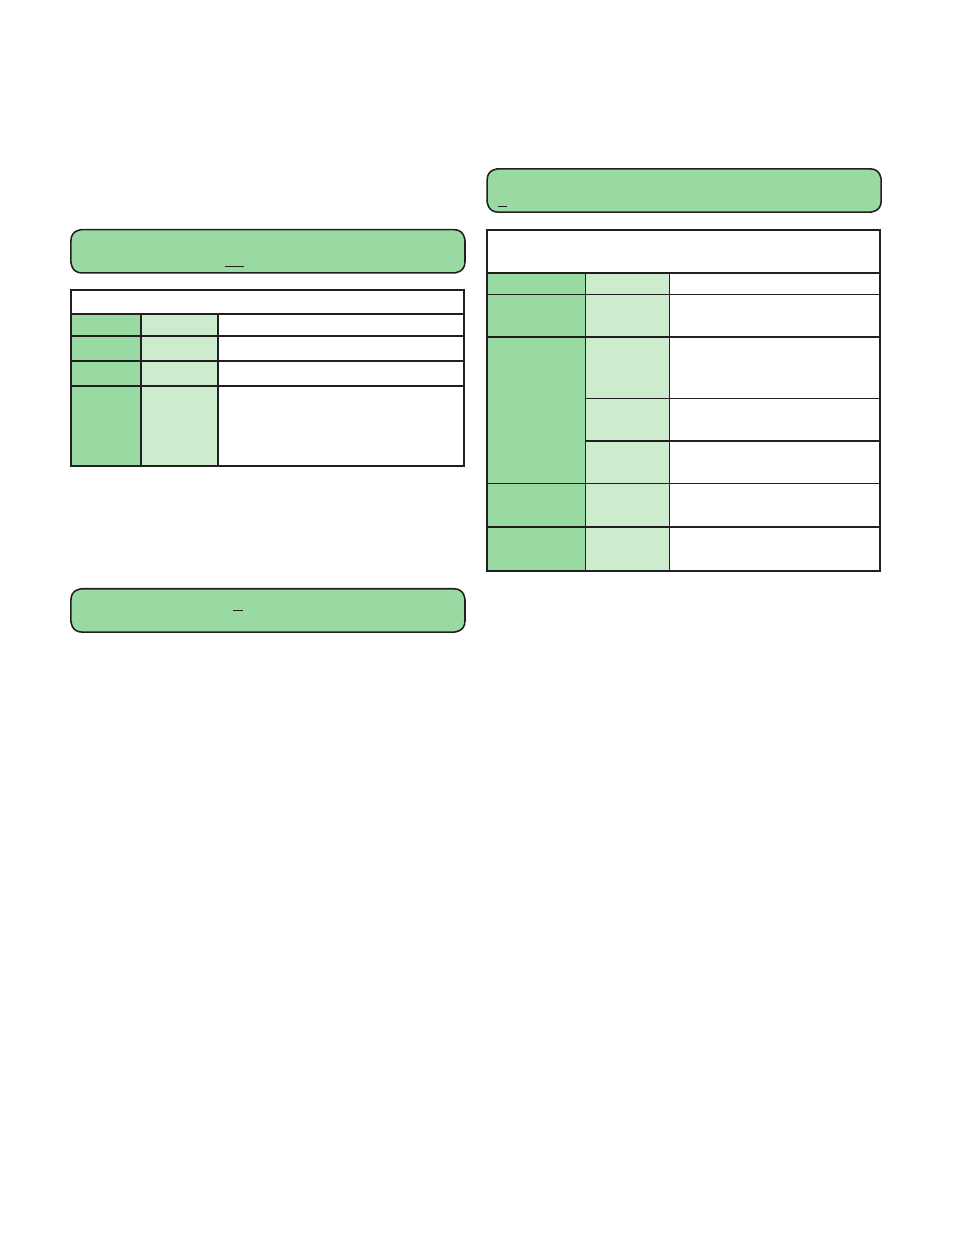
Utility: Cue Bus Configuration
Page 1 of 6
Parameter
Value
Description
ON BUS
1 to 4
Number of MM 42s connected
to the cue bus.
CUE/
PHONES
STEREO
Left/right mix (OUT 1/OUT
2 assignment) is sent to the
Cue/Phones.
MONO 1
OUT 1 is sent to both channels
of the Cue/Phones.
MONO 2
OUT 2 is sent to both channels
of the Cue/Phones.
PROCESSING
PRE or
POST
Selects whether the Cue/Phones
signal is pre- or post processing.
MODE
LATCH or
MOMENT
Selects between latching or
momentary Cue Bus mode.
On Bus
When connecting multiple MM 42s via the Cue Bus, set
each unit’s ON BUS parameter to match the number of con-
nected units, to a maximum of 4. For example, if three MM 42s
are connected, set the ON BUS parameter of all units to 3. This
parameter is especially important if you need to precisely match
the gain settings of a spare transmitter/beltpack to those of the
primary transmitter/beltpack.
It is possible to connect more than four MM 42s to the Cue
Bus, but be aware that there will be a slight loss in the Cue/
Phones signal for each additional connected device. This loss
equates to 6 dB per doubling of the number of devices, and can
be compensated for by turning up the PHONES level or by ad-
justing the input gain of the spare transmitter/beltpack if using
the CUE outputs.
Important note:
The main outputs (OUT 1, 2 & SUB) are
not affected
by adding or removing MM 42s to or from the CUE
BUS. Only the front panel PHONES and rear panel CUE OUTs
are affected.
Processing
The PROCESSING parameter determines whether the cued
signal is monitored pre- or post-processing. This feature is espe-
cially useful for doing a before-and-after comparison to hear the
effect of the channel processing and only affects the Phones and
CUE Outputs – the Main Outputs (OUT 1, OUT 2) and SUB
Output are always post-processing. Did you really get that low-
end compression properly dialed in? Is the PEQ adding enough air
to the mix? Use the pre/post feature to hear for yourself – without
disrupting the artist’s mix.
Storing and Recalling Memories
(Presets)
The current CONFIG settings and parameters for all
processing sections (filter/sub, compressor, EQ, and limiter) are
saved when you store a Memory. Input and output levels and all
UTILITIES settings are not stored.
Pressing the MEMORY button displays this edit page:
MEMORY |STORE : 1 STEREO DEFAULT
|RECALL: 1 STEREO DEFAULT *MOD
MEMORY
Parameter
Value
Description
STORE
1 to 16
Memory location stored to.
RECALL
1 to 16
Memory location recalled from.
*MOD
The *MOD flag appears when
parameters have been changed since
the last Memory Recall or Memory
Store.
To store all processing and configuration settings to a
Memory location:
1. Press the key once to navigate to the STORE field.
2. Rotate the DATA control to select a Memory number to
STORE to and press ENTER, producing this screen:
NAME MEMORY 1: MEM 1
CANCEL
3. Give the Memory a meaningful name. Use the and
keys to move between character fields. Select the characters
by rotating the DATA control. A maximum of 16 characters is
permitted.
4. Press ENTER to move the cursor to the flashing STORE
field. Press ENTER to complete the operation.
The Memory store operation can be cancelled at any time by
pressing (you guessed it) the CANCEL button.
To recall a stored Memory:
1. Navigate to the RECALL field.
2. Rotate the DATA control and select the Memory to recall.
3. Press ENTER.
The audio outputs mutes briefly when a Memory is recalled.
Warning:
the current processing and configuration settings will
be overwritten with the content of the selected Memory.