Assembly instructions 5/8, Step 7, Step 8 – Home Styles 5018-95 User Manual
Page 6
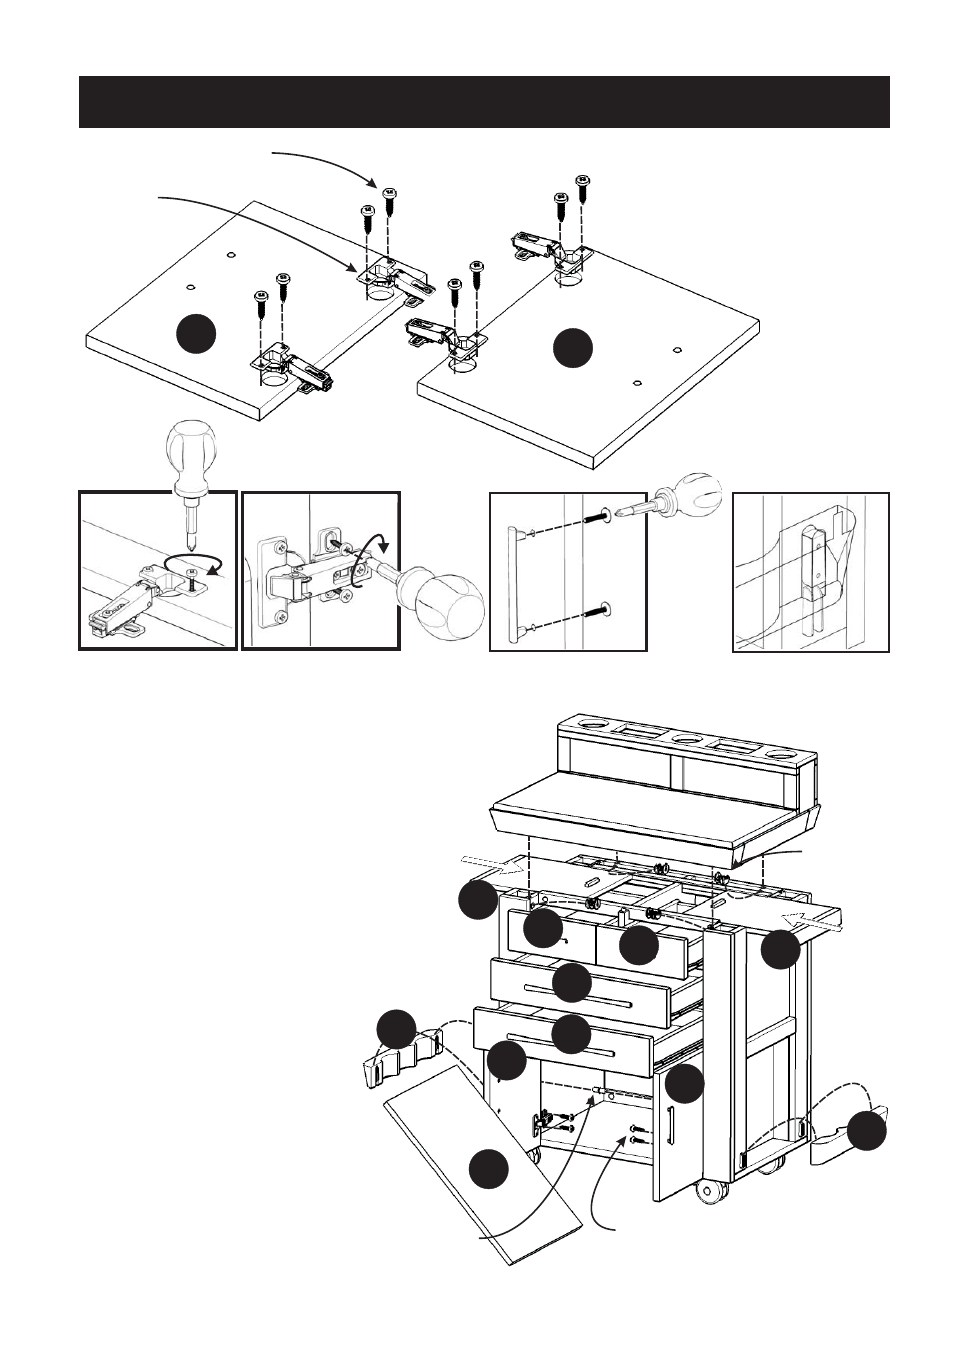
Assembly Instructions 5/8
Adjustable Pin
Hinge
Figure 6
STEP 7
Attach Hinges to Door (M), (N)
with Wood Screws for Hinge.
(see Figure 6)
K
M
M
N
N
K
E
Cam Lock
Figure 8
Figure 9
Figure 7
STEP 8
Slide Trays (L) into position.
Place top unit onto unit using Cam Locks.
Attach Door (M) and (N) to unit with Wood
Screws for Hinge. (see Figure 7)
Assemble Pull Handles to Doors (M) and (N)
with Machine Screws. (see Figure 8)
Insert Adjustable Pins into
side panels.
Place Shelf (E) into position.
Slide Bottle Racks (K) down
onto side panels.
(see Figure 9)
Slide Drawers (W), (X) and (Y)
into position.
Wood Screw for Hinge
Wood Screw for Hinge
X
L
L
Y
W
Y
See also other documents in the category Home Styles Kitchen:
- 9200-1611 (5 pages)
- 9200-1411 (5 pages)
- 9200-1211 (5 pages)
- 9200-1111 (5 pages)
- 9100-1711 (5 pages)
- 9100-1611 (5 pages)
- 9100-1411 (5 pages)
- 9100-1211 (5 pages)
- 9100-1111 (5 pages)
- 9001-0711 (5 pages)
- 9001-0611 (5 pages)
- 9001-0411 (5 pages)
- 9001-0211 (5 pages)
- 9001-0111 (5 pages)
- 5257-95 (5 pages)
- 5254-95 (5 pages)
- 5252-95 (5 pages)
- 4508-95 (5 pages)
- 5520-958 (2 pages)
- 5061-95 (4 pages)
- 5134-95 (4 pages)
- 5411-61 (3 pages)
- 5411-615 (3 pages)
- 5033-94 (6 pages)
- 5033-958 (2 pages)
- 5033-94 (2 pages)
- 5010-948 (7 pages)
- 9100-1077G (5 pages)
- 9100-1066G (5 pages)
- 9100-1071 (4 pages)
- 9100-1027G (5 pages)
- 9100-1072 (4 pages)
- 9100-1023 (4 pages)
- 9001-0066G (5 pages)
- 9001-0047G (6 pages)
- 5588-948 (2 pages)
- 5588-948 (9 pages)
- 5543-948 (2 pages)
- 5543-948 (9 pages)
- 5542-948 (2 pages)
- 5542-948 (9 pages)
- 5181-64 (5 pages)
- 5180-64 (5 pages)
- 5033-358 (1 page)
- 5020-65 (6 pages)