Assembly instructions 2/8, Step 2, Step 1 – Home Styles 5018-95 User Manual
Page 3
Assembly Instructions 2/8
IMPORTANT
* Do not tighten up all the screws until each part is properly assembled.
* You should keep Hex Wrench in a safe place as you may need to tighten up the Head Cap Bolts in the future.
* After assembly, item must be level to work properly. Use the included adjustable levelers to level.
* Use a soft cloth between these parts and the floor.
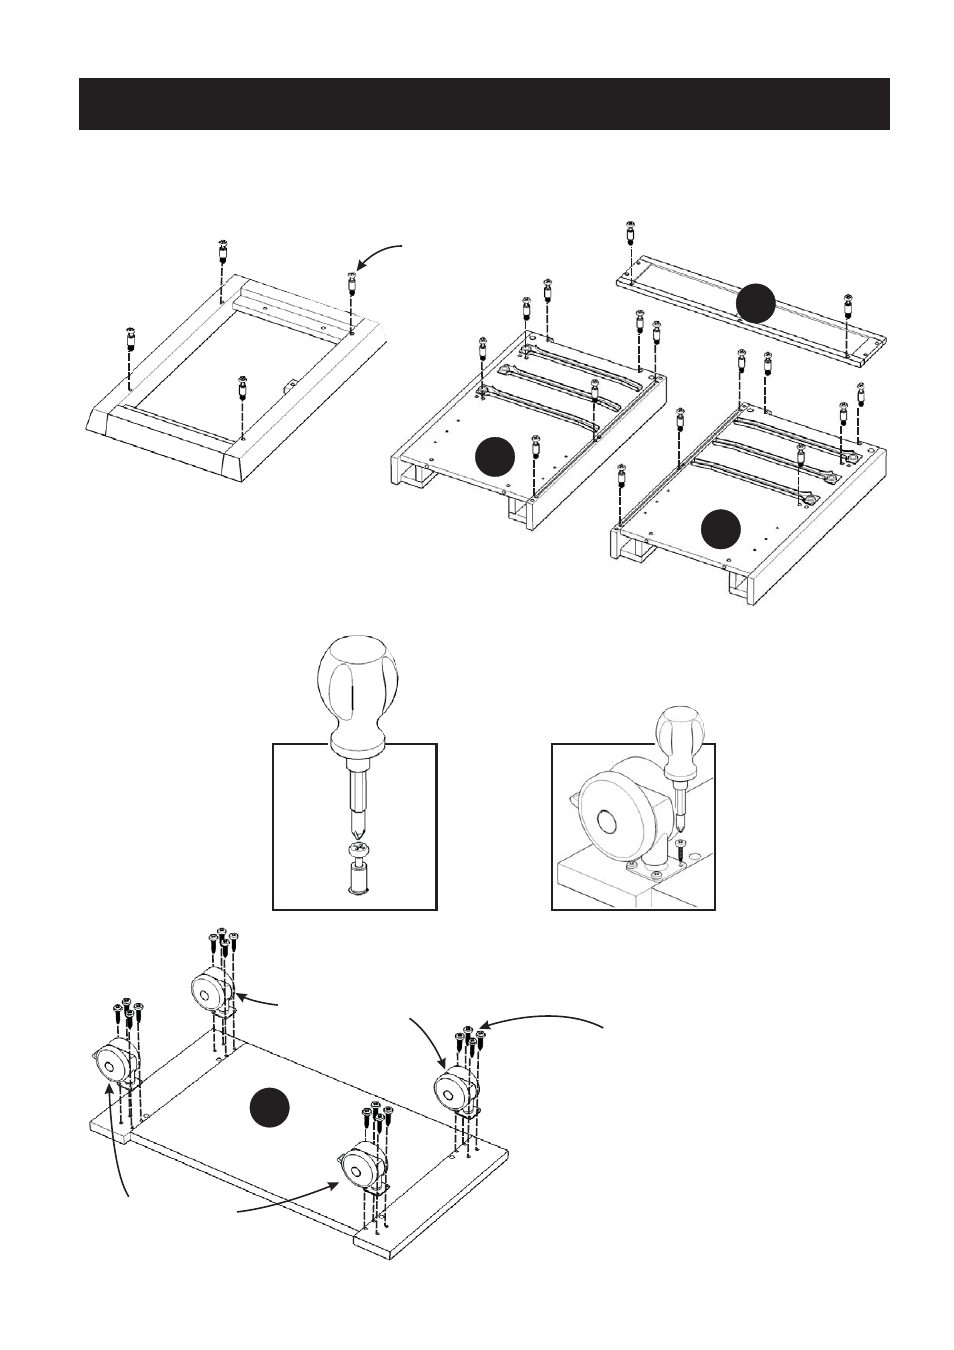
STEP 2
Attach Casters to Bottom (C) with
Wood Screws for Caster.
(see Figure 2)
STEP 1
Insert Cam Lock Screws into
the pre-drilled holes of Top (B),
Side Panels (O), (P) and Box Frame (F).
(see Figure 1)
Figure 2
C
O
P
B
F
Figure 1
Cam Lock Screw
Wood Screw for Caster
Casters (lock)
Casters (non-lock)
See also other documents in the category Home Styles Kitchen:
- 9200-1611 (5 pages)
- 9200-1411 (5 pages)
- 9200-1211 (5 pages)
- 9200-1111 (5 pages)
- 9100-1711 (5 pages)
- 9100-1611 (5 pages)
- 9100-1411 (5 pages)
- 9100-1211 (5 pages)
- 9100-1111 (5 pages)
- 9001-0711 (5 pages)
- 9001-0611 (5 pages)
- 9001-0411 (5 pages)
- 9001-0211 (5 pages)
- 9001-0111 (5 pages)
- 5257-95 (5 pages)
- 5254-95 (5 pages)
- 5252-95 (5 pages)
- 4508-95 (5 pages)
- 5520-958 (2 pages)
- 5061-95 (4 pages)
- 5134-95 (4 pages)
- 5411-61 (3 pages)
- 5411-615 (3 pages)
- 5033-958 (2 pages)
- 5033-94 (2 pages)
- 5033-94 (6 pages)
- 5010-948 (7 pages)
- 9100-1077G (5 pages)
- 9100-1066G (5 pages)
- 9100-1071 (4 pages)
- 9100-1027G (5 pages)
- 9100-1072 (4 pages)
- 9100-1023 (4 pages)
- 9001-0066G (5 pages)
- 9001-0047G (6 pages)
- 5588-948 (2 pages)
- 5588-948 (9 pages)
- 5543-948 (2 pages)
- 5543-948 (9 pages)
- 5542-948 (2 pages)
- 5542-948 (9 pages)
- 5181-64 (5 pages)
- 5180-64 (5 pages)
- 5033-358 (1 page)
- 5020-65 (6 pages)