Installations instructions – Thetford C-200 CS D3 Cassette User Manual
Page 4
Installations instructions
The toilet can only be mounted against a vertical rear
wall.
1. Remove the toilet from the box.
2. Remove the plastic bag containing the loose parts.
The instructions for use and the spout cap are also
in this bag.
3. First read the instructions for use to familiarise
yourself with the names of the various parts.
4. Pull the yellow clip upwards and remove the holding
tank. (See drawing 3)
5. Remove the fastening strip and screws under the
holding tank.
6. Remove the shower tray, if applicable, or adjust this
tray in such a way that the C-200 can be fitted in.
7. Put the toilet in the right place and lift the seat to
check the vertical clearance. Draw the toilet’s
outline on the rear wall with a pencil. If there is any
floor covering, bear in mind that this will be pressed
down when someone sits on the toilet. (Tip: Sit on
the toilet when you draw the outline.) Remove the
toilet.
8. Place template number 1 over the outline of the
toilet. Use the awl to mark the holes for the
fastening strip. (Drawing 4)
9. Drill two holes with a diameter of 3 mm in the
caravan wall from the inside of the caravan. The
locations are shown by the template. Remove the
template.
10. Fasten template number 2 to the outside of the
caravan with 2 screws in the pre-drilled holes.
Template 2 is used to check the 20 mm distance
(from the trim rear wall caravan/wheel housing to the
opening). (See drawing 5 + 6)
11. Replace template 2 with template 3 and outline
template 3 using a marker to indicate the cutting
line. (See drawing 7)
12. Remove template 3 and stick protective tape on the
inside and outside of the cutting line.
13. Drill a hole with a diameter of 8 mm on the inside of
the cutting line (at the bottom) to admit the saw.
(See drawing 8)
14. Make the cut-out using an electric saw. Make sure
that the cut is dead straight. (See drawing 9)
15. Check that the door frame fits in the opening.
16. Make the wooden frame which will be placed round
the doorway to strengthen the wall and secure the
door. (See drawing 10). The frame is glued in for
additional strength. (See drawing 11)
17. Screw the fastening strip on the rear wall using 4 x
13 mm screws. (See drawing 12)
18. Install the adapted or new shower tray.
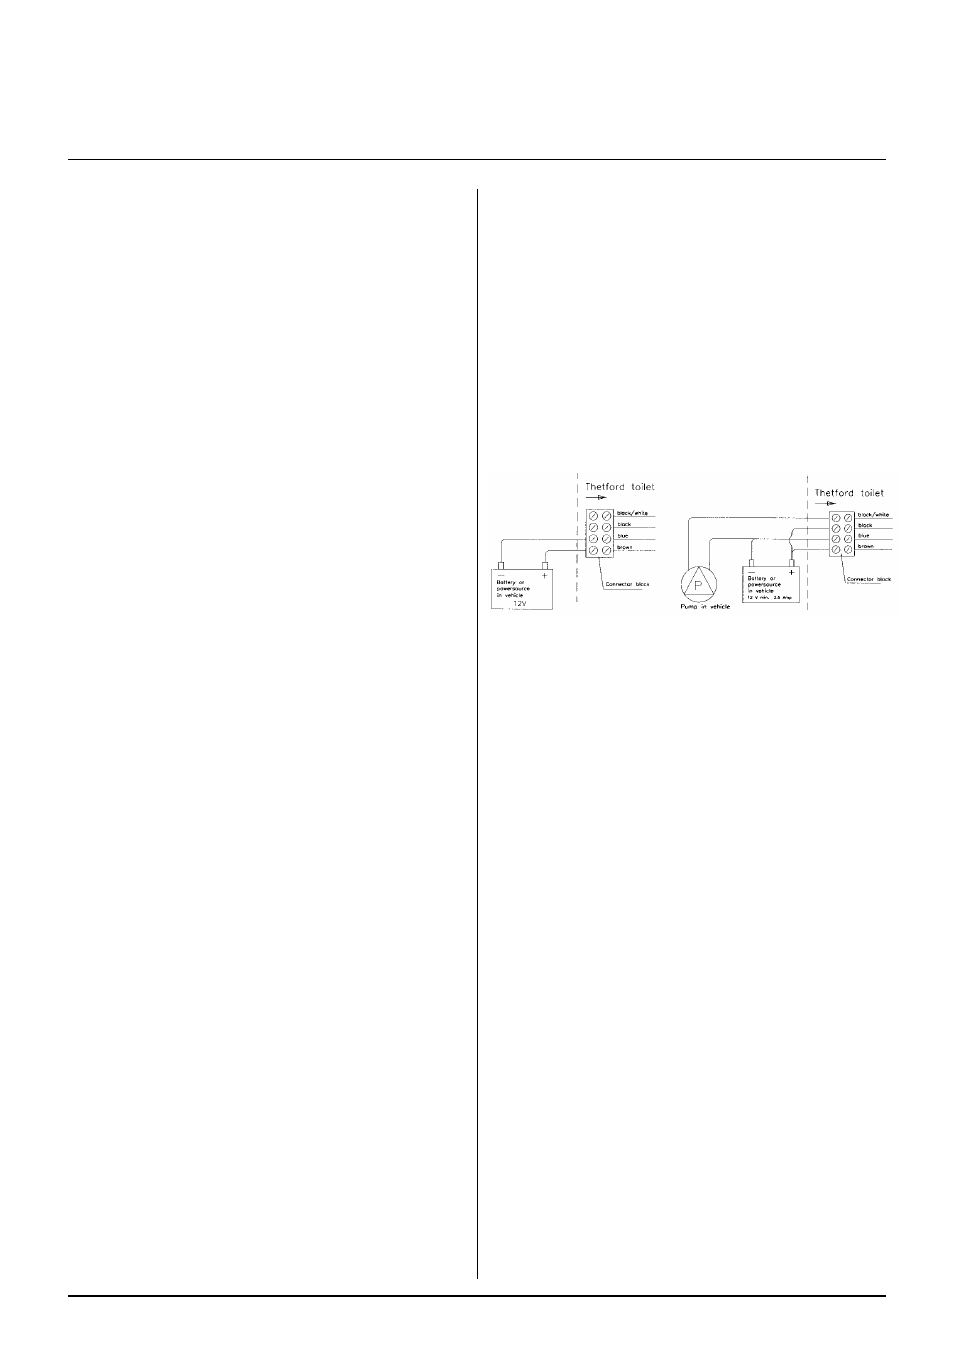
19. Before the C-200 CS toilet is installed, the electrical
connection must be made first.
If the toilet is connected to a pressurised system:
The brown wire is positive
The blue wire is negative
Do not connect the black wire
Drawing 19A
Do not connect the black and white wire
If the toilet is connected to a water supply system
that is not pressurised:
The brown wire is positive
The blue wire is negative
The black wire is positive
Drawing 19B
Black and white wire: to the + connection of the pump
19A. 19B.
20. Before installation, the toilet must first be connected
to the water supply system. Use a hose bushing for
this. (The inside diameter of the hose is 10 mm (3/8
inch). Fasten the hose with a hose clip. (See
drawing 13)
21. Place the toilet in the correct position (See drawing
14) and screw the toilet on to the floor with 4 screws
(4,5 x 55)
22. Now cut the sawn-out panel from the caravan wall
to fit the door frame using template no. 4A or 4B,
depending on whether the door is right-hand or left-
hand hung. Make sure that the decorative stripes on
the panel are in line with those on the caravan. (See
drawing 15)
23. Fill the groove of the door outer with sealant. (16). Then
position the panel in the door outer. Fix the clips to the
door inner, make sure that the two clips with the arrow
are mounted on this location (See diagram no.17), and
then push the door inner into the door outer. Fill in the
groove of the frame to be placed in the opening (=3)
with sealant (See drawing 18), place the complete door
against the outside wall of the caravan and fasten the
door with 9 sheet- metal screws (4.2 x 12.5 mm.)
24. Seal the space between the door and the toilet from
the outside. Also seal the gaps between the toilet
and the side walls, between the toilet and the rear
wall and between the toilet and the shower tray (or
floor). (See drawings 19 + 20)