Detail a detail b, J-box 1 - detail a j-box 2 - detail b, Load cell wiring 17 – Rice Lake SURVIVOR OTR Steel Deck User Manual
Page 21: Cable from j-box 2, Cable to j-box 1, Cable to indicator
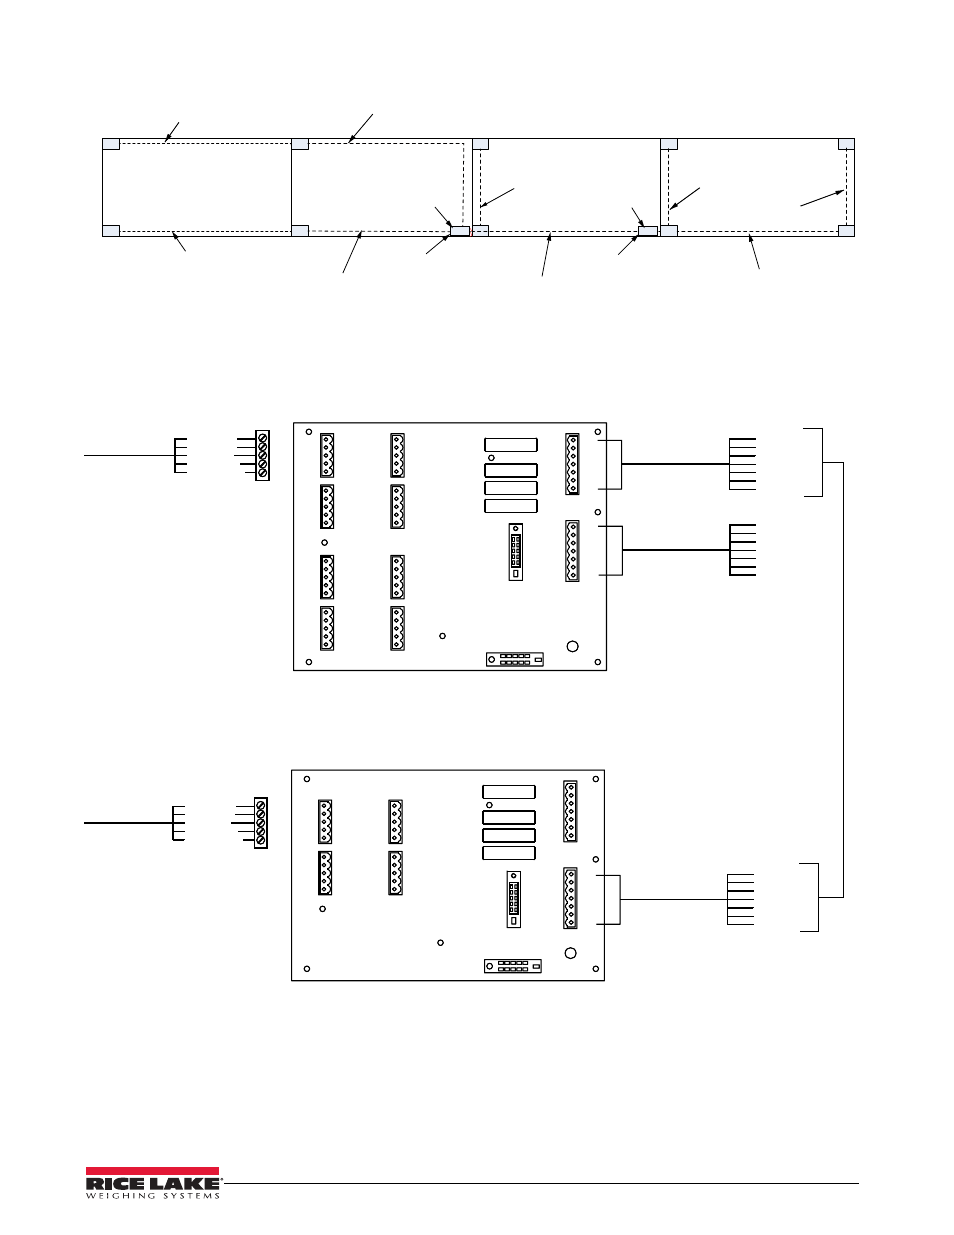
Load Cell Wiring
17
Figure 5-2. J-Box Wiring and Conduit Runs for a Five Section/Four Module Scale
Pocket 1 Conduit
Conduit runs to J-Box
Pocket 3 Conduit
Pocket Conduit for J-Box 2
cable to Expansion Slot in J-Box 1
Pocket 5 Conduit
Load Cell
Cable to
Connector
Pocket 9 and 10
Conduit runs to J-Box
SI - Green
SI - White
EX - Red
EX - Black
SHD - Shield
+
-
+
-
+SI
-SI
+EX
-EX
SHD
+SI
-SI
+EX
-EX
SHD
+SI
-SI
+EX
-EX
SHD
+SI
-SI
+EX
-EX
SHD
J3
J4
J7
J8
J6
J5
J2
J1
+SI
-SI
+EX
-EX
SHD
+SI
-SI
+EX
-EX
SHD
+SI
-SI
+EX
-EX
SHD
+SI
-SI
+EX
-EX
SHD
Load Cell #1
Load Cell #2
Load Cell #9
Load Cell #3
Load Cell #10
Load Cell #8
+SI
-SI
+EX
-EX
SHD
-SEN
+SEN
SHD - Shield
+SI
-SI
+EX
-EX
SHD
-SEN
+SEN
Indicator/J10
Expansion/J9
Cable from J-Box 2
SI - Green
+
SI - White
-
EX - Red
+
EX - Black
-
SEN - Yellow
-
SEN - Blue
+
Pocket 10 Conduit
Module C
Module B
Module A
Module D
Pocket 4 Conduit
3
8
2
1
10
9
5
4
Section 1B
Section 1A
Section 2B
Section 2A
Section 3B
Section 3A
Section 4B
Section 4A
Section 5B
Section 5A
6
7
Pocket 5 and 6 Conduit
J-Box 2
J-Box 1
Load Cell
Cable to
Connector
SI - Green
SI - White
EX - Red
EX - Black
SHD - Shield
+
-
+
-
+SI
-SI
+EX
-EX
SHD
+SI
-SI
+EX
-EX
SHD
J3
J4
J2
J1
+SI
-SI
+EX
-EX
SHD
+SI
-SI
+EX
-EX
SHD
Load Cell #4
Load Cell #7
Load Cell #5
Load Cell #6
+SI
-SI
+EX
-EX
SHD
-SEN
+SEN
SHD - Shield
+SI
-SI
+EX
-EX
SHD
-SEN
+SEN
Indicator/J10
Expansion/J9
Cable to J-Box 1
SI - Green
+
SI - White
-
EX - Red
+
EX - Black
-
SEN - Yellow
-
SEN - Blue
+
Detail A
Detail B
SHD - Shield
Cable to Indicator
SI - Green
+
SI - White
-
EX - Red
+
EX - Black
-
SEN - Yellow
-
SEN - Blue
+
J-Box 1 - Detail A
J-Box 2 - Detail B