La-z-time, Home theater assembly instructions: f, 4la-z-time – La-Z-Boy Home Theater User Manual
Page 8: Home theater assembly details
La-Z-Time
®
Home Theater
Assembly Instructions:
F
IGURE
1
F
IGURE
2
F
IGURE
5
F
IGURE
3
F
IGURE
4
La-Z-Time
®
Home Theater
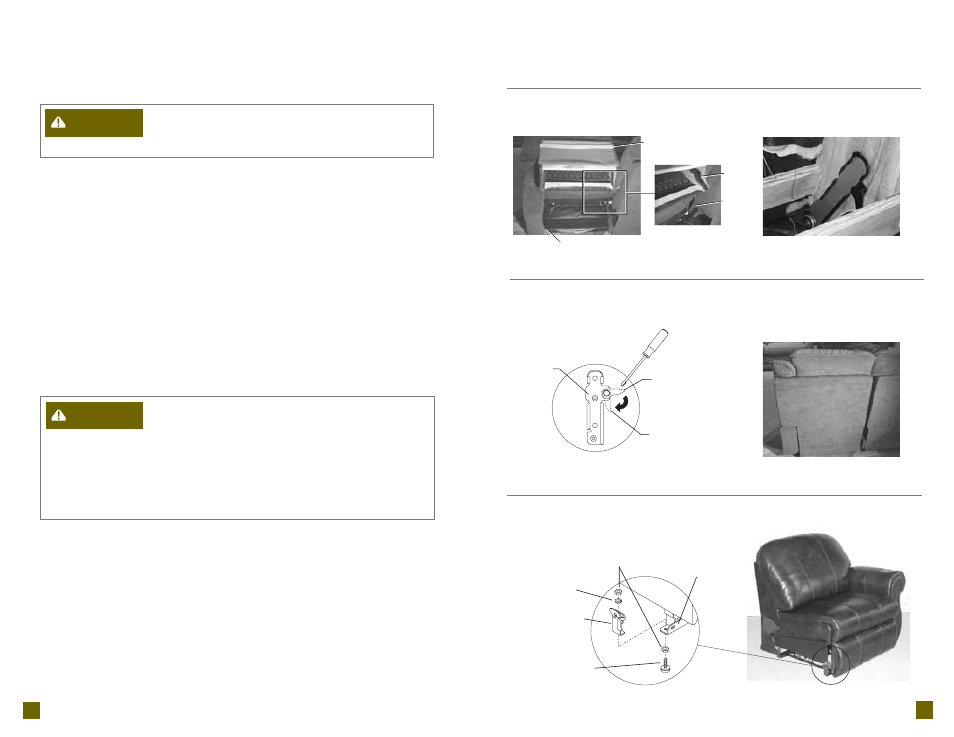
Assembly Details:
Lock
Washer
Locking Latch
Bracket
Adjustable Glide
Jam Nut
Base Rail
15
14
Back
Bracket
Body
Bracket
Fastening Tape
Fastening Tape
- To reduce the risk of injur y:
• Do not operate the unit until the back is installed and locked.
1. Install the backs.
• Lay the back across the arm(s) of the body (F
IGURE
1). Lift the back at
a slight angle and align the brackets on the back with the brackets on
the body.
• Lower the back onto the body, making sure the back and body brackets
are completely engaged.
• To make sure the back is properly installed, with both sets of back and
body brackets engaged, stand behind the unit and twist the back from
side to side. If one or both sides move out of position the brackets are
not properly engaged. If both brackets are not completely engaged
remove the back and repeat the steps above. See (F
IGURE
2) for correct
body and back bracket engagement.
• If you are unable to install the back properly contact your La-Z-Boy
®
dealer for assistance.
• Lock the brackets using a slotted screwdriver to push down the locking
levers; do this for each bracket (F
IGURE
3). For proper operation the
brackets must be locked down.
• Pull the outside back upholster y cover down tight. Firmly press the
fastening tape on the outside back upholster y cover to the fastening
tape on the bottom of the rear rail (F
IGURE
1 and F
IGURE
4).
- To reduce the risk of serous injur y:
• Use care when moving the product. Before lifting the product, secure
the mechanism to prevent unexpected opening or movement. Never
move the product by the mechanism, legrest, handle, reclining back or
swivel base. Disconnect modular units. Securely grip non-moving parts only.
• Provide a clear path for operation of the back and legrest. Place
tables and area rugs at a distance to allow the legrest to fully extend
without rubbing or interference.
2. Place units in the desired location.
3. Adjustable glides are provided on units with metal base rails. Make sure the
glides are adjusted to a height that provides a clear path for operation of
the legrest (see Furniture Placement Guide).
• Each glide is attached to the base rail by one jam nut and one lock
washer on top of the latch bracket and one jam nut on the bottom of
the base rail (F
IGURE
5). Loosen the jam nut located on top of the latch
bracket.
• Holding the top jam nut, turn the glide clockwise to lower the unit or
counterclockwise to raise the unit.
• Tighten the bottom jam nut to the base rail and tighten the top jam nut
to the latch bracket.
• Repeat this step for each adjustable glide, if necessar y.
(Assembly Instructions Continued)
WARNING
WARNING
Assembly Instructions for La-Z-Time
®
Modular Units
Back
Bracket
Locking
Lever
Locked
Position