10 f – La-Z-Boy Home Theater User Manual
Page 5
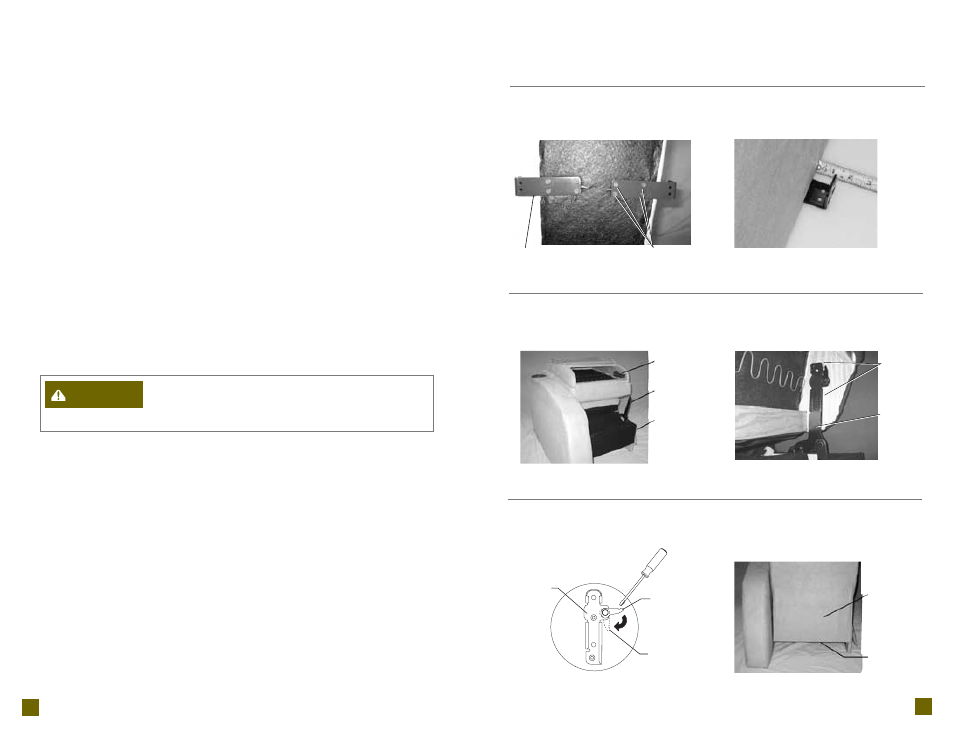
4. Attach the support brackets to the modular units.
• Align the holes in the support bracket with the (2) pilot holes in the
bottom rail (F
IGURE
3). Use a T-25 torx driver and (4) pan head screws to
fasten each support bracket to the bottom rails of the modular units
(F
IGURE
6). Fasten (2) screws into the pilot holes in the bottom rail and
then fasten the remaining (2) screws into the bottom rail.
• Repeat this step until all the support brackets necessar y to connect the
modular units are attached. Save the remaining support brackets in case
you want to change the configuration of your Home Theater modular group.
NOTE: The suppor t bracket must extend approximately 1" beyond the bottom
edge of the modular unit (F
IGURE
7). The suppor t bracket flange must be parallel
with the side of the unit.
5. Connect the modular units together.
• Return the units to the upright position. Place two units, to be connected
together, side by side.
• If the side without a bracket has a frame slot, lift the modular unit and
place the slot over the support bracket (F
IGURE
4).
• If the side without a bracket is an armless side, lift the modular unit and
place the armless side rail over the support bracket (F
IGURE
5).
• Follow these steps until all the modular units are connected.
TIP: It is easier to connect the modular units if you star t in the middle and work
outward.
- To reduce the risk of injur y:
• Do not operate the unit until the back is installed and locked.
6. Install the back(s).
• Lay the back across the arm(s) of the body (F
IGURE
8). Lift the back at a
slight angle and align the brackets inside the back with the brackets on
the body.
• Lower the back onto the body, making sure the back and body brackets
are completely engaged.
• To make sure the back is properly installed, with both sets of back and
body brackets engaged, stand behind the unit and twist the back from
side to side. If one or both sides move out of position the brackets are not
properly engaged. If both brackets are not completely engaged remove
the back and repeat the steps above. See (F
IGURE
9) for correct body and
back bracket engagement.
• If you are unable to install the back properly contact your La-Z-Boy
®
dealer
for assistance.
• Lock the brackets using a slotted screwdriver to push down the locking
levers; do this for each bracket (F
IGURE
10). For proper operation the
brackets must be locked down.
• Pull the outside back upholster y cover down tight. Firmly press the
fastening tape on the outside back upholster y cover to the fastening
tape on the inside lower rear seat frame (F
IGURE
11).
(Assembly Instructions Continued)
482 “Matinee” Home Theater
Assembly Instructions:
482 “Matinee” Home Theater
Assembly Details:
F
IGURE
6
F
IGURE
7
F
IGURE
8
F
IGURE
9
F
IGURE
10
F
IGURE
11
Back
Bracket
Locking
Lever
Locked
Position
Back
Bracket
Body
Bracket
Rear Seat
Frame
Back
Upholster y
Cover
Lower Rear
Seat Frame
Back
Bracket
Body
Bracket
9
8
Assembly Instructions for 482 “Matinee” Modular Units (Continued)
WARNING
Support
Bracket
(4) Screws