Get value format, Troubleshooting – AVer SPB350+ User Manual
Page 23
21
ENGLISH
Function
Data[0]
Data[1]
Data[2]
CheckSum Code
CAPTURE SINGLE
0x0D
0x00
0x00
0x56
CAPTURE CONTINUOUS
0x0D
0x01
0x00
0x57
*1 :CheckSum = 0x0B xor 0x03 xor Data[0] xor Data[1] xor Data[2] xor 0x53
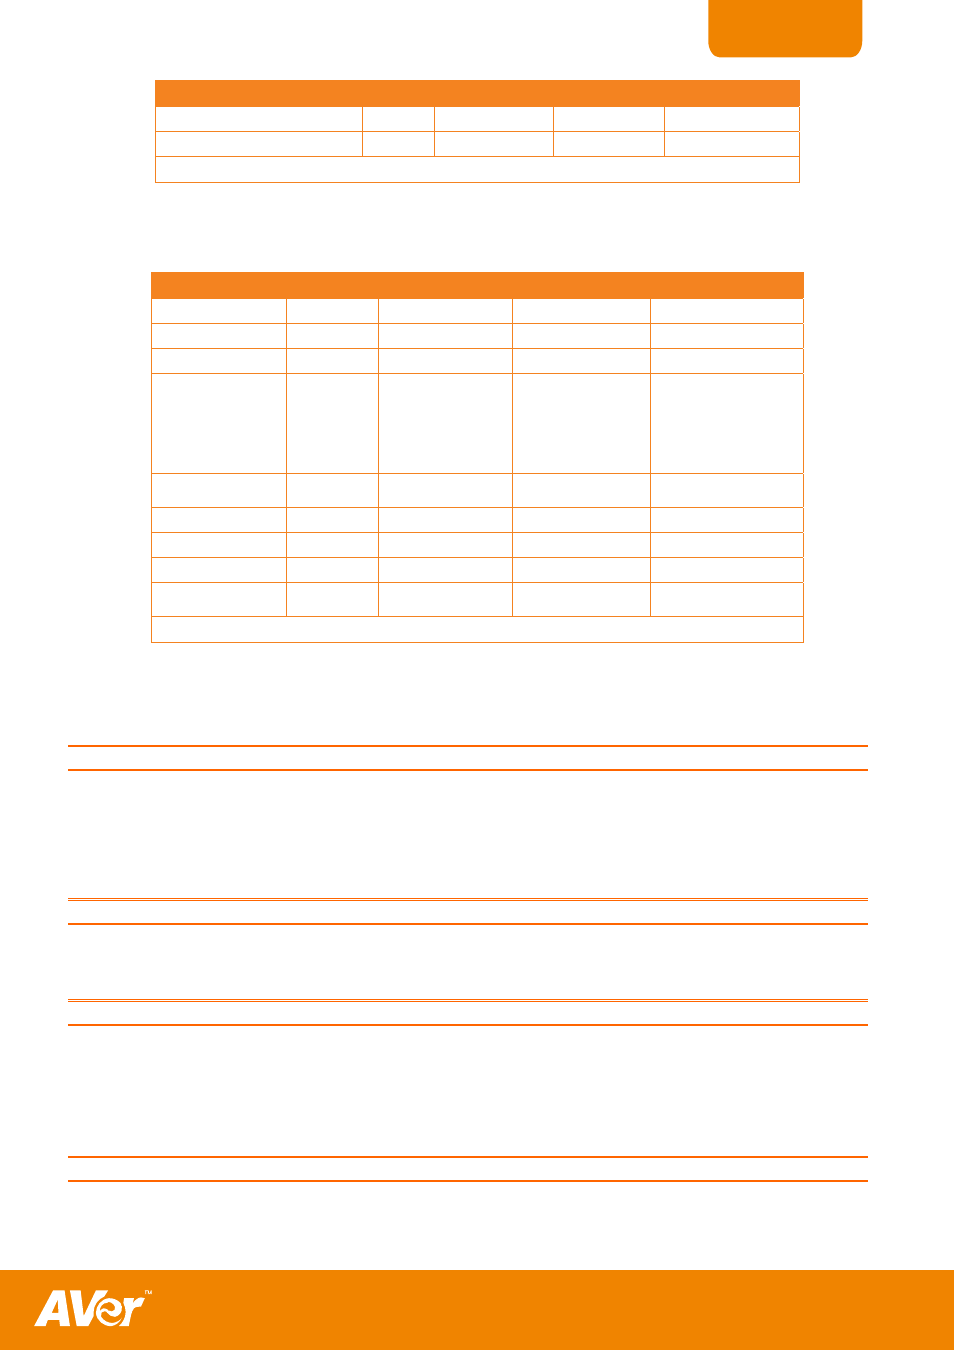
Get Value Format:
Send Format︰0x52 + 0x0A + 0x01 + Data[0] + 0x53 + CheckSum
Receive Format︰0x53 + 0x0C + 0x01 + ReData[0] + 0x53 + ReCheckSum
Function
Data[0]
CheckSum Code ReData[0]
ReCheckSum Code
Red Value
0x02
0x5A
Value[0~255]
*1
Blue Value
0x03
0x5B
Value[0~255]
*1
Lamp Status
0x05
0x5D
0 : OFF 1: ON
*1
Display Status
0x06
0x5E
0: Camera Mode
1: Playback Mode
2: PC-1 Pass
Through
3: PC-2 Pass
Through
*1
Video Output
Status
0x07
0x5F
0: VGA 1: TV
*1
Freeze Status
0x08
0x50
0 : OFF 1: ON
*1
Brightness Value
0x0A
0x52
Value[0~63]
*1
Contrast Value
0x0B
0x53
Value[0~255]
*1
LIGHT BOX
Status
0x0C
0x54
0 : OFF 1: ON
*1
*1 :ReCheckSum = 0x0C xor 0x01 xor ReData[0] xor 0x52
T
T
r
r
o
o
u
u
b
b
l
l
e
e
s
s
h
h
o
o
o
o
t
t
i
i
n
n
g
g
This section provides useful tips describing how to solve common problems while using the AVerVision
SPB350+.
There is no picture on the presentation screen.
1. Check all the connectors again as illustrated in this manual.
2. Check the remote control’s on/off switch on your display output device.
3. Verify the setting of the display output device.
4. If you are using a notebook or computer, you may have to switch the source to VGA.
5. Make sure the TV/RGB switch is properly set based on your display output.
There is no computer signal on the presentation screen.
When you turn on the computer, it will auto-detect the type of monitor you have. During auto-detection, there
won’t be any display on your presentation screen. To avoid this problem, connect your computer and all the
necessary cables to the AVerVision SPB350+ first before you power on your computer.
Unable to capture and save still image or is not responding.
- The message “FULL” is displayed. It means the memory source has reached the maximum capacity. Just
transfer the images to PC or format the memory source.
- The message “SD PROTECT” is displayed. It means the SD card is write protected. Just remove the SD
card from the slot and unlock it.
- The Capture setting could be in Continuous mode and the time interval is very long. Press MENU > select
Capture > Single or change the Continuous mode interval setting.
The picture on the presentation screen is distorted or the image is blurry.
- If the image is blurry or out of focus, press the Auto Focus button to automatically adjust the focus.
- If the Auto Focus button does not work and still unable to adjust the focus, the lens motor must be
misaligned. Unplug and plug the power to realign the lens motor.