Dell PowerEdge 1900 User Manual
Page 62
62
Installing System Components
3 Install the hard-drive bay. See Figure 3-10:
a
Slide the hard-drive bay into the system until the drive bay contacts the system.
b
Install the four screws that secure the drive bay to the system.
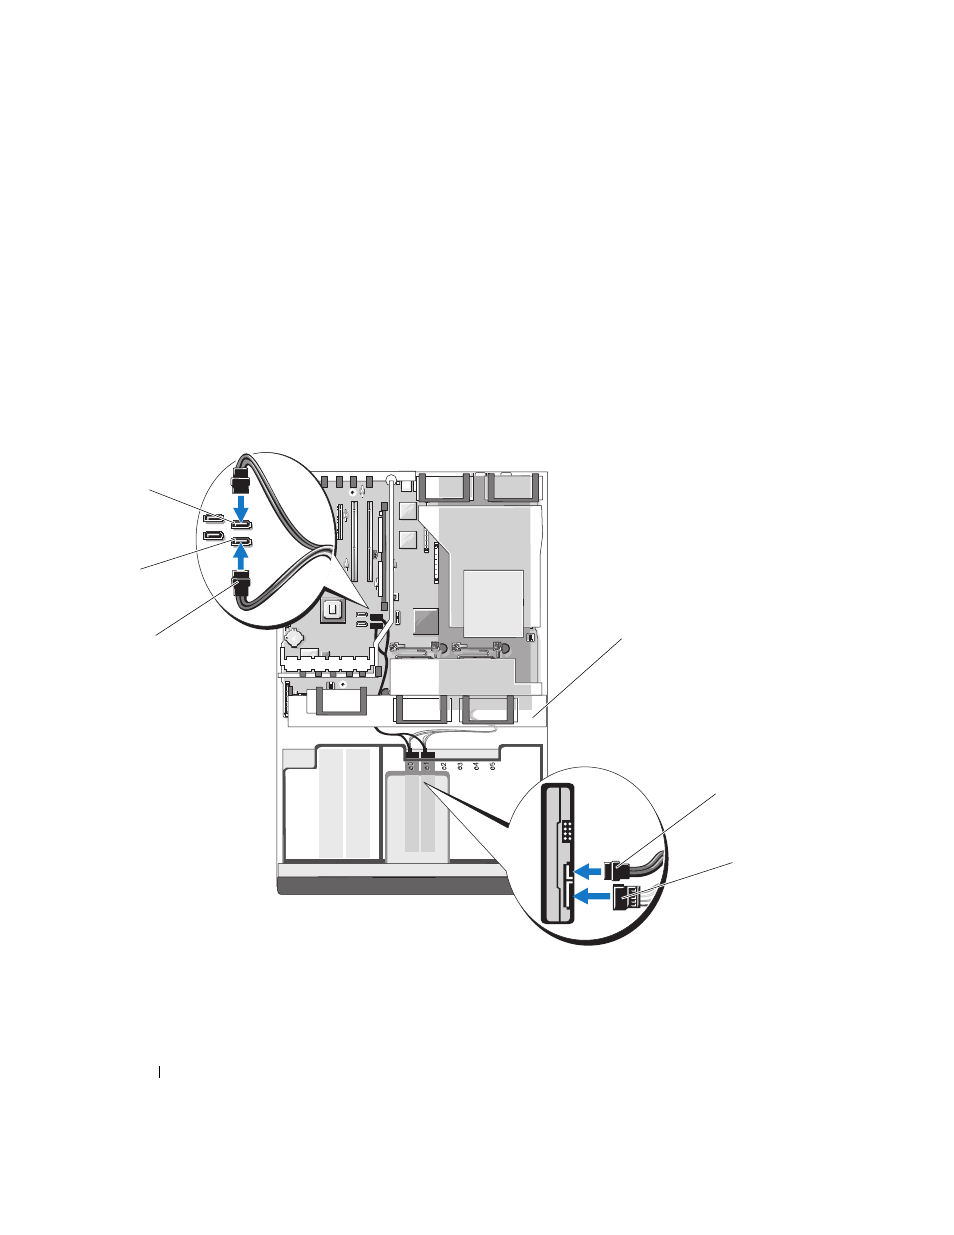
4 Depending on your hard-drive configuration, connect the hard-drive interface and power cables as
follows:
•
For up to two SATA drives, connect the cables to the two SATA connectors on the system board.
SATA_A is the blue connector, and SATA_B is the black connector. Route the cables through the
center fan retention cage. See Figure 3-12 for connector location and cabling guidance.
Figure 3-12.
Two-Hard-Drive Configuration (Integrated SATA on System Board)
4
5
3
6
2
1
1
center fan retention cage
2
power cable connector
3
hard drive interface cable
connector
4
hard drive interface connector 5
SATA_A connector
6
SATA_B connector
- PowerEdge RAID Controller H700 (56 pages)
- PowerEdge RAID Controller H700 (200 pages)
- PowerEdge RAID Controller H700 (178 pages)
- PowerVault TL2000 (1 page)
- PowerVault 110T DLT VS80 (Tape Drive) (49 pages)
- PowerVault TL2000 (22 pages)
- PowerVault TL4000 (306 pages)
- PowerVault TL2000 (2 pages)
- PowerVault TL4000 (2 pages)
- PowerVault TL2000 (176 pages)
- PowerVault TL2000 (16 pages)
- PowerVault TL2000 (3 pages)
- PowerVault TL2000 (116 pages)
- PowerVault 130T DLT (Tape Library) (49 pages)
- PowerEdge 800 (24 pages)
- PowerEdge 800 (82 pages)
- PowerEdge 800 (2 pages)
- PowerEdge 800 (27 pages)
- PowerEdge 800 (28 pages)
- PowerEdge 800 (58 pages)
- PowerEdge 800 (87 pages)
- PowerEdge 6400 (86 pages)
- PowerVault 124T (66 pages)
- PowerVault 124T (57 pages)
- PowerVault 110T LTO (Tape Drive) (28 pages)
- PowerVault 124T (55 pages)
- PowerVault 124T (73 pages)
- PowerVault 124T (65 pages)
- PowerVault 124T (4 pages)
- PowerVault 124T (79 pages)
- PowerVault 124T (2 pages)
- PowerVault 124T (64 pages)
- PowerVault 124T (56 pages)
- PowerVault TL4000 (116 pages)
- PowerVault TL4000 (1 page)
- PowerVault TL4000 (66 pages)
- PowerVault TL4000 (22 pages)
- PowerVault TL4000 (3 pages)
- PowerVault TL4000 (176 pages)
- PowerVault TL4000 (2 pages)
- PowerVault TL4000 (16 pages)
- PowerEdge RAID Controller 6i (120 pages)
- PowerEdge RAID Controller 6i (156 pages)
- PowerVault 715N (Rackmount NAS Appliance) (10 pages)
- PowerVault 715N (Rackmount NAS Appliance) (56 pages)