Lights, Install rear hitch (optional), Lights install rear hitch (optional) – Great Plains TC5319 (S/N A1420X+) Assembly Manual User Manual
Page 33
Great Plains Manufacturing, Inc.
Assembly
29
03/06/2014
566-224Q-ENG
Lights
Refer to Figure 28
121.Route light harness 30’ lead
from front of hitch (trac-
tor plug to front), along same route as hydraulic hose
(fasten in same clamps and hose wraps as hoses).
Plug one end of enhance light module
to small end of
light harness 30’ lead
. Plug bigger end of wishbone
light harness
into other end of enhance light module
. Route other ends over towards (marked left and
right) the light mounting brackets as shown.
122.Mount red lamp lights
to mounting plates of wing
stop or rigid smv and light bracket, with 1/4 x 1 hex
bolts
and 1/4 lock nuts.
123.Mount amber lamp lights
to top of light brackets with
1/4 x 1 hex bolts
and 1/4 lock nuts.
124.Tighten all bolts to specs, See “Torque Values Chart”
on page 31. Be sure and get all wiring harnesses fas-
tened up securely with hose wraps or clamps (if routed
close to hydraulic hoses) or use cable ties
.
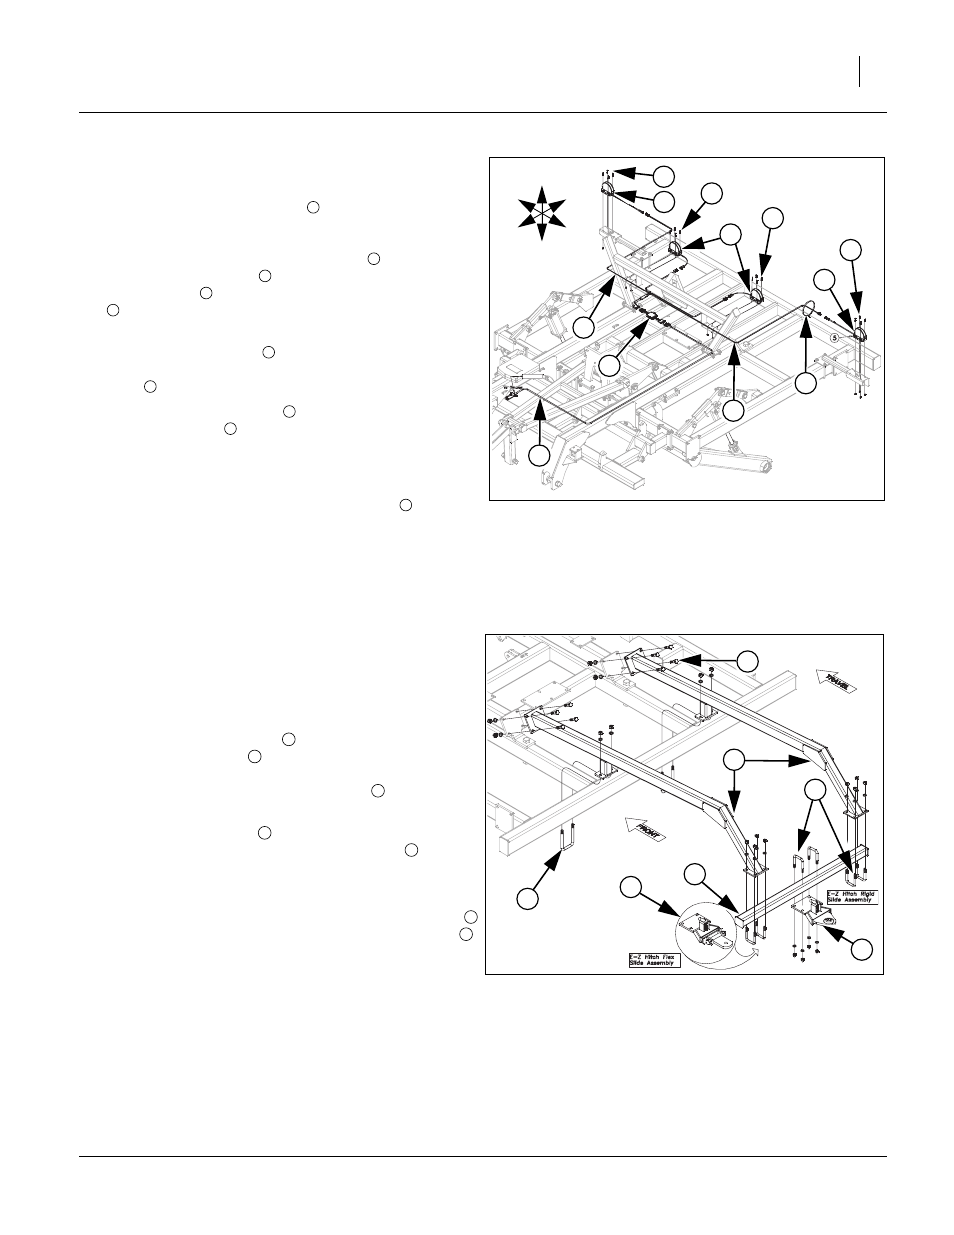
Install Rear Hitch (optional)
Note: The rear tow hitch will be shipped with big compo-
nents banded together and bolts will be in a box.
Carefully un-band the components.
Refer to Figure 29
125.Attach rear hitch trusses
to rear of hitch arms with
3/4 x 2 1/2 hex bolts
, 3/4 lock washers and 3/4 nuts.
Attach middle of rear hitch arms to tubes on center
frame with 3/4 x 4 1/32 x 7 1/2 u-bolts
, 3/4 lock
washers and 3/4 nuts.
126.Attach 56” cross arm
to bottom side of rear hitch
arm plates with 5/8 x 3 1/32 x 4 1/2 u-bolts
, secure
with 5/8 lock washers and 5/8 nuts.
Note: Do not tighten any bolts until every thing is installed.
Note: The bolt on sleeve assembly with rigid or flex slide
may be fastened using 5/8 x 3 1/32 x 4 1/2 u-bolt
,
secure with 5/8 lock washers and 5/8 nuts.
Note: Tighten all bolts to specs, See “Torque Values
Note: If machine is equipped with optional rear hitch acces-
sory kit may be installed as shown in “Parts Manual”.
Note: Route hoses and light harness along hitch and frame
with hose clamps and hose wraps, provided.
Note: Be sure hoses and light harness is fastened securely
so they don’t drag or get pinched.
Figure 28
Lights
42685
5
5
2
4
5
6
5
U
D
F
B
L
R
1
6
3
3
7
1
2
1
3
2
4
5
6
5
7
Figure 29
Rear Hitch
42648
1
2
5
3
4
6
6
1
2
3
4
5
6
5
- TC5323 (S/N A1420X+) Assembly Manual TC5321 (S/N A1420X+) Assembly Manual TC5317 (S/N A1420X+) Assembly Manual TC5315 (S/N A1420X+) Assembly Manual TC5313 (S/N A1420X+) Assembly Manual TC5115 (S/N A1420X+) Assembly Manual TC5113 (S/N A1420X+) Assembly Manual TC5111 (S/N A1420X+) Assembly Manual TC5109 (S/N A1420X+) Assembly Manual