Air-pro® meter operation, Meter operation, Air-pro – Great Plains 3P4025AH Operator Manual User Manual
Page 39
Great Plains Manufacturing, Inc.
Operating Instructions
35
2014-07-29
411-099M
Air-Pro
®
Meter Operation
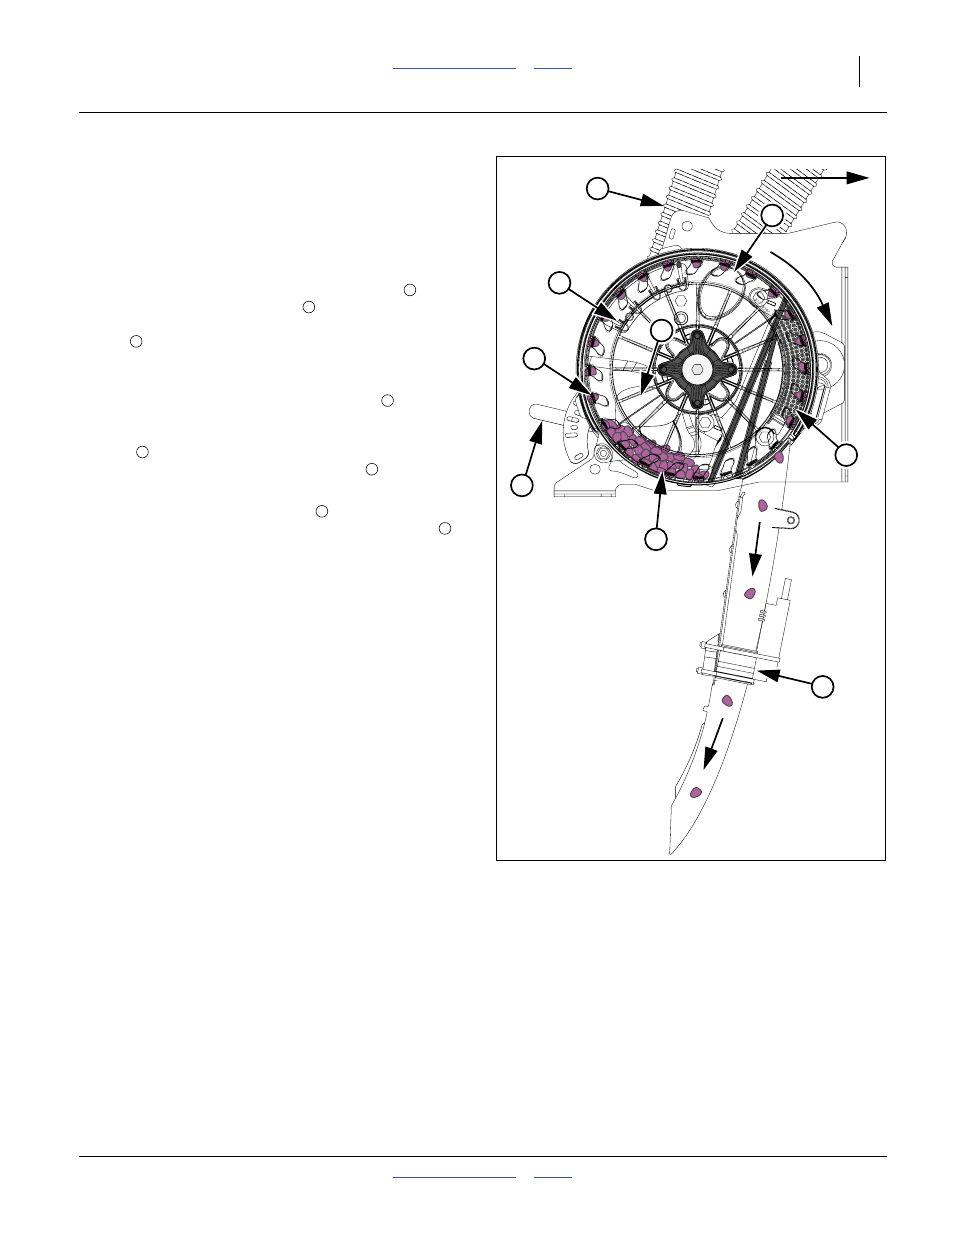
Refer to Figure 27
The meter disk is driven, top forward, by a chain drive
(not shown) always connected to the section drive shaft.
At non-planting rows, use a blank disk (page 64).
Seed is gravity-delivered to the inlet from the hopper.
Seed enters the meter at the seed inlet shutter
(if open), and forms a seed pool
at the base of the
meter. Seed pool size is controlled by the shutter
handle
setting (which is the only user adjustment at
the meter). Initial shutter settings are given in the seed
rate charts.
Meter pressurization air enters the meter at
, and exits
the meter primarily at the seed pockets in the seed disk.
The pressure differential holds seed in the disk
pockets
rising from the seed pool. Excess seed at a
pocket is picked off by the tickler brushes
.
The strip and drop brushes block meter pressurization
air. Seeds passing the drop brush
are free to fall into
the seed tube, and are detected by the seed sensor
.
Meter Operation
1.
Install disks for your crop/population range per the
Seed Rate Manual and the instructions beginning
on page 62 of this manual.
2.
Open the shutter at planting rows to the
recommended initial setting (from the Seed Rate
charts). At unused rows, install a blank disk
(page 64) and close shutter.
3.
Set sprocket indexing if staggering a twin-row crop
(see Seed Rate Manual for details).
4.
Operate fan to achieve suggested manifold pressure
(Seed Rate Manual, and page 42).
5.
With all rows primed, rotate meters one turn to fill
pockets to edge of drop brush. Rotate the drive shaft
(top forward) with a
7
⁄
8
inch (23 mm) wrench, or raise
and rotate ground drive wheel (top forward).
6.
Leave fan running (to keep seed in top pockets).
Re-install rain covers. Commence planting.
Meter operation is automatic from this point on.
See also:
“Seed Pool Troubleshooting” on page 70,
“Meter Clean-Out” on page 80, and
“Meter Brush Maintenance” on page 81.
Figure 27
Air-Pro
®
Seed Meter at Row
29825
3
2
1
5
6
4
7
8
9
2
3
4
5
6
7
8
9