Great Plains PD8070 Operator Manual User Manual
Page 40
PD8070
401-266M
1/24/2006
38
Population Max™ Installation. Population Max™ can be
added easily to existing finger pick-up meters. Carefully
follow the instructions below for best performance:
4.
Remove three screws (4) holding backing plate to
bearing housing and remove existing backing plate.
5.
Carefully align Population Max backing plate (1) over
bearing housing making sure exit hole is positioned
over hole in belt housing.
6.
Insert three center section screws (4) and uniformly
tighten Population Max backing plate to bearing hous-
ing. Make sure backing plate is secured tightly to bear-
ing housing.
7.
The PopMax plate has an “A” insert (2) already in-
stalled. Three different inserts are avaliable. Inserts
are marked “A”, “B”, and “C” on the back side. The “A”
insert is insert of choice. “B” or “C” inserts are used for
unusual seed - like sunflowers. Consult a MeterMax
representative for more specific recommendations.
8.
Properly tighten nut against finger holder. Rotate fin-
ger set until set properly clicks in place. Press finger
set firmly against plate and carefully tighten nut until it
makes contact with finger holder. Turn 1/4 to 1/2 flat
(1/24 to 1/12 turn) tighter after contact (a flat is one of
six sides of a nut). This equals about 4 inch pounds of
torque on the nut.
9.
The PopMax plate includes an adjustable brush. It is
held in position with two screws (6). When replacing
brush, be careful not to tighten brush too tightly or
plastic lip may crack.
The Adjustable Brush. The adjustable brush provides
additional flexibility to accommodate a wide range of seed
sizes. Use attached “T” handle to gently rotate brush into
position. Follow these general guidelines to adjust brush
position to seed size and shape. Adjust brush counter-
clockwise for larger seed and clockwise for smaller seed.
The numbers listed below correspond to the numbers
printed on outer housing of meter.
Replacing Population Max Inserts. Population Max fea-
tures interchangeable inserts. The inserts can be changed
without disassembling meter. Follow these steps to re-
place inserts:
1.
Remove brush screws (6) and brush. Gently pull in-
sert (2) out.
2.
Select appropriate insert and carefully slide into the
window. Insert may catch on a finger or two. It may be
necessary to lift the fingers up with a small screwdriv-
er or rotate the fingers backward while sliding insert in.
Insert will slide in without any unecessary force.
3.
Make sure insert slides in all the way and firmly locks
in place.
4.
Secure insert to backing plate by fastening the two
screws (3) through the insert.
5.
Reinstall brush and screws (6). Be careful! Do not
tighten brush too tightly or plastic lip may crack.
Population Max™ Annual Maintenance. Population
Max should be inspected annually. Inspect plate for wear
or other abnormalities
that may develop. The
action site area (5) might
also eventually show
some wear. When signs
of wear appear, simply
replace insert.
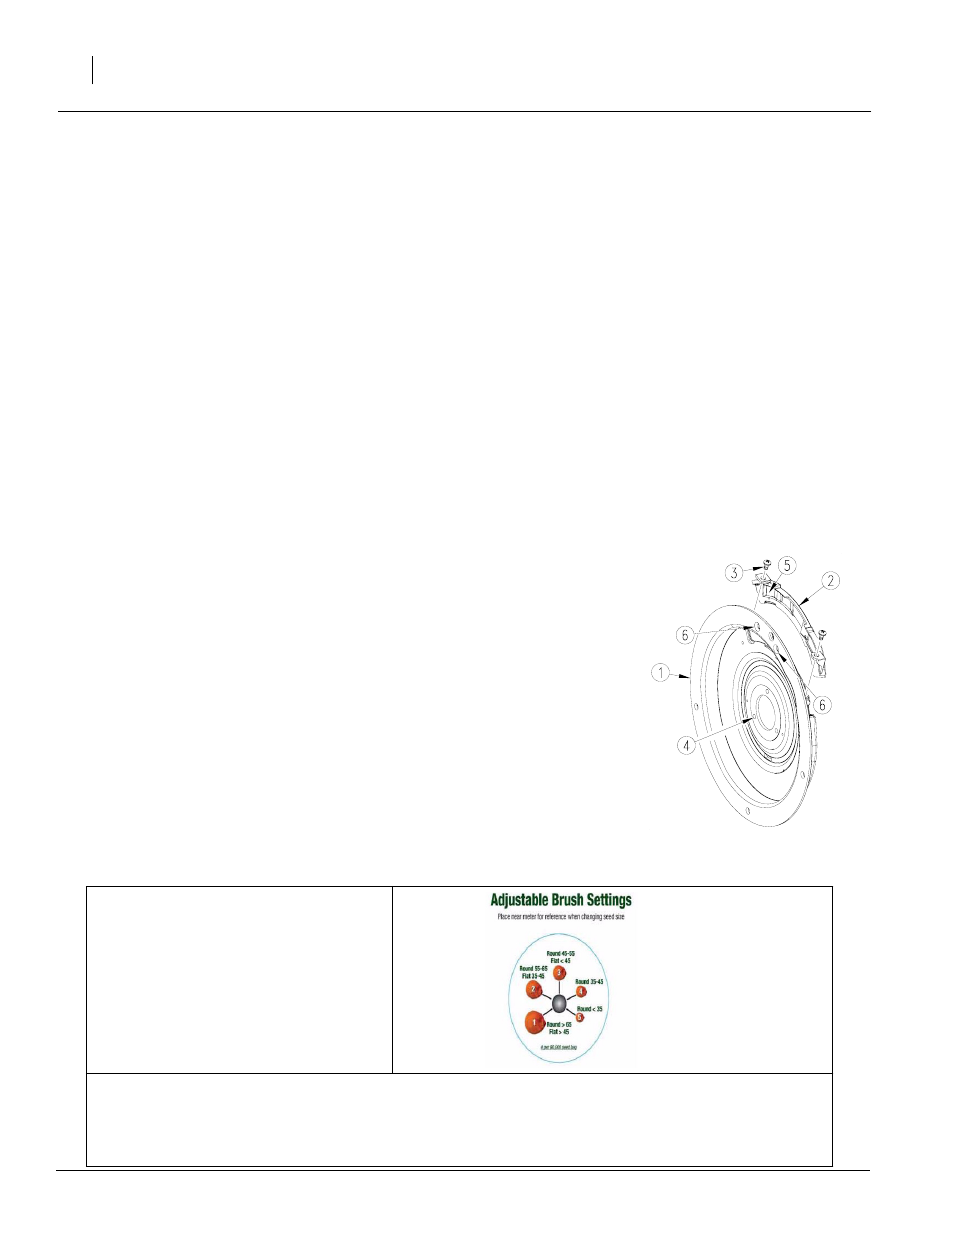
Use enclosed sticker as a simple refer-
ence guide for setting the brush to each
seed type. Mount this sticker to the hop-
per panel or to back cover of the meter so
it is visible as you make brush adjust-
ments.
Recommended Brush Settings - start here and adjust for peak performance
(NOTE: All are pounds per unit)
Round > 65 or Flat > 45
1
Round 45 - 55 or Flat < 45
3
Round < 35
Figure 31
Population Max Insert Replacement
24031